

Introduction
The Seestar S30 is the entry-level model in ZWO’s range of “all-in-one” smart telescopes: optics, mount, camera and software in a single body, designed for anyone who wants to do astrophotography without necessarily facing the — often steep — learning curve of “traditional” astrophotography.
I wanted to test it from a slightly unusual point of view: I am not a beginner, I have been doing astrophotography for over 40 years, and the question I was really interested in was whether this instrument could find a place in my photographic arsenal. My term of comparison was the Star Adventurer, which I already use and have reviewed here: also designed for “grab and go” astrophotography, it was the natural reference for this test.
The answers, as you will see, turned out to be two, and in conflict with each other.
Technical specifications – Seestar S30
| Feature | |
|---|---|
| Optics | Apochromatic triplet refractor, ED glass, 30 mm |
| Focal length | 150 mm |
| Focal ratio | f/5 |
| Field of view (tele) | 2.46° |
| Wide camera | FOV ~23.2°, for framing/landscapes |
| Sensor | Sony IMX662 (Starvis 2), colour |
| Resolution | 1920×1080 (Full HD) |
| Built-in filters | UV/IR-Cut · Duo-Band (OIII 30nm / Hα 20nm) · Dark Field |
| External filter | Solar, magnetic attachment (included) |
| Mount | Motorised alt-azimuth, GoTo + tracking |
| Autofocus / Plate solving | Yes, managed by the app |
| Single exposure | 0.5–30 s (up to ~60 s in EQ configuration) |
| Battery | 6000 mAh, ~6h runtime, USB-C |
| Internal storage | 64 GB eMMC |
| File formats | JPEG/FITS (photos), MP4/AVI (video) |
| Connectivity | Wi-Fi 5G/2.4G, Bluetooth 5.0 |
| Weight | ~1.65 kg |
| Tripod thread | 3/8″-16 standard |
Unboxing and first use
The instrument is extremely compact and easy to carry: I took it with me on my recent holiday in Tuscany and, after loading the car, I still managed to squeeze it into a gap between the luggage, so it proves to be extremely portable and convenient.
The carrying bag contains a small but sturdy tripod that allows you to use the Seestar in alt-azimuth mode, and a solar filter that can be attached to the telescope with a magnet: installation is very simple, but the quality of the filter is really basic.
I did my first test on the Sun: the smartphone app (I have an Android phone) is fairly easy to use and guides you step by step through the wireless connection and the initial setup of the instrument: using the sensors you can level it and then calibrate the compass.
Well, needless to say, the speed of setting up is unmatched by any other astrophotography system (it is comparable to setting up a camera on a fixed tripod). My first test was on the Sun, but this is where the first problem arose: I followed the app’s instructions to the letter, yet the Seestar missed the target spectacularly, ending up many degrees away from the Sun.
So I tried again but, once more, the target was missed — so either I am making some fundamental mistake in the setup (though the app did not help me), or there is something wrong with the search algorithm.
Something similar happened with the Moon as well.
However, thanks to the secondary wide-field sensor it is easy to recover the target and point at it correctly: the Moon and the Sun are bright enough to be easily identified in the wide-angle view and, using the in-app joystick (which allows movement at two speeds), you can move and aim the telescope manually without much trouble.
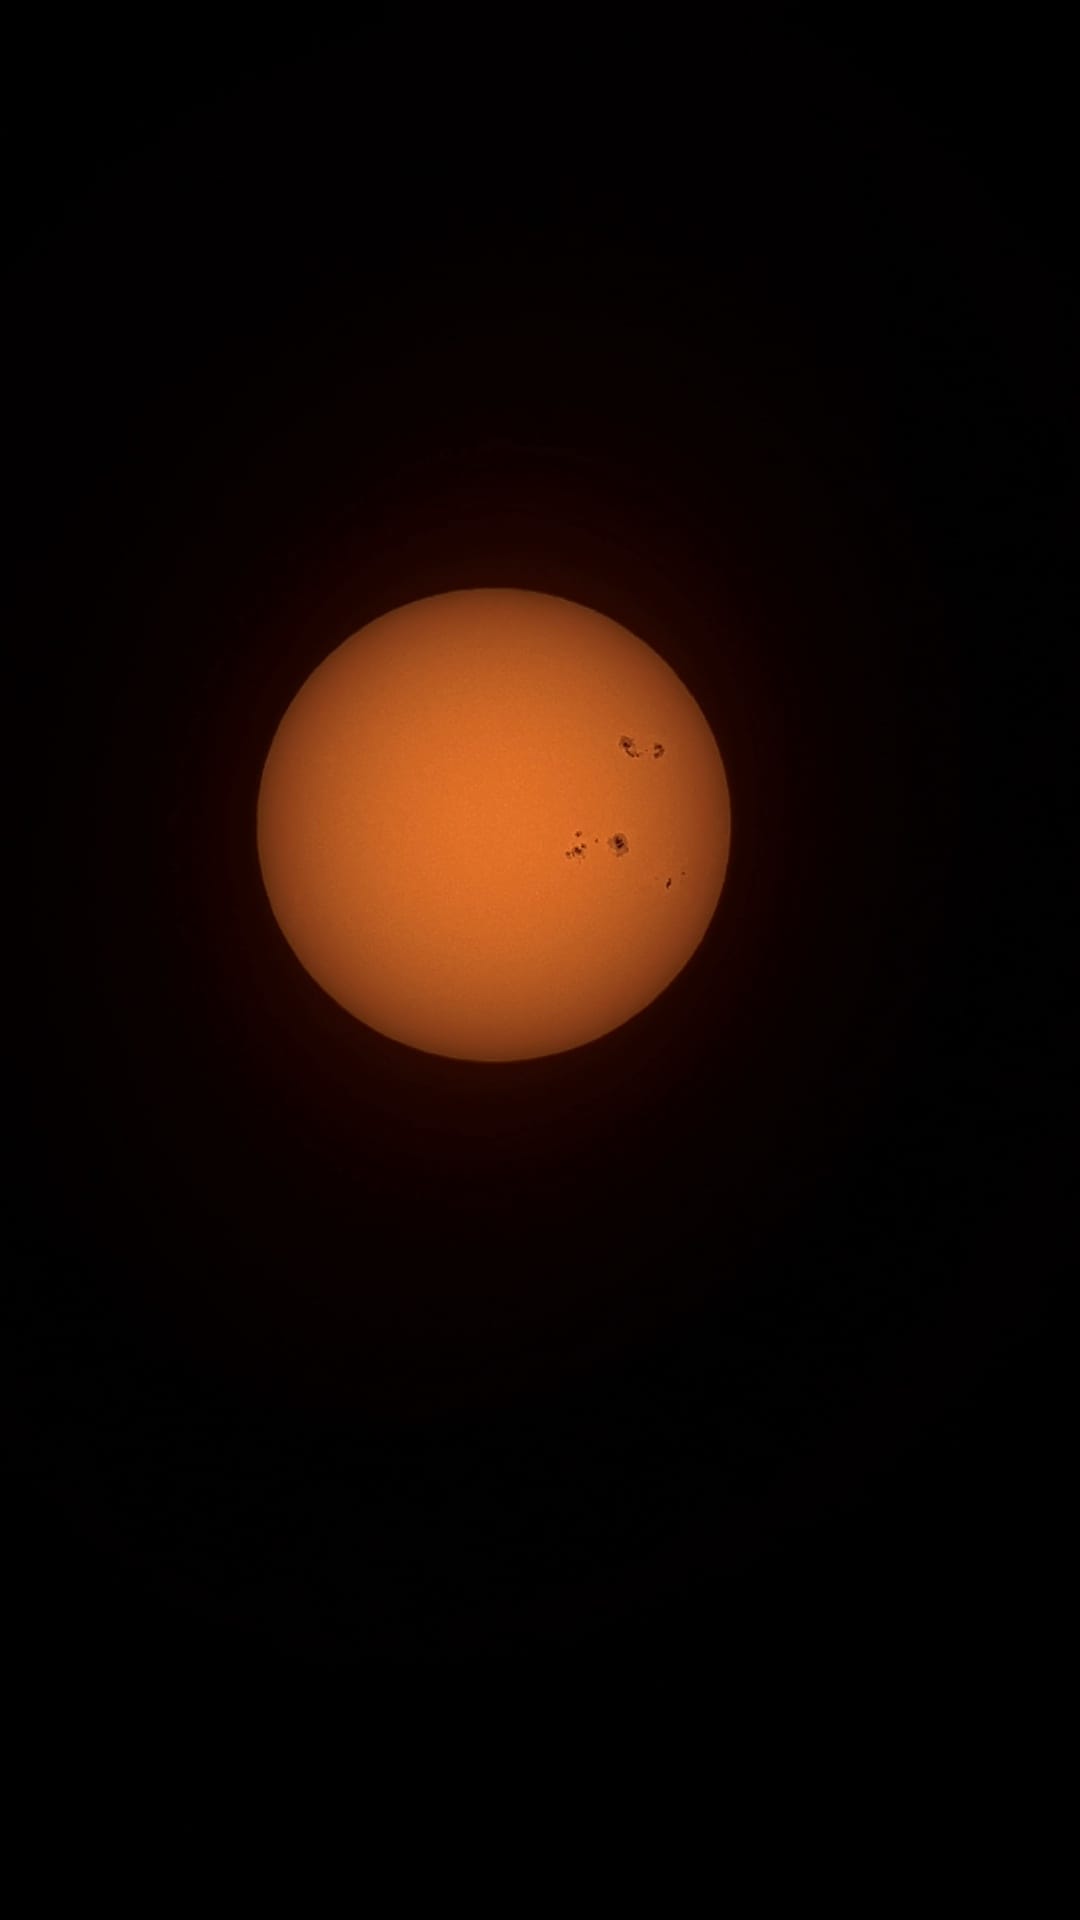
Unfortunately the image quality is not excellent: the solar disc appears small within the framed field — a direct consequence of the short focal length — and the detail remains limited by the low resolving power: this is not a fault of the instrument, we are simply limited by the 30 mm aperture.
The supplied solar filter makes matters worse: although it is convenient (it clips on magnetically in a few seconds), it is not a quality optic.
It produces an orange cast and a “softer” definition compared to what you would get with a good dedicated white-light filter — it is no coincidence that third-party replacement filters already exist, designed precisely to overcome this limitation: I have not tested these filters directly, but I have seen photos taken by other photographers who, with the same instrument, achieved considerably better results.
In spite of this, I found it fun and, above all, instructive to see sunspots so easily and, above all, so safely: the only risk is damaging the sensor, but only and exclusively if you do not follow the instructions of the app, which tells you when to fit and remove the filter.
 |
|---|
| The Sun on 2 July 2026 at 11:30 UT |
Field test: Val d’Orcia
For the real test I took the Seestar to Tuscany, to a splendid farmhouse near Montalcino: in the quiet of the Val d’Orcia I was able to appreciate the ease of use and the extreme convenience of this instrument.
Since my aim was to do a serious job, I decided to use it in equatorial mode, mounting it on a tripod and using a small equatorial wedge (the same one I use with the Star Adventurer): the equatorial wedge is not strictly necessary if you have a good tripod with an adjustable head, but it greatly simplifies polar alignment, so I strongly recommend using one.
Important note: the Seestar tripod thread has a diameter of 3/8": if your tripod has the classic 1/4" thread you will need to buy an adapter (which costs a few cents).
The initial setup is made much easier by the smartphone app: once the telescope has been pointed north, the device uses its internal sensors and an astrometric routine based on image plate solving to align itself to the pole with more than acceptable accuracy: within a few minutes you are ready to start imaging.
This is where the Seestar S30 really convinced me. The idea of pointing the telescope, choosing the target from the app and watching it start imaging on its own — stacking included — is an experience that completely removes the barrier to entry, perhaps a little too much for my hardcore astrophotographer tastes.
Personally I feel there is something deeply wrong in skipping the whole process of learning the basic concepts of astronomy (coordinates, the motion of the celestial sphere, the seasons, the constellations and so on) but, even though I do not share that view, I can understand that for some people this part may seem merely a tedious preamble, and that they would rather — to use an analogy — take the cable car than climb a mountain path.
For those who want to get closer to the sky without first having to study polar alignment, guiding, meridian flips and all the rest, using a Seestar is an almost magical experience, and watching the image gradually build up on the screen as the exposure increases is certainly interesting.
For the test I photographed some of the “classic” summer objects with exposures between 15 and 30 seconds.
The initial amazement
I must say that, during the imaging phase, I was positively impressed by the Seestar’s performance: unlike the frankly approximate pointing on the Moon and the Sun, centring deep-sky objects — assisted by plate solving — is quick and accurate and, within a handful of seconds, brings the target to the centre of the field and begins the ENHANCING phase, that is, the integration of the individual exposures to improve the signal-to-noise ratio.
The instrument can save in JPEG or FIT format and also offers the option of saving the individual raw frames. For serious use JPEG is obviously completely useless and serves only a “recreational” purpose, so if you want to do even simple post-processing outside the app, saving in FIT format is essential.
The individual files are not true raw frames: the Seestar automatically applies a first calibration with a “stock” flat stored in its internal memory, plus a dark.
Personally I would have liked the option of having genuine raw frames to calibrate myself (or at least a setting to enable in the software), but at least there is the option of updating the factory flat by creating your own.
Another thing I find pointless is that, alongside the individual FIT files, JPG copies are also saved in two different formats (full resolution and thumbnail): these files are completely useless and only take up precious space in the internal storage.
In this mode it is not possible to set the number of exposures to be stacked in advance: integration only stops when it is manually interrupted by the user although, fortunately, it continues even if you disconnect the phone/tablet.
While integration proceeds, the Seestar performs a simple processing of the acquired image that already lets you see the object being photographed, but the fun part for a beginner is using the app on the smartphone.
 |
|---|
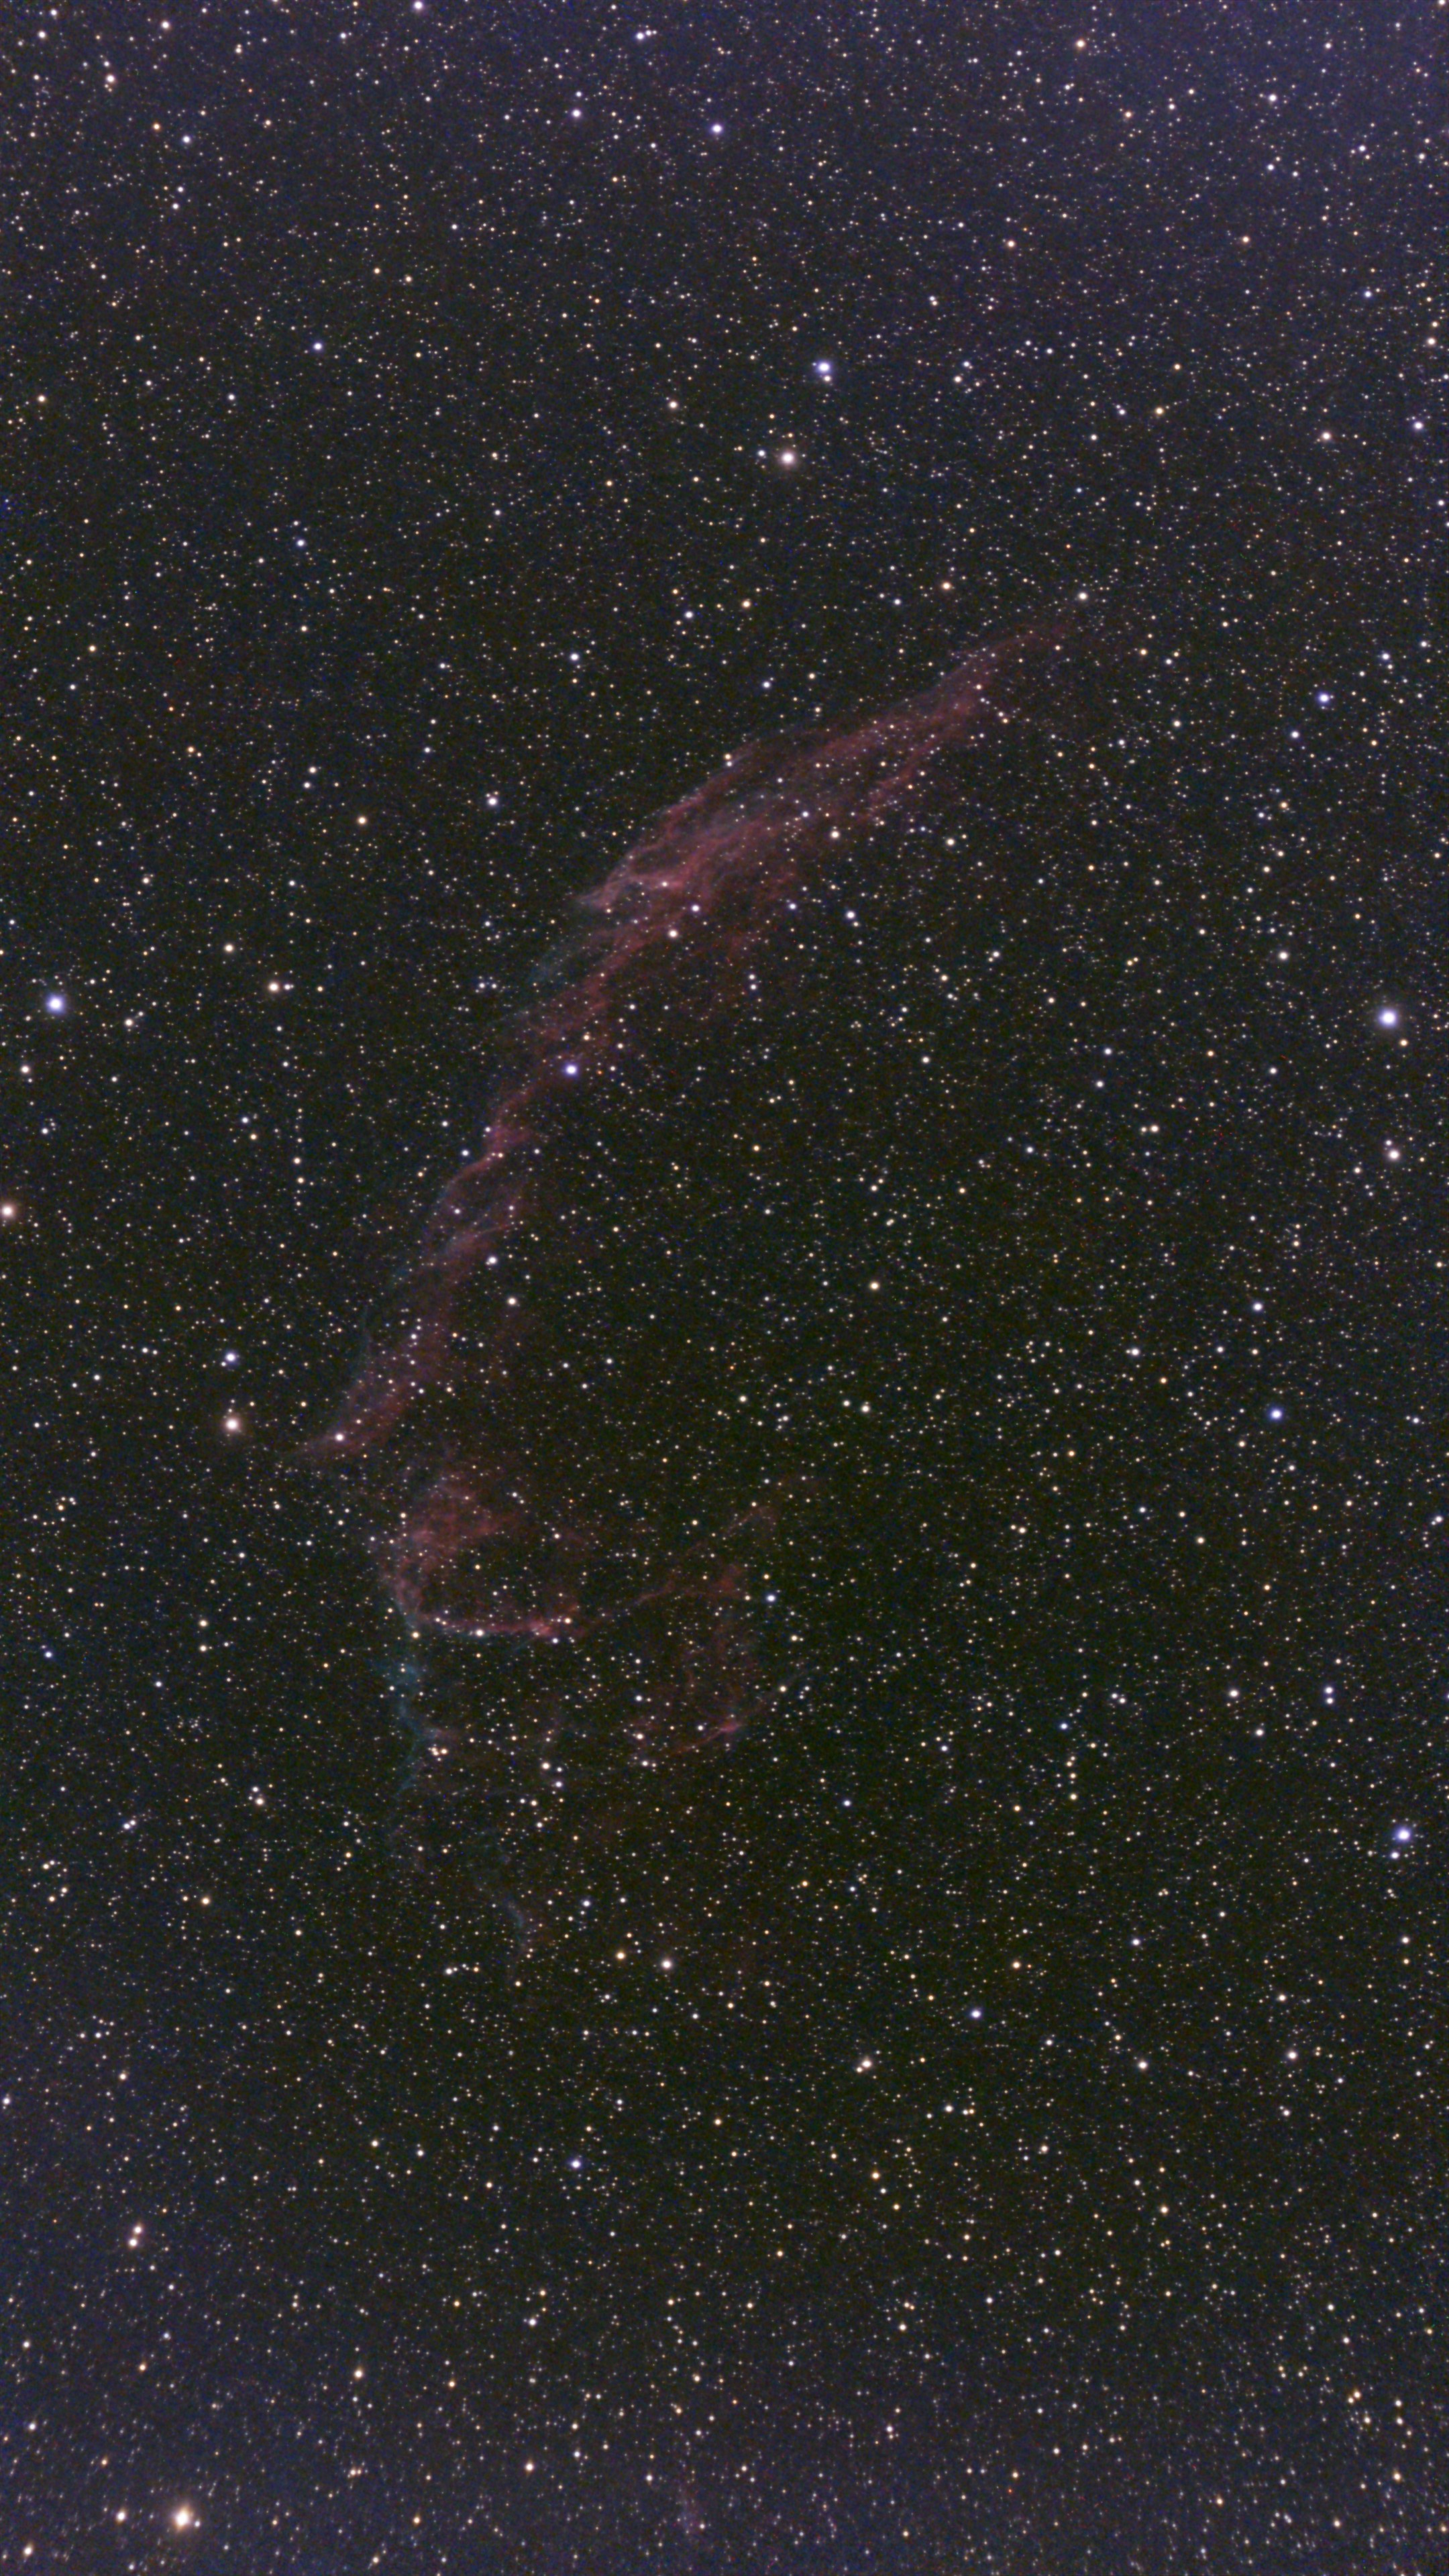
| The Veil Nebula straight out of the Seestar S30: 220 exposures of 30 seconds |
The processing app, while very basic, allows you to carry out the fundamental operations of astronomical post-processing with the help of AI: reduction of stellar diameters, adjustment of brightness and contrast, saturation and, if imaging from light-polluted skies or with the Moon up, a simple gradient reduction.
The final result, considering it was obtained with such a small instrument, is surprising and made me hopeful about this instrument’s potential.
The limits: tracking and integration
Back from the holiday I decided to download the raw frames and the integration performed automatically by the Seestar and process them manually with PixInsight, and this is where the first cold shower arrived:
Analysing the individual 30-second frames of the Veil Nebula, I realised that many of them were heavily trailed, even though I had mounted the Seestar in polar configuration and had carried out the polar alignment (following the app’s instructions) very carefully.
I estimated a rejection rate of over 60% for the 30-second frames and around 50% for the 20-second ones: I believe that, for an instrument dedicated to astrophotography, such approximate tracking is a fairly serious flaw. Just for comparison, with the Star Adventurer I manage to obtain acceptable exposures of around 3 minutes at a focal length similar to that of the Seestar S30, so this tracking error completely took me by surprise.
I honestly do not know whether this is a limitation of this particular model which, let us remember, is the entry level of the Seestar range, but I believe the company should work harder on tracking quality, especially in EQ mode.
Despite the trailing, I decided to integrate all the images in order to make a direct comparison with the integration performed automatically by the Seestar software; the result can be seen in the image below.
 |
|---|
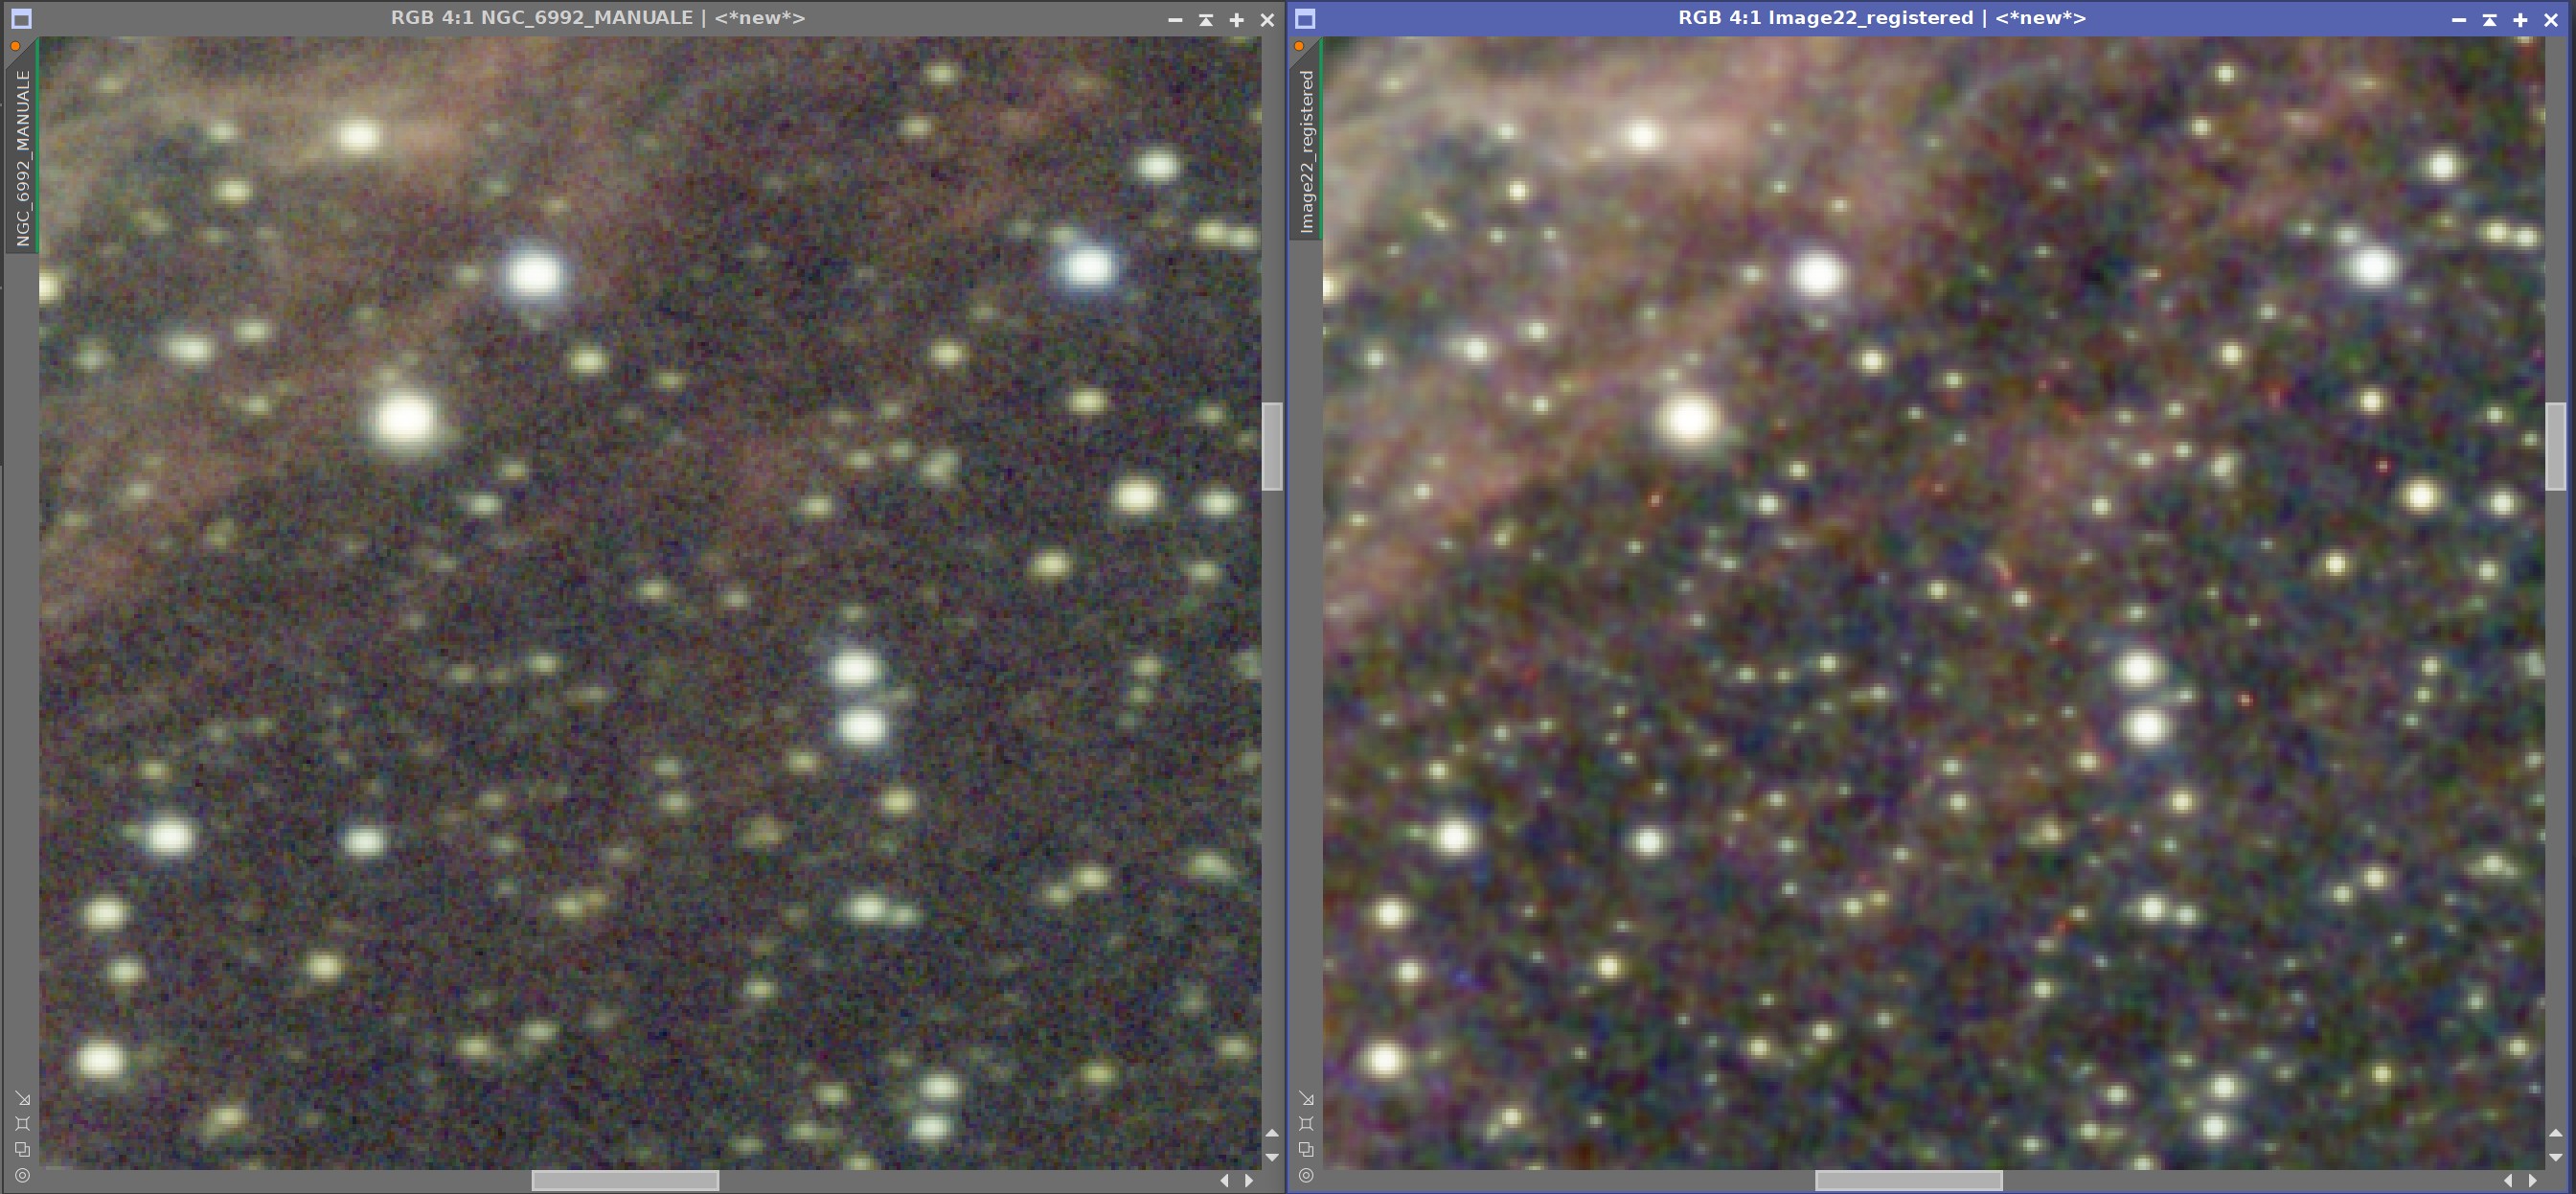
| Comparison between the integration performed with PixInsight (left) and the one performed directly by the Seestar S30 (right) |
Two rather important things can be noticed: the first is that the Seestar applies fairly heavy noise reduction to the integrated image, but only on high spatial frequencies, so a strong “blotchy” noise remains in the sky background, which is quite difficult to recover in post-processing.
The second thing: the appearance of the stars produced by the Seestar is decidedly better. This could be due to the fact that only the best images are integrated, or that an AI-based detail reconstruction technique is applied.
Given the appearance of the stars, I would lean towards the second hypothesis, but of course I cannot be certain.
Although this may seem like an advantage for a beginner, I personally find it profoundly wrong to hand the end user a pre-digested raw file without giving them the option of disabling a function that substantially alters the quality of the image.
I therefore decided to discard the automatic integration outright and to carry on working on the manually integrated images.
Important note for those using PixInsight for preprocessing: the Seestar’s FIT files use an unusual convention for the origin of the coordinates. In order to import and process the image correctly, especially during debayering, you need to tell PixInsight the coordinate origin of the FIT file. This can be done temporarily using the top-down format hint in the appropriate field of the processes, or by setting the origin in the FIT file format within FORMAT EXPLORER.
The helping hand: machine learning
Even though the quality of the integration is not optimal, I tried processing the image anyway using a well-known deconvolution tool based on a neural network: thanks to this technique the images are “repaired” and become more than acceptable.
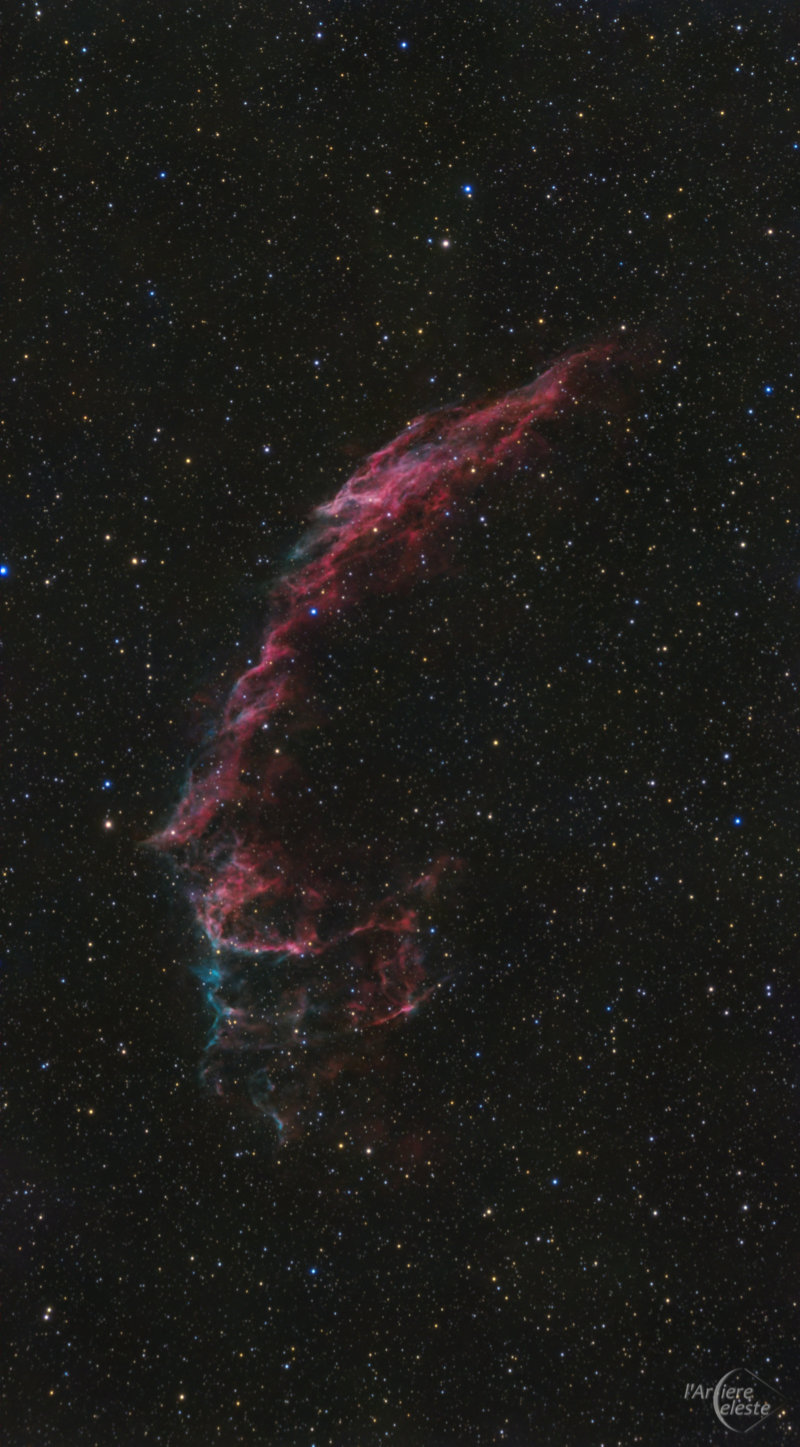
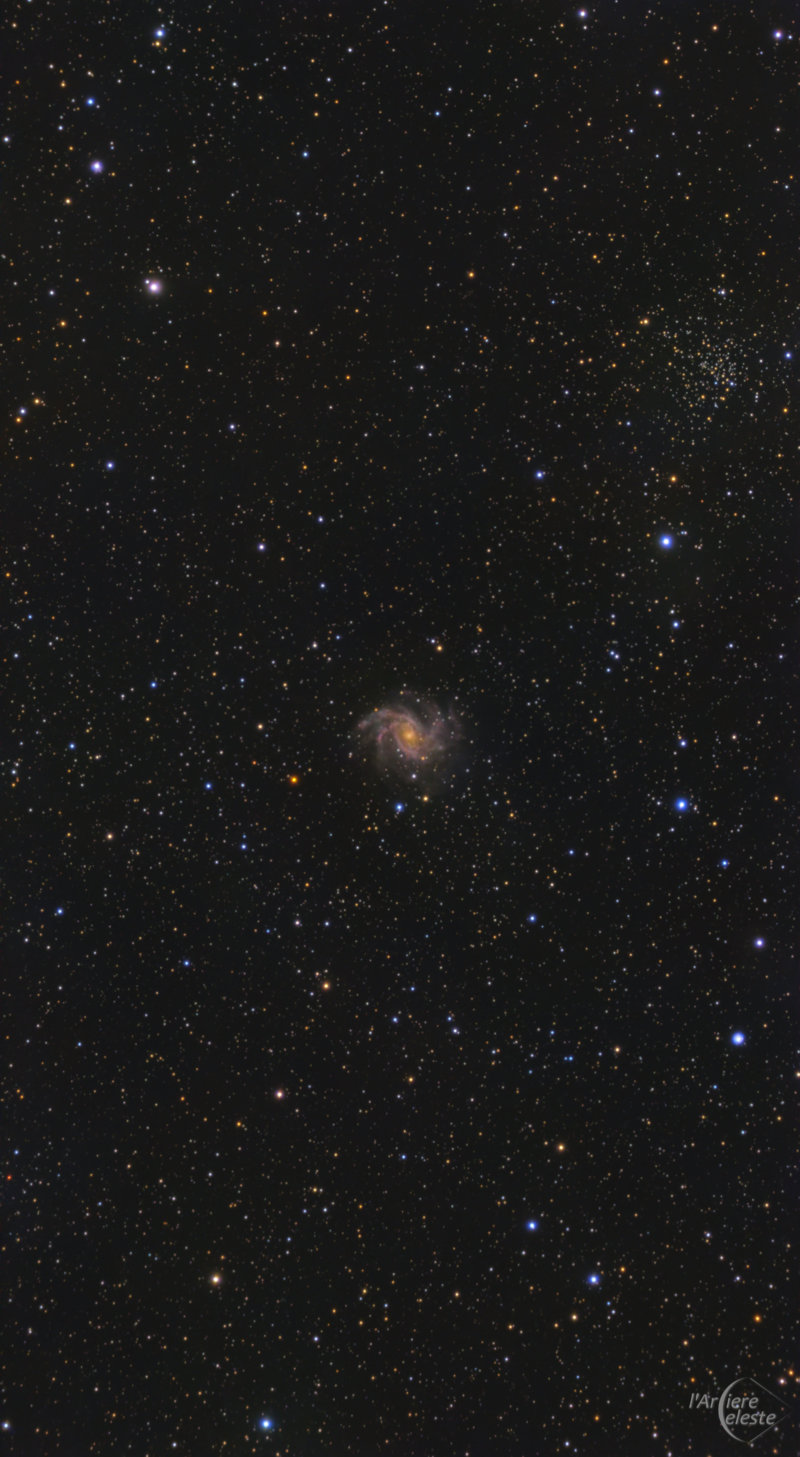
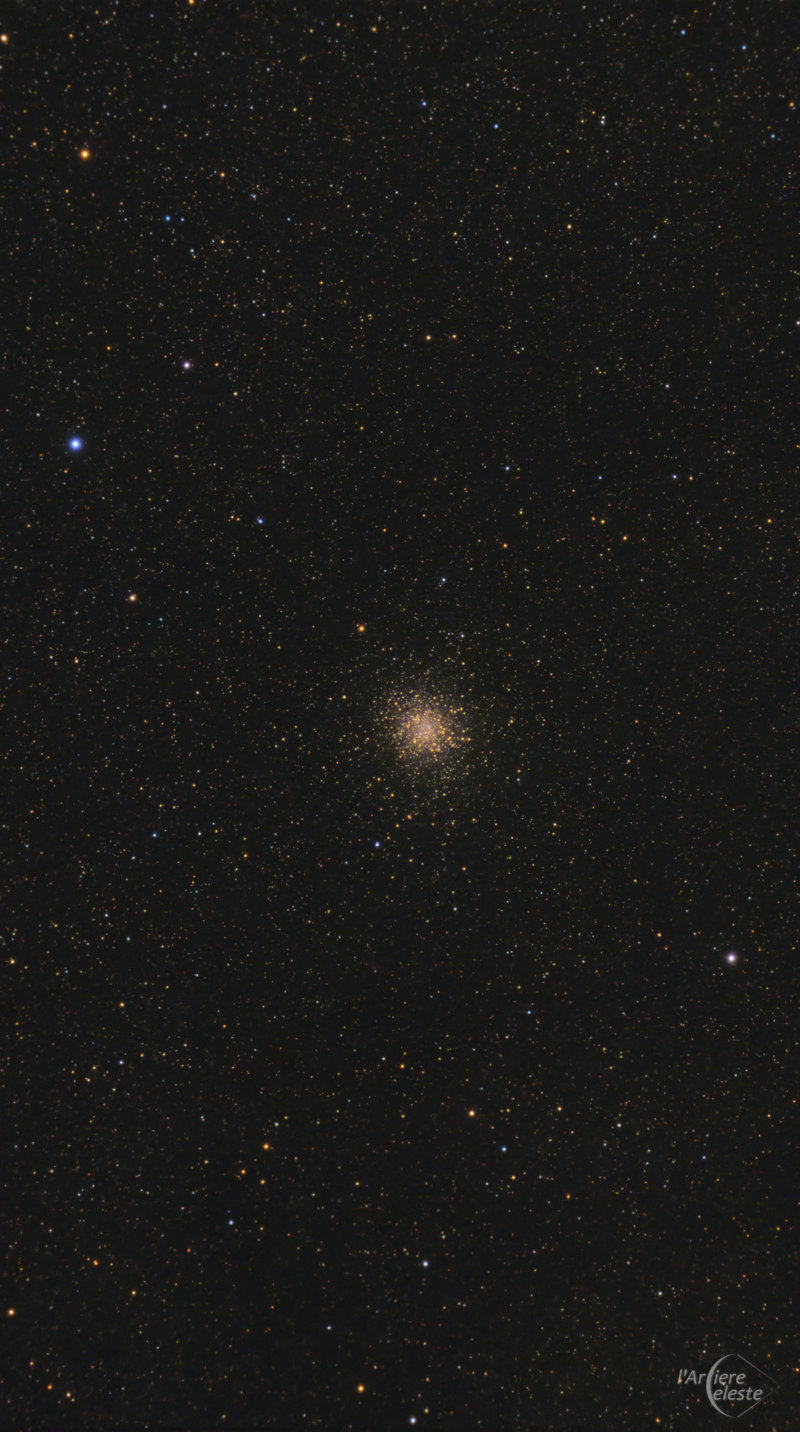
The images below show the result of processing with PixInsight the tests I carried out in the field under the beautiful skies of the countryside around Montalcino. For anyone interested, the full-resolution images are available on Astrobin, accessible by clicking on each individual image.
 |
|---|
| The Veil Nebula with the Seestar S30 |
 |
|---|
| The galaxy NGC 6946 with the Seestar S30 |
 |
|---|
| The M22 cluster with the Seestar S30 |
It is an interesting paradigm shift: the Seestar S30 is not a good acquisition instrument in the classic sense, especially if you want to lengthen the integration times of the individual frames, but it becomes a perfectly usable and enjoyable tool if you accept it as part of a modern pipeline in which software does the lion’s share of the work.
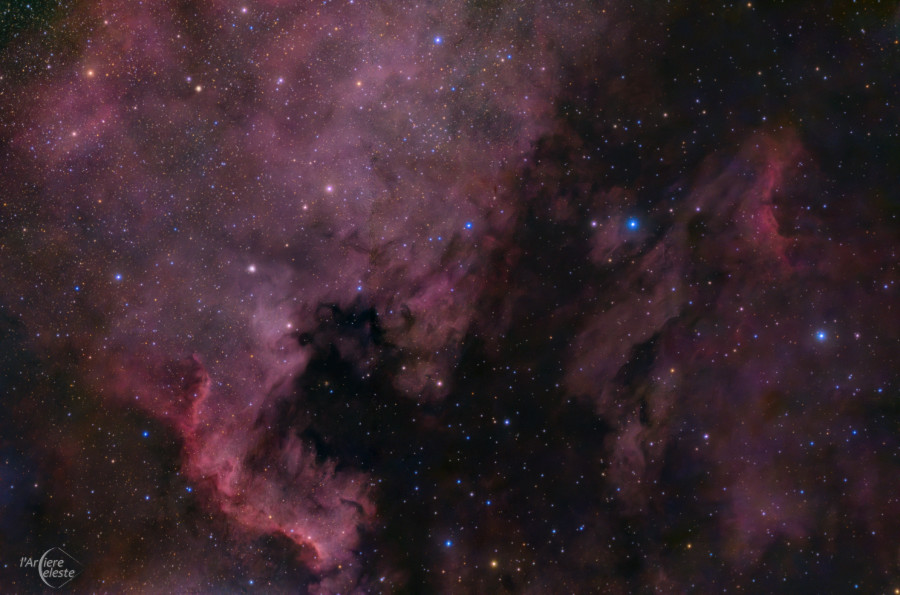
As a final test I wanted to try the planning function of the smartphone software: the idea was to create a small mosaic made up of three panels of the North America Nebula region.
The Seestar has its own mosaic creation function but, I was told, in that case the individual frames are not provided, only the final integration: I was not able to verify this information but, since my holiday had come to an end, I preferred to test the planning function.
The software is really intuitive and worked well, allowing me to create the mosaic in PixInsight by integrating the individual frames.
 |
|---|
| North America and Pelican with the Seestar S30 |
Conclusions (for now)
I am torn, and I say so without hesitation.
On the one hand, for my specific use the Seestar S30 is essentially useless: I already have a Star Adventurer which, with a little more effort on my part, achieves equivalent or better results, with far more control over every stage of the process. It is a method much closer to my way of seeing astrophotography and one I feel more comfortable with.
On the other hand, its convenience and immediacy of use impressed me deeply, and the fact that modern machine learning manages to partially bridge the quality gap left by the tracking changes the terms of the assessment considerably.
I remain convinced that, for someone who is learning, relying on a smart telescope is a slightly too easy shortcut into astrophotography, and that important parts of this hobby are lost along the way. However, in discussing it with people who take a more accommodating view than mine, I realised something interesting: if someone is genuinely interested in astrophotography, sooner or later they will find this instrument inadequate for their goals and will decide to move on to something more complex — at which point they will still have to bridge the knowledge gap that the instrument initially allowed them to postpone.
That said, I do not think I will buy the Seestar S30: for me its characteristics make it little more than an entertaining pastime, even though I appreciated the idea of having a compact, easy-to-use instrument when on holiday with the family.
I would therefore like to try other models, to see whether I can find something closer to my own experience that leaves me more freedom in the configuration options. In particular, I am looking with interest at the Seestar S50 Pro, which should be released by the end of the year — provided the price is reasonable.