
Introduction
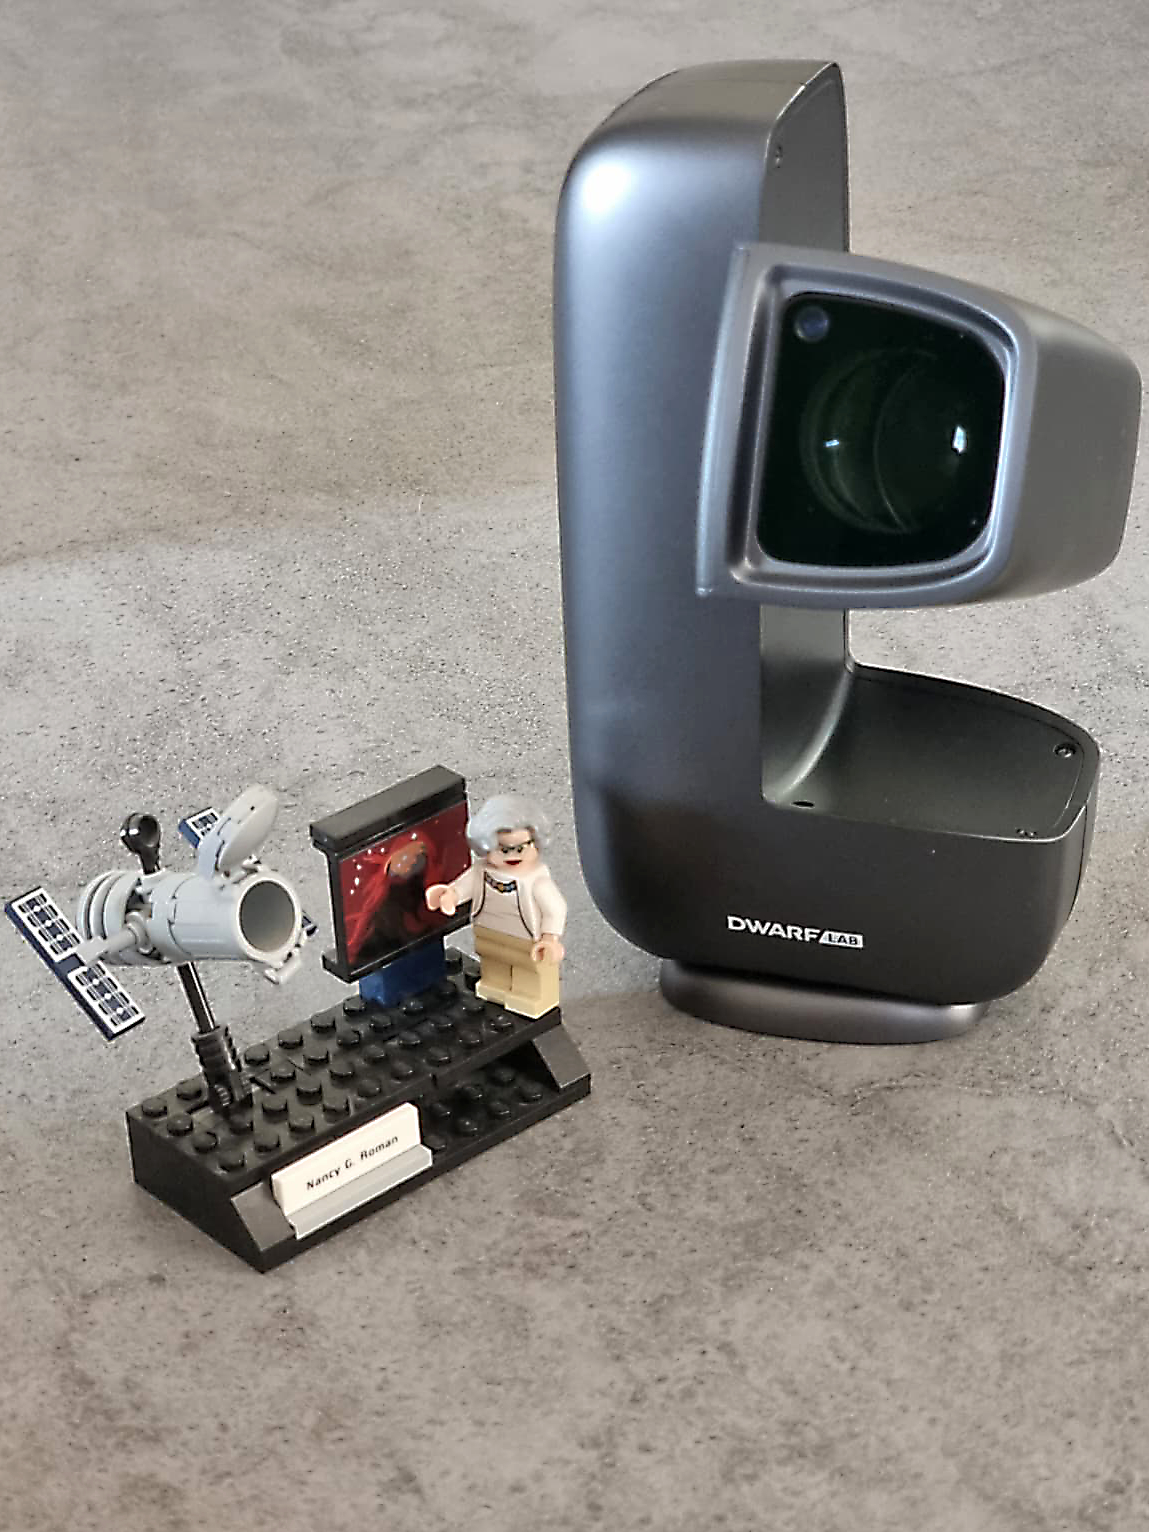
The smart telescope market now offers more and more solutions designed to lower the barriers to entry into astrophotography, and the DWARF Mini by DWARFLAB sits right in this entry-level bracket at a price within everyone’s reach: optics, mount, sensor and software all live together in a single device, accessed from a smartphone or tablet.
 |
|---|
I would like to thank Tecnosky, who gave me the chance to put the instrument through its paces by lending it to me, together with its tripod, for this review.
As with my previous review of a ZWO Seestar S30, here too I am writing from the point of view of the “seasoned” astrophotographer who wants to add to his collection of telescopes, while bearing in mind all the limitations a 30 mm instrument can have.
I will therefore follow the same outline as the previous review, without however putting the two systems into direct comparison: that is not my style, I prefer to describe each instrument for what it seemed to me.
Technical specifications
| Feature | |
|---|---|
| Optics (tele) | Apochromatic refractor, 6 elements, 30 mm |
| Focal length | 150 mm (equiv. 1016 mm full-frame) |
| Focal ratio | f/5 |
| Optics (wide) | 3.4/6.7 mm, equiv. 45 mm full-frame |
| Sensor | Sony IMX662 (Starvis 2), colour |
| Resolution | 1920×1080 (Full HD), 2 MP RAW stills |
| Built-in filters | Astro (430–690 nm) · Dual Narrowband (Hα 656.3 nm / OIII 500.7 nm) · Dark Frame |
| External filter | ND (solar filter), magnetic attachment (included) |
| Mount | Motorised alt-azimuth, GoTo + tracking; EQ mode available |
| Rotation angles | 225° (optical tube), 360° head |
| Autofocus / Plate solving | Yes, handled by the app |
| Single exposure | Up to 90 s (equatorial mode) |
| Battery | 7000 mAh, ~4h runtime, USB-C charging in ~100 min |
| Internal storage | 64 GB |
| File formats | JPG/FITS/TIFF (stills), MP4 (video) |
| Connectivity | Wi-Fi (2.4/5 GHz, range ~15 m), Bluetooth 5.0, USB-C |
| Weight | ~840 g |
| Tripod thread | Standard 1/4" photographic thread (tripod not included) |
Unboxing and first light
The DWARF Mini really lives up to its name: with a footprint barely larger than a smartphone, it is extremely compact and easy to carry.
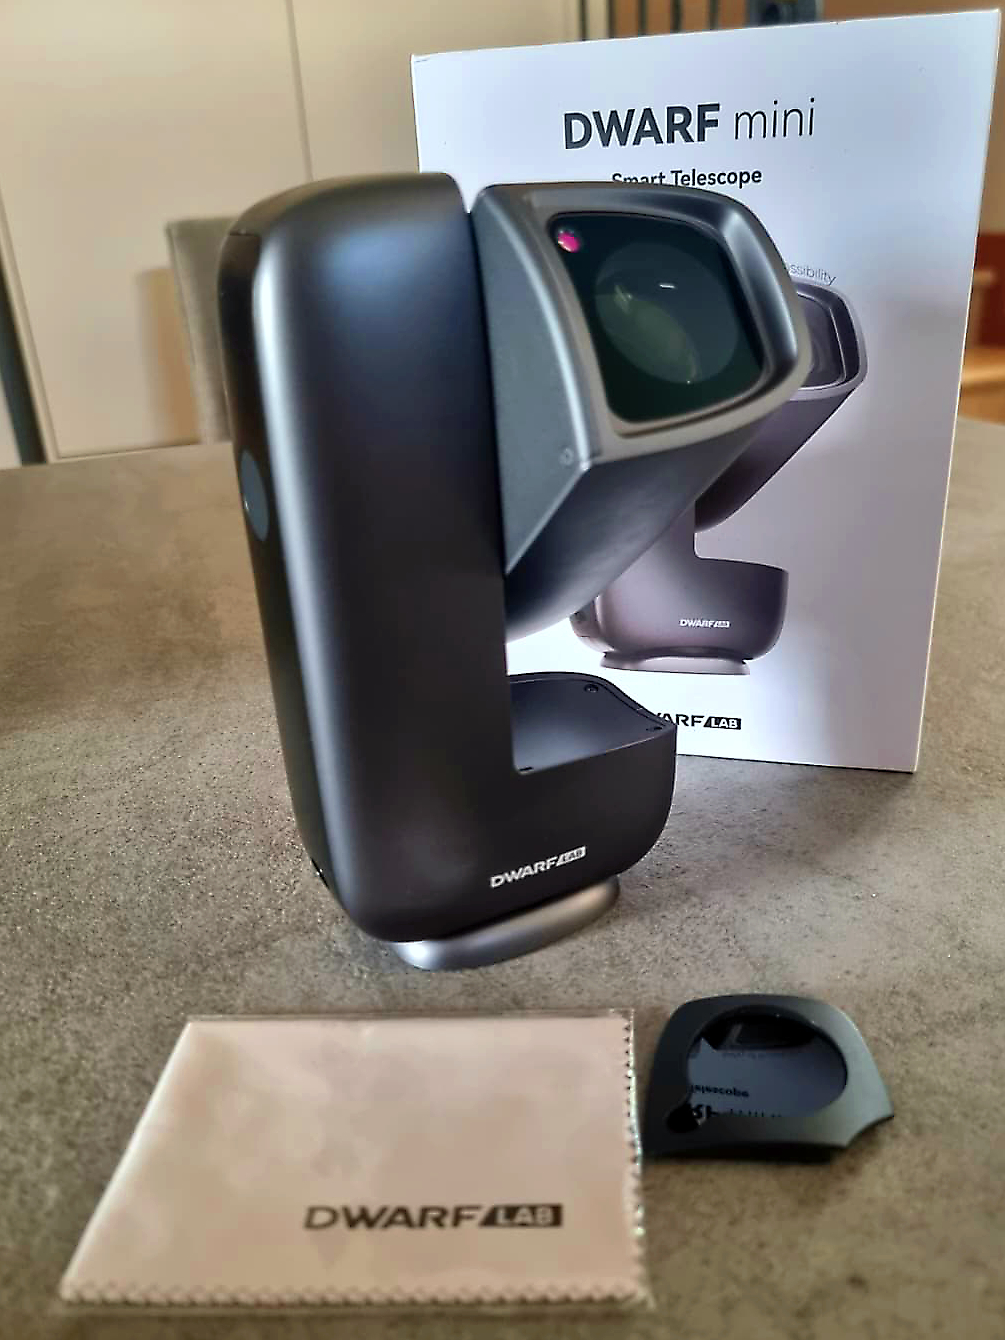
In the box you will find the telescope, the magnetic solar filter, the USB-C cable — usable both for charging the battery and for transferring data to a PC — and a small microfibre cloth: the tripod and the carrying bag are paid optional extras.
 |
|---|
The telescope is minimal: it can be placed on the ground or on a table and used straight away in alt-azimuth mode, even without a proper support.
The telescope’s axes are clutched, so they can be rotated freely by hand without using the motors: the altitude/declination axis can be turned through 225°, while the azimuth/right ascension axis allows free rotation through 360°.
As mentioned above, Tecnosky also sent me its own tripod along with the telescope: a small tripod with extendable legs and a hydraulic head offering smooth, well-controlled movements.
The tripod has a stated maximum load of 3 kg and extends to roughly half a metre in height. The legs can be set into several positions, so it always provides a stable base, and they allow the telescope to be mounted either in alt-azimuth or in equatorial configuration.
In equatorial configuration, however, one feature I consider important is missing: fine adjustment screws to refine the polar alignment. With those it would have been perfect; even without them, though, with a little patience you can still reach a decent alignment.
Connecting to the smart telescope for the first time is remarkably straightforward: thanks to the NFC function the smartphone’s Wi-Fi network configures itself, the connection is almost instant and the instrument is ready to use in a few minutes.
As in the previous review, I wanted my first test to be on the Sun.
Pointing at the Sun and the Moon is semi-automatic and involves three steps: first you aim at the object by moving the telescope by hand, then you refine the framing with the app’s joystick — using the wide-field view as a guide — until the object falls within the main camera’s field, and finally you send the pointing command. From then on the telescope does everything: it performs a quick calibration, centres the object and begins tracking it very accurately.
Throughout these stages the app guides the user step by step, reminding them to fit the solar filter — supplied as standard — before pointing, to avoid irreparably damaging the sensor.
In planetary mode the telescope automatically uses only the central portion of the sensor, producing images 720×1280 pixels in size: the choice is more than understandable, in fact, given the short focal length of the lens, the images of the Sun and Moon are rather small and therefore downloading the full-field image would result in saving useless data.
The app automatically sets the exposure time and sensor gain to give an optimal exposure, while still allowing the user to change these settings manually; I personally preferred to lower the exposure time slightly, to make the centre of the solar disc a little darker.
When you press the start button, the telescope acquires a set number of frames (chosen by the user) and automatically produces a combined image from them, with a much better signal-to-noise ratio than a single shot.
During this stage, however, the software is locked: you cannot do anything else. Producing the “master” takes several minutes if there are many frames (The stacking operation takes about 4 seconds per frame), and I found no way of interrupting it (for instance if you have started the sequence by mistake).
I found this choice rather irritating: a button to send the telescope a command to abort the procedure would not have gone amiss.
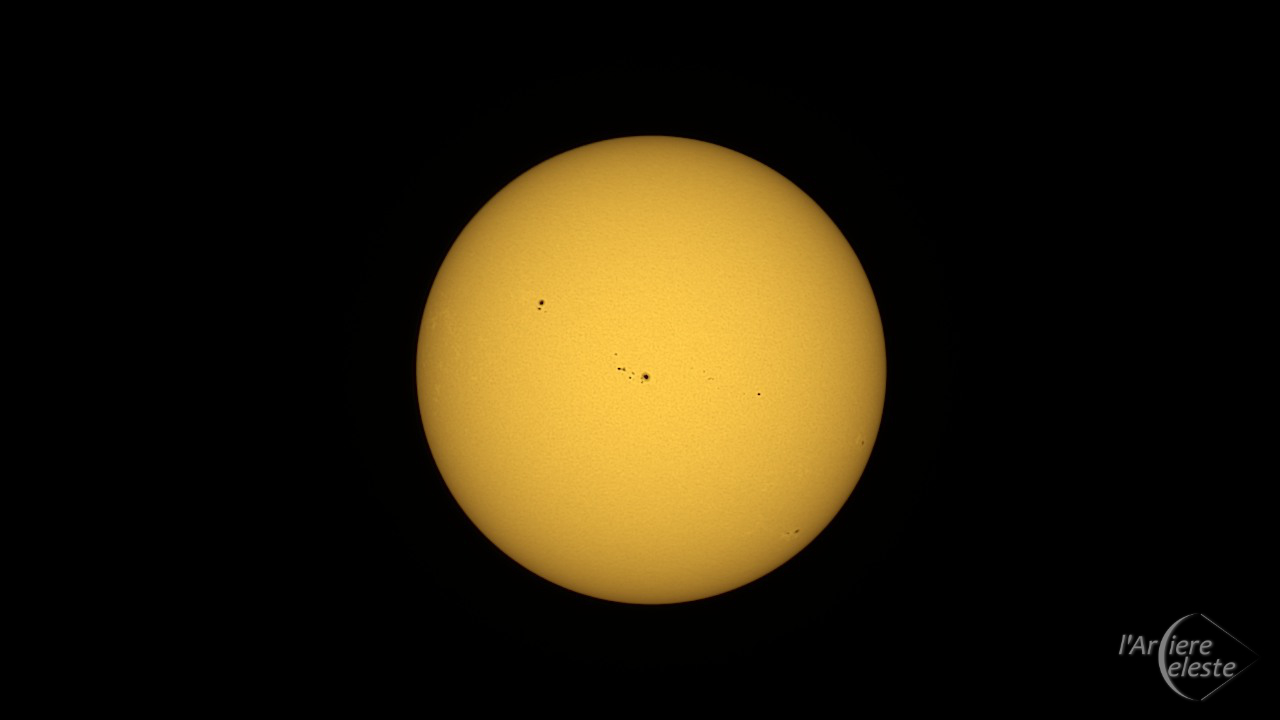
Despite this limitation, stacking improves the quality of the final images considerably, even with only 20-30 single frames. What really makes the difference here is the optics: 30 mm of aperture is not much, and resolution suffers. On the Sun you can clearly see the spots, the brighter faculae and limb darkening, with a hint of granulation; interesting from a didactic point of view, but nothing more.
 |
|---|
| The Sun on 14 August 2026 at 16:57 UT |
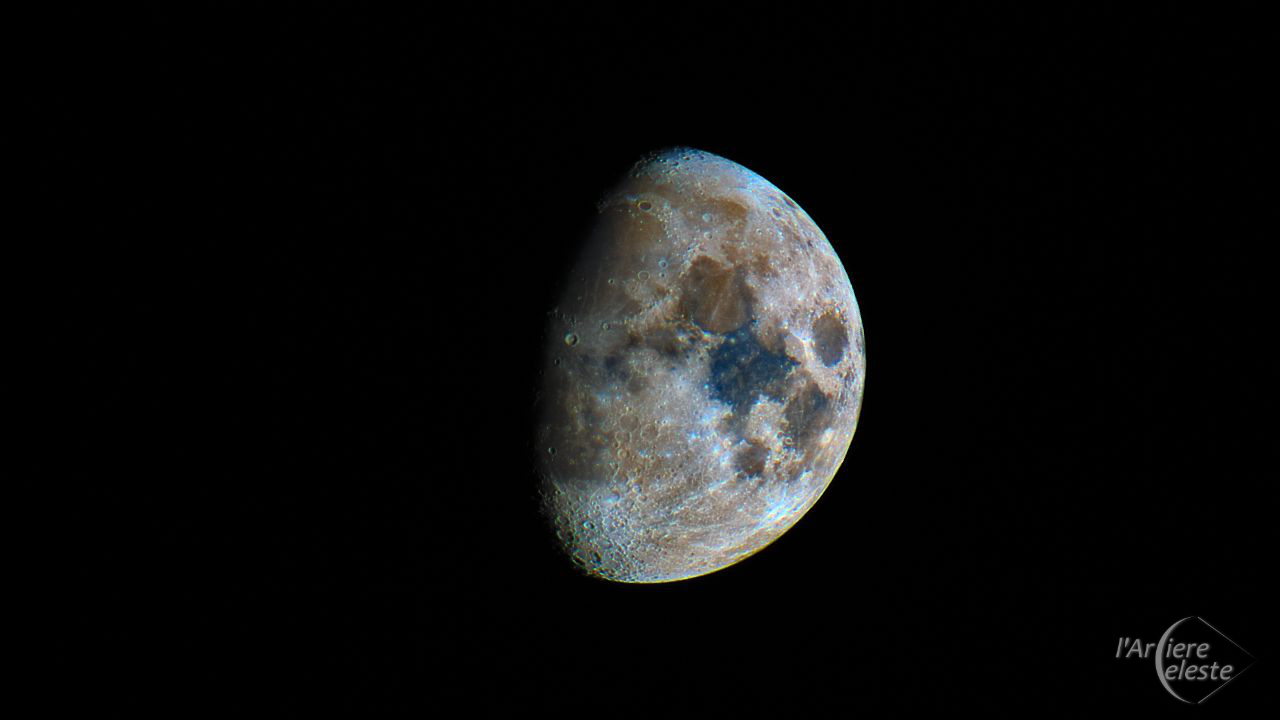
The pointing and acquisition procedure for the Moon is identical to that for the Sun, and the images show the same resolution limits due to the small aperture. Let me be clear: this is not a fault of the instrument, it is a consequence of the aperture and would not improve even with a better sensor: it is a physical limit you need to be aware of when buying the instrument; if your goal is planetary imaging this is not the right telescope, simply because it wasn’t designed for that job.
Resolution aside, if you acquire the Moon with a good number of frames (at least thirty or so), you can reach a signal-to-noise ratio good enough to allow a decent Mineral Moon treatment in post-processing with external software (in my case I used PixInsight), working directly on the master produced by the DWARF’s own software.
If you would like to explore Mineral processing in PixInsight further, you can watch my YouTube tutorial at this link.
 |
|---|
| The Moon on 22 August 2026 at 19:58 UT (PixInsight processing) |
Deep sky
The DWARF Mini is at its best in deep-sky astrophotography on medium-sized fields. Unfortunately I had no chance to try it under a decent sky: I had to use it under the suburban skies of the Brescia hinterland; the typical SQM at my home is 18.6 mag/arcsec², so a sky heavily affected by light pollution. My main aim, however, was to test the tracking performance and the ease of use of the instrument, so sky quality did not compromise the test — on the contrary, given the results obtained it made this instrument even more interesting.
For the test I photographed some of the “classic” summer objects with exposures between 15 and 30 seconds, in both alt-azimuth and equatorial configuration, and I also tried the mode that widens the field, effectively producing a mosaic.
The first test was in alt-azimuth mode, which is the simplest and quickest way to use the instrument: you set it down on a flat surface or, better, on a tripod; you rotate the optics by hand towards the sky and then, from the app, you switch to photo mode and select deep-sky mode from the small icon at the top right.
At this point the DWARF activates the wide-field camera and, after a few moments, shows the main objects in the field directly on the screen. If what you want to see is not there, you can move the instrument with the app’s joystick and the objects in the field will update in real time.
Alternatively you can go through the in-app star atlas (which requires an additional download), searching for and selecting the object you are interested in.
In both cases, once the object has been selected and the alignment confirmed, the DWARF performs a quick calibration by plate-solving the images, then points at the object accurately: in less than a minute the object is centred in the field and, if bright enough, already visible.
Depending on the physical characteristics of the object, the software selects either the broadband “Astro” filter or the narrowband “Duo-Band” one — though, and this is a good thing, this choice can be overridden by the user.
The wheel actually carries a third position, labelled “Dark Frame”: it is not a real filter but an opaque cap that the system inserts by itself to acquire dark frames during the session, without any intervention from the user. It is thanks to this automatic process that the master darks I will discuss later are found in the internal memory.
In alt-azimuth mode DWARFLAB recommends a maximum exposure of 15 seconds. I wanted to try longer exposures too, but around 30 seconds the stars do begin to show noticeable trailing, so the recommended times are entirely correct and suitably conservative.
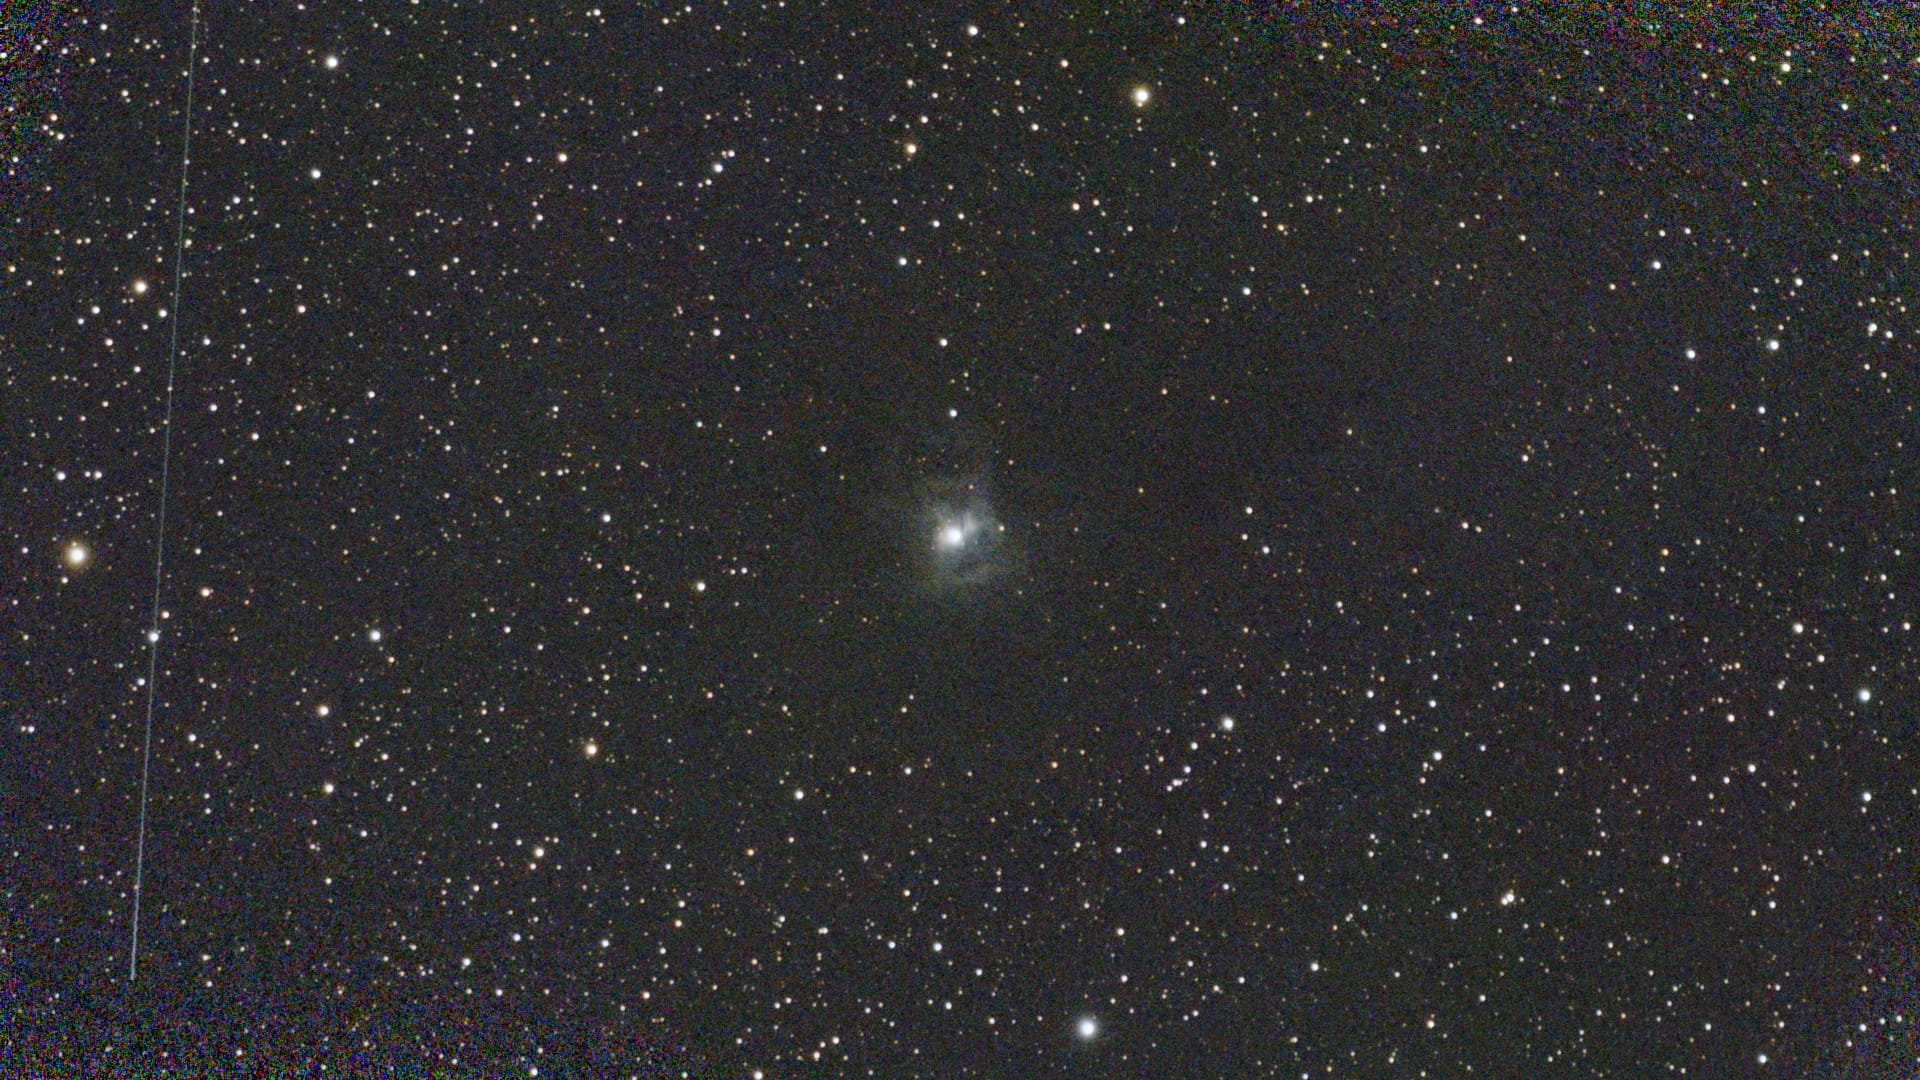
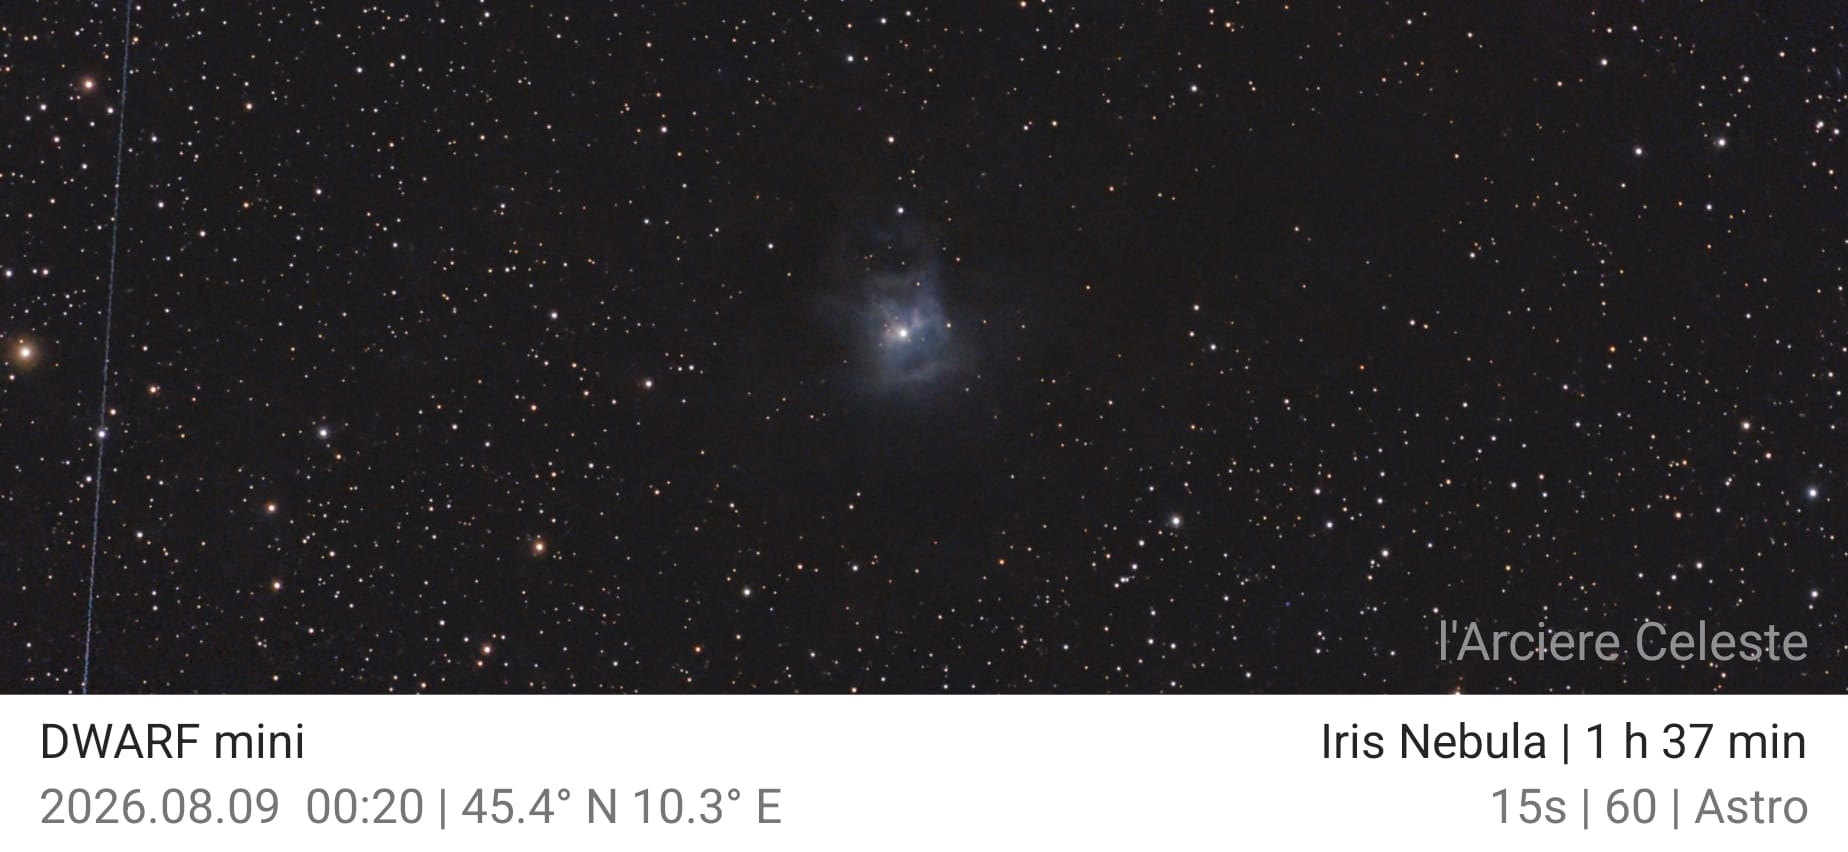
The target of the shoot was NGC 7023, the Iris Nebula.
15-second exposures, GAIN 60, ASTRO filter, total integration 1 hour 37 minutes, Bortle 7-8 sky.
The final integration obviously shows the limits of imaging in alt-azimuth mode, with the centre of the image fully exposed and the edges progressively worse because of field rotation, but the telescope’s software aligned and stacked the individual frames perfectly.
 |
|---|
| The raw file of the Iris Nebula in alt-azimuth mode |
Once the master has been produced, you move on to the processing stage: the DWARF app provides a cloud-based service called “Stellar Studio”: you set the corrections you want to apply (star size reduction, noise reduction, and so on), then confirm, and the cloud service does everything, returning the final cropped and processed image.
The result is genuinely astonishing: the processing runs I tried were never excessive, either in pulling out signal or in reducing noise, giving well-balanced images.
 |
|---|
| The Iris Nebula processed with Stellar Studio: the aspect ratio is the result of cropping away the low-SNR areas caused by field rotation |
Nevertheless, although this small miracle may fascinate and impress the beginner (and not only them), I would personally have preferred a little more control over post-processing. In my view a basic processing package should offer at least some control over histogram, curves and the strength of the effects applied (such as denoise and star reduction), ideally available offline too (for when you are high in the mountains with no internet connection, for example). Stellar Studio, on the other hand, takes every burden off the user and hands over a finished product with no possibility of altering it.
There is a trick to get around excessive field rotation in alt-azimuth mode: you image the same object on several consecutive nights at roughly the same time, for short time periods (less than 30 minutes) so as to minimise field rotation within each series, and then you combine the different runs using the “Mega Stack” function of the control software.
Mega Stack lets you select several imaging sessions acquired on different nights and merge them into a single master, which can then be fed to Stellar Studio or exported for external processing.
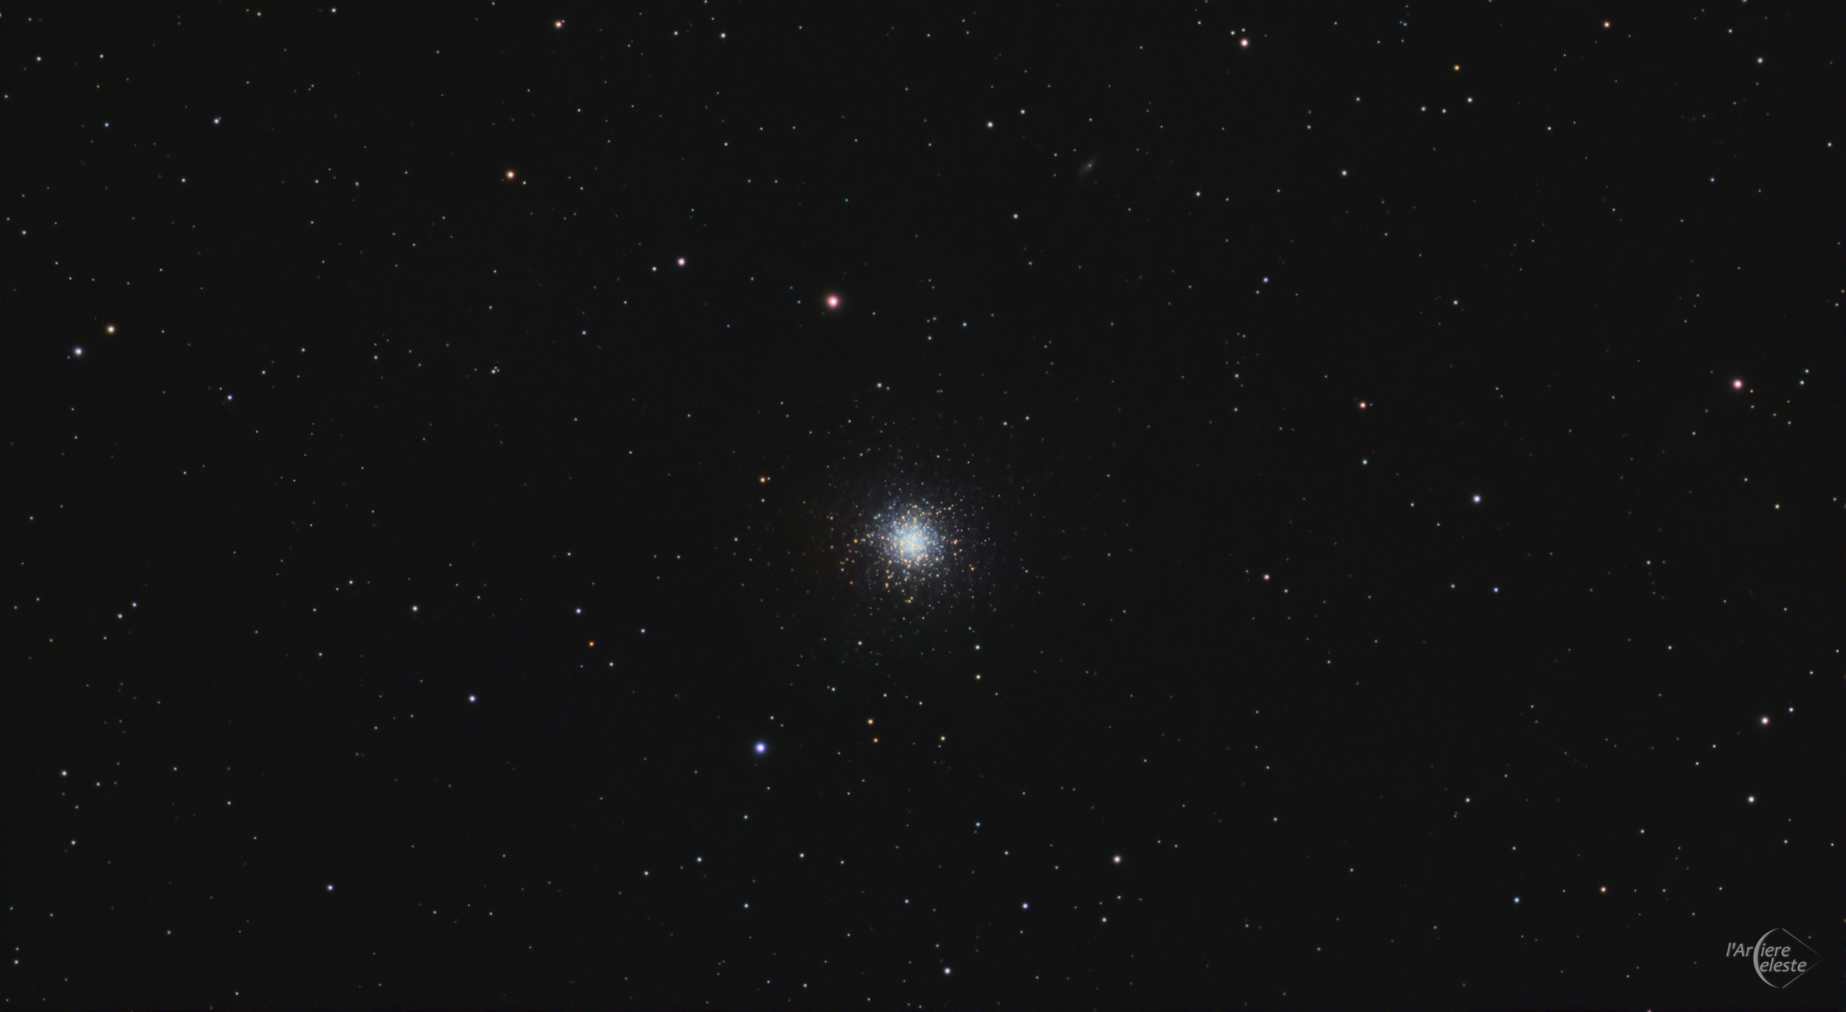
The image below is a shot of M13 taken over 3 consecutive nights with 15-second exposures: to show the telescope to friends I had made short runs, five minutes at most, on the famous Hercules globular, always at roughly the same time. With Mega Stack I merged the various sessions and then took the master to my PC to process it with PixInsight.
The result is very interesting, bearing in mind that the shot was taken, as always, under a Bortle 7 sky.
 |
|---|
| M13 imaged over different nights and merged with the Mega Stack function — PixInsight processing |
The DWARF Mini’s real potential, though, emerges when you move from alt-azimuth to equatorial mode: at that point you are no longer limited to 15-second exposures, but can stretch them to 90 seconds.
Polar alignment is very simple and guided step by step by the app:
- Point the telescope’s vertical rotation axis roughly towards Polaris
- Point the optics at the sky
- Start the calibration procedure: the software then tells you how far the axis is away from the pole and suggests how many degrees to rotate it in azimuth and altitude to improve the alignment.
- Repeat the check procedure and the software recalculates the new misalignment: if it is within certain limits it reports that the alignment is good enough, while still giving you the option of refining it further if you wish.
A couple of iterations are usually enough to achieve a good alignment.
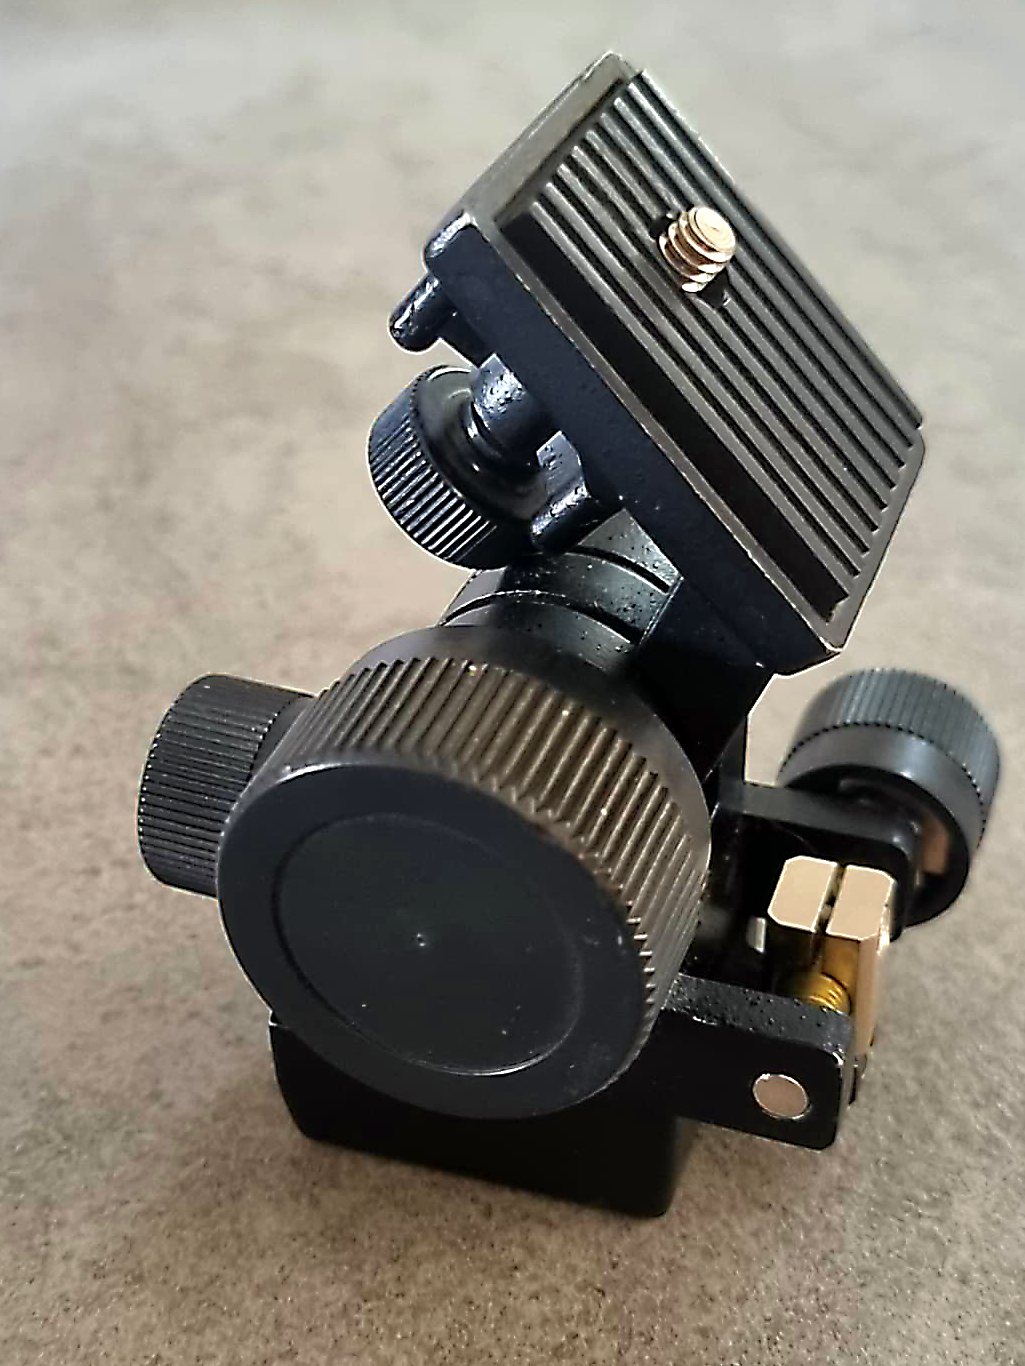
In this case, though, a support allowing fine adjustment of the pointing proves extremely useful, if not essential: with the movements of an ordinary ball head it is hard to achieve a sensitivity of 1°.
I use a small micrometric head which, given the DWARF’s minimal weight, is perfect for the job.
 |
|---|
| The micrometric support used for fine polar alignment |
I actually took my images with 30-second exposures, because of the heavy light pollution in my area, and I also tried, as I will explain shortly, running the calibration and integration of the raw files in PixInsight.
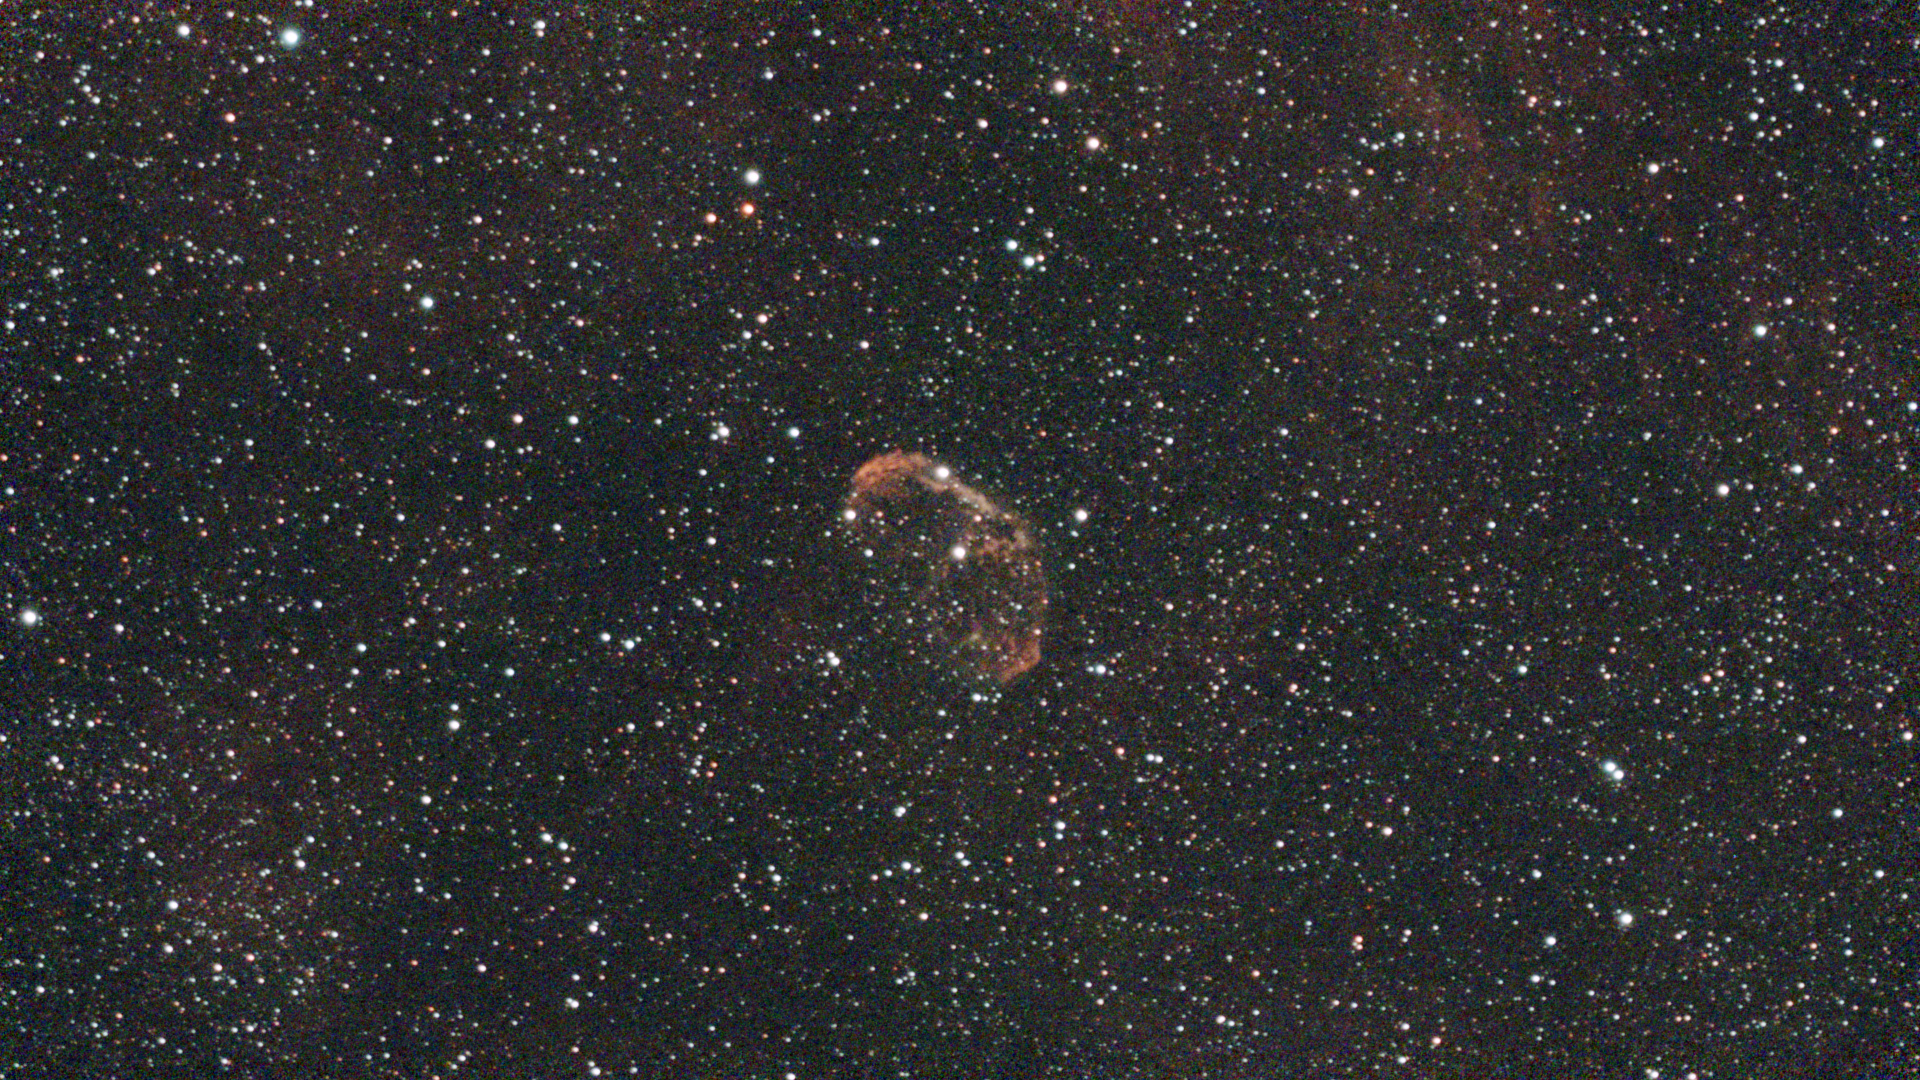
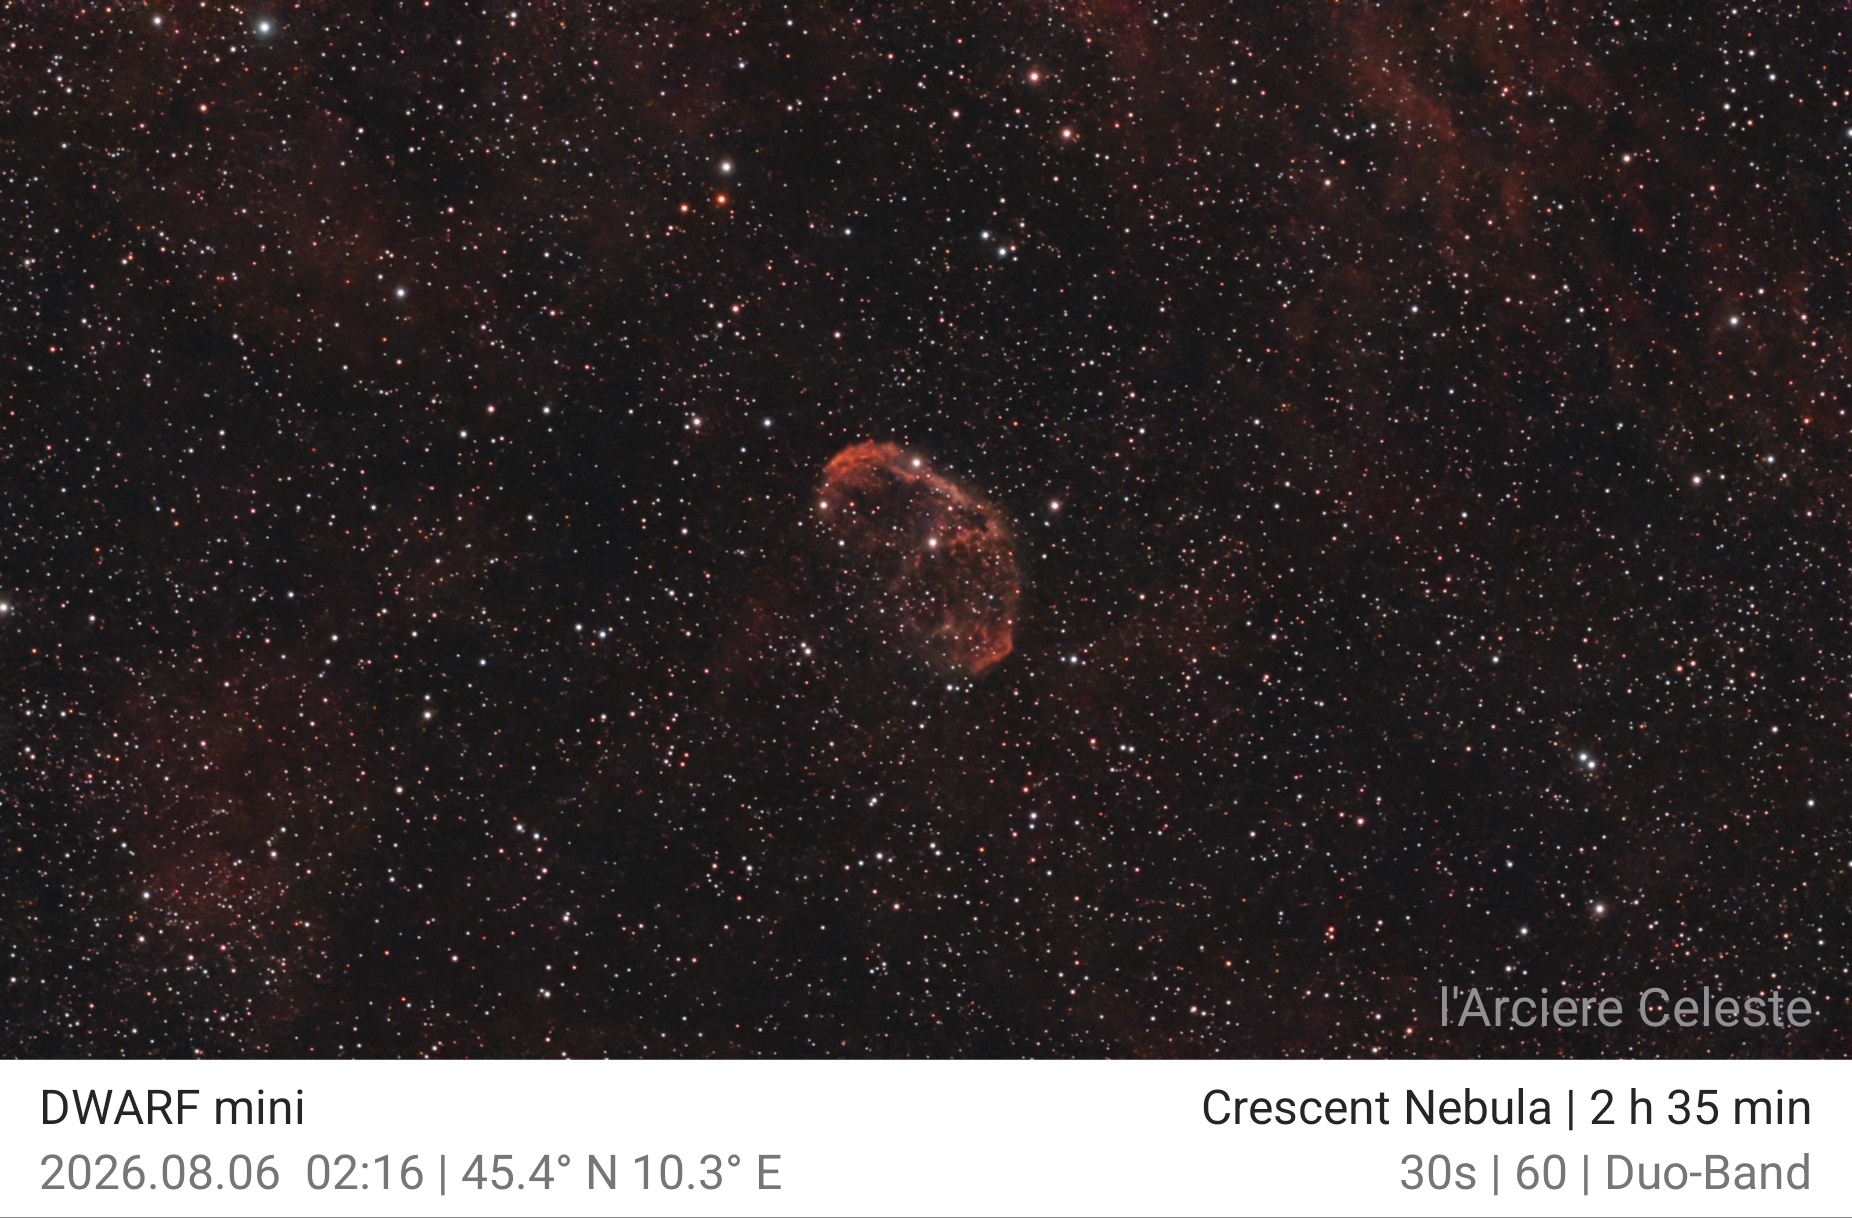
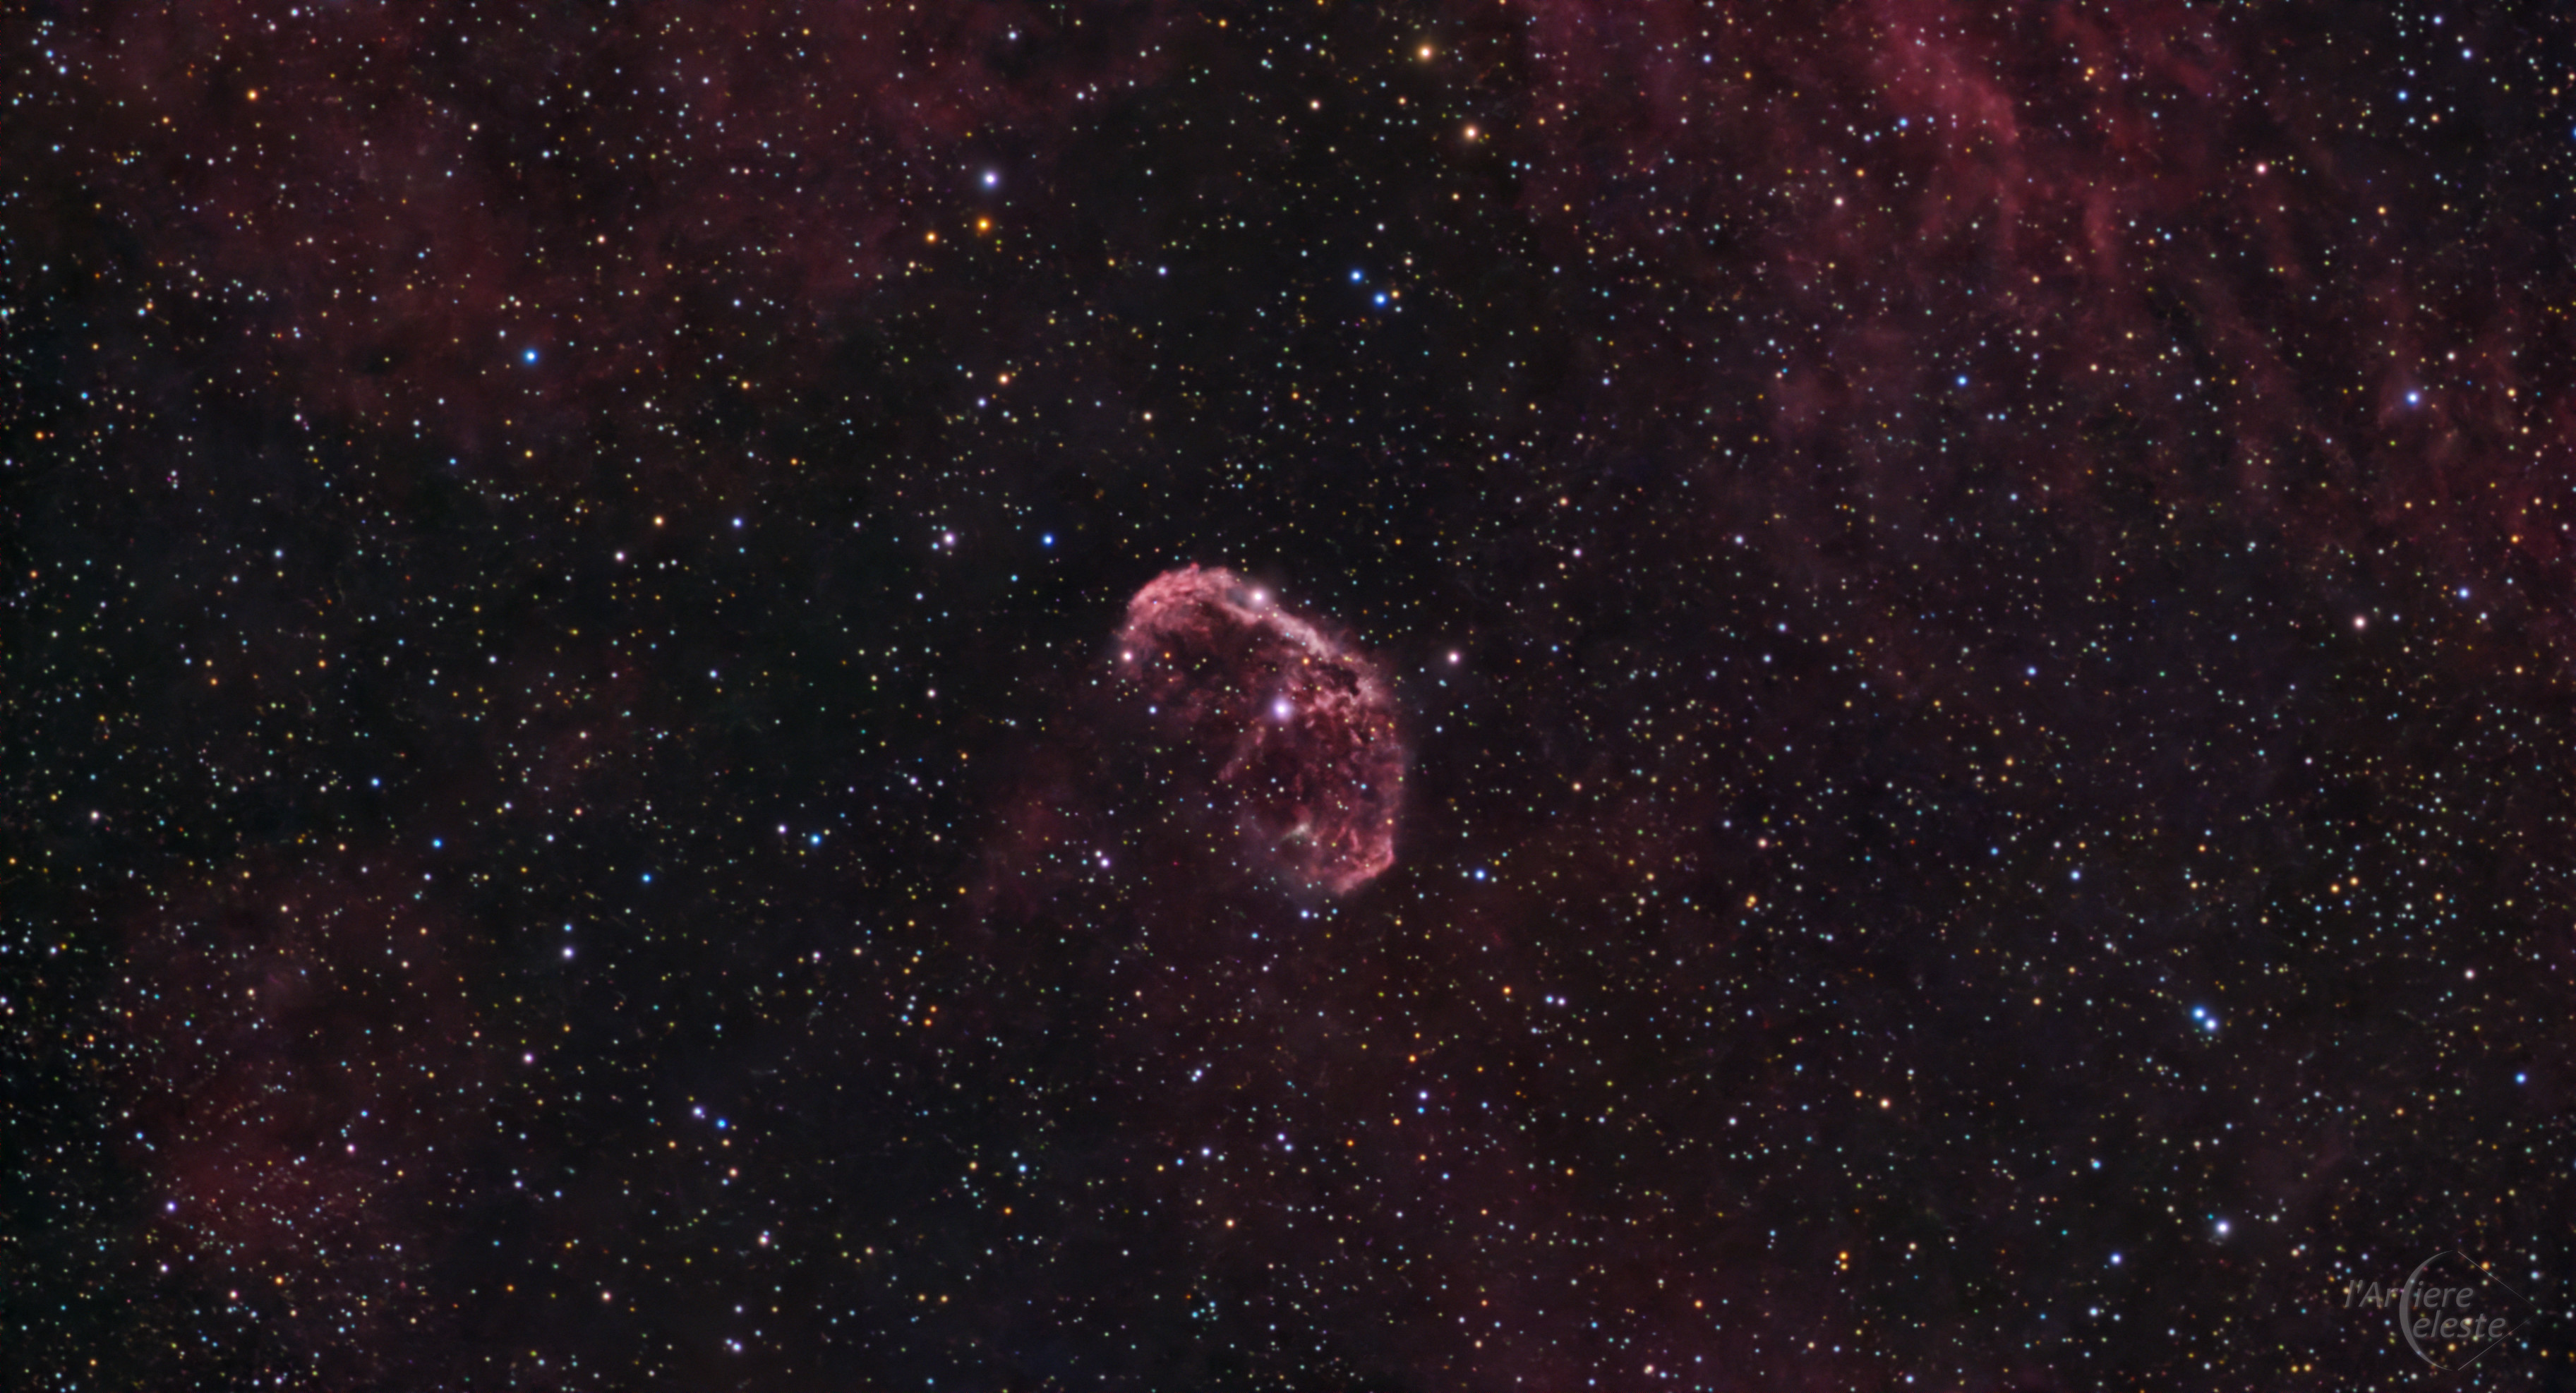
As a test I imaged NGC 6888, the Crescent Nebula, on a new-Moon night, once again from home and using the Duo-Band filter, which isolates the line and the oxygen doublet.
On this point, unfortunately, I could find no official information on the filter’s bandwidth, but its sibling the DWARF 3 quotes , , which would seem plausible for the DWARF Mini as well. If that were the case, the filter would also let through, marginally, the emission, which would give better colour balance in HII regions.
The images below show the raw image created by the DWARF, the Stellar Studio processing, and the version I produced by exporting the data to my PC and redoing the whole calibration and processing pipeline in PixInsight.
On this subject it is worth highlighting an interesting point; as mentioned above, the telescope has a Sony IMX662 sensor with pixels and a focal length of 150 mm, which gives a sampling of about 4 arcsec/pixel.
With a 30 mm aperture the Airy disc at 550 nm is about 3.9 arcsec, so two observations can be made:
- The telescope is practically never affected by atmospheric turbulence and always works in the diffraction limited regime.
- The image is undersampled according to the Nyquist criterion and, given the high number of frames typically acquired, it can benefit from resampling with at least 2x DRIZZLE, so as to exploit the small optics’ resolving power to the full. In effect it is like having a 4K sensor instead of a Full HD one.
 |
|---|
| The Crescent Nebula: raw image stacked by the DWARF Mini |
| 310 frames of 30 seconds with the Duo-Band filter in equatorial configuration |
 |
|---|
| Automatic processing with Stellar Studio |
 |
|---|
| Full processing: calibration, integration and processing carried out in PixInsight |
| Image resampled with 2x Drizzle |
The last test I carried out was mosaic mode. In this case I stopped at the processing provided by the system, without rebuilding the mosaic in PixInsight.
Although the focal length is short, the small sensor results in a rather narrow field of view; mosaic mode makes it possible to widen the field up to 1.8x.
Here too everything is handled through the app: you choose the framing on the atlas, expand the field and start the run — the telescope will cycle through the various panels to build up even coverage on each one and, at the end of the procedure, delivers the complete mosaic.
With the constellation of Cygnus high in the sky, I decided to image the region of , Sadr, characterised by a bright star surrounded by rather faint HII regions.
The initial outcome, unfortunately, was not very encouraging: the four panels were perfectly aligned but, because of the heavy light pollution, the seams were clearly visible.
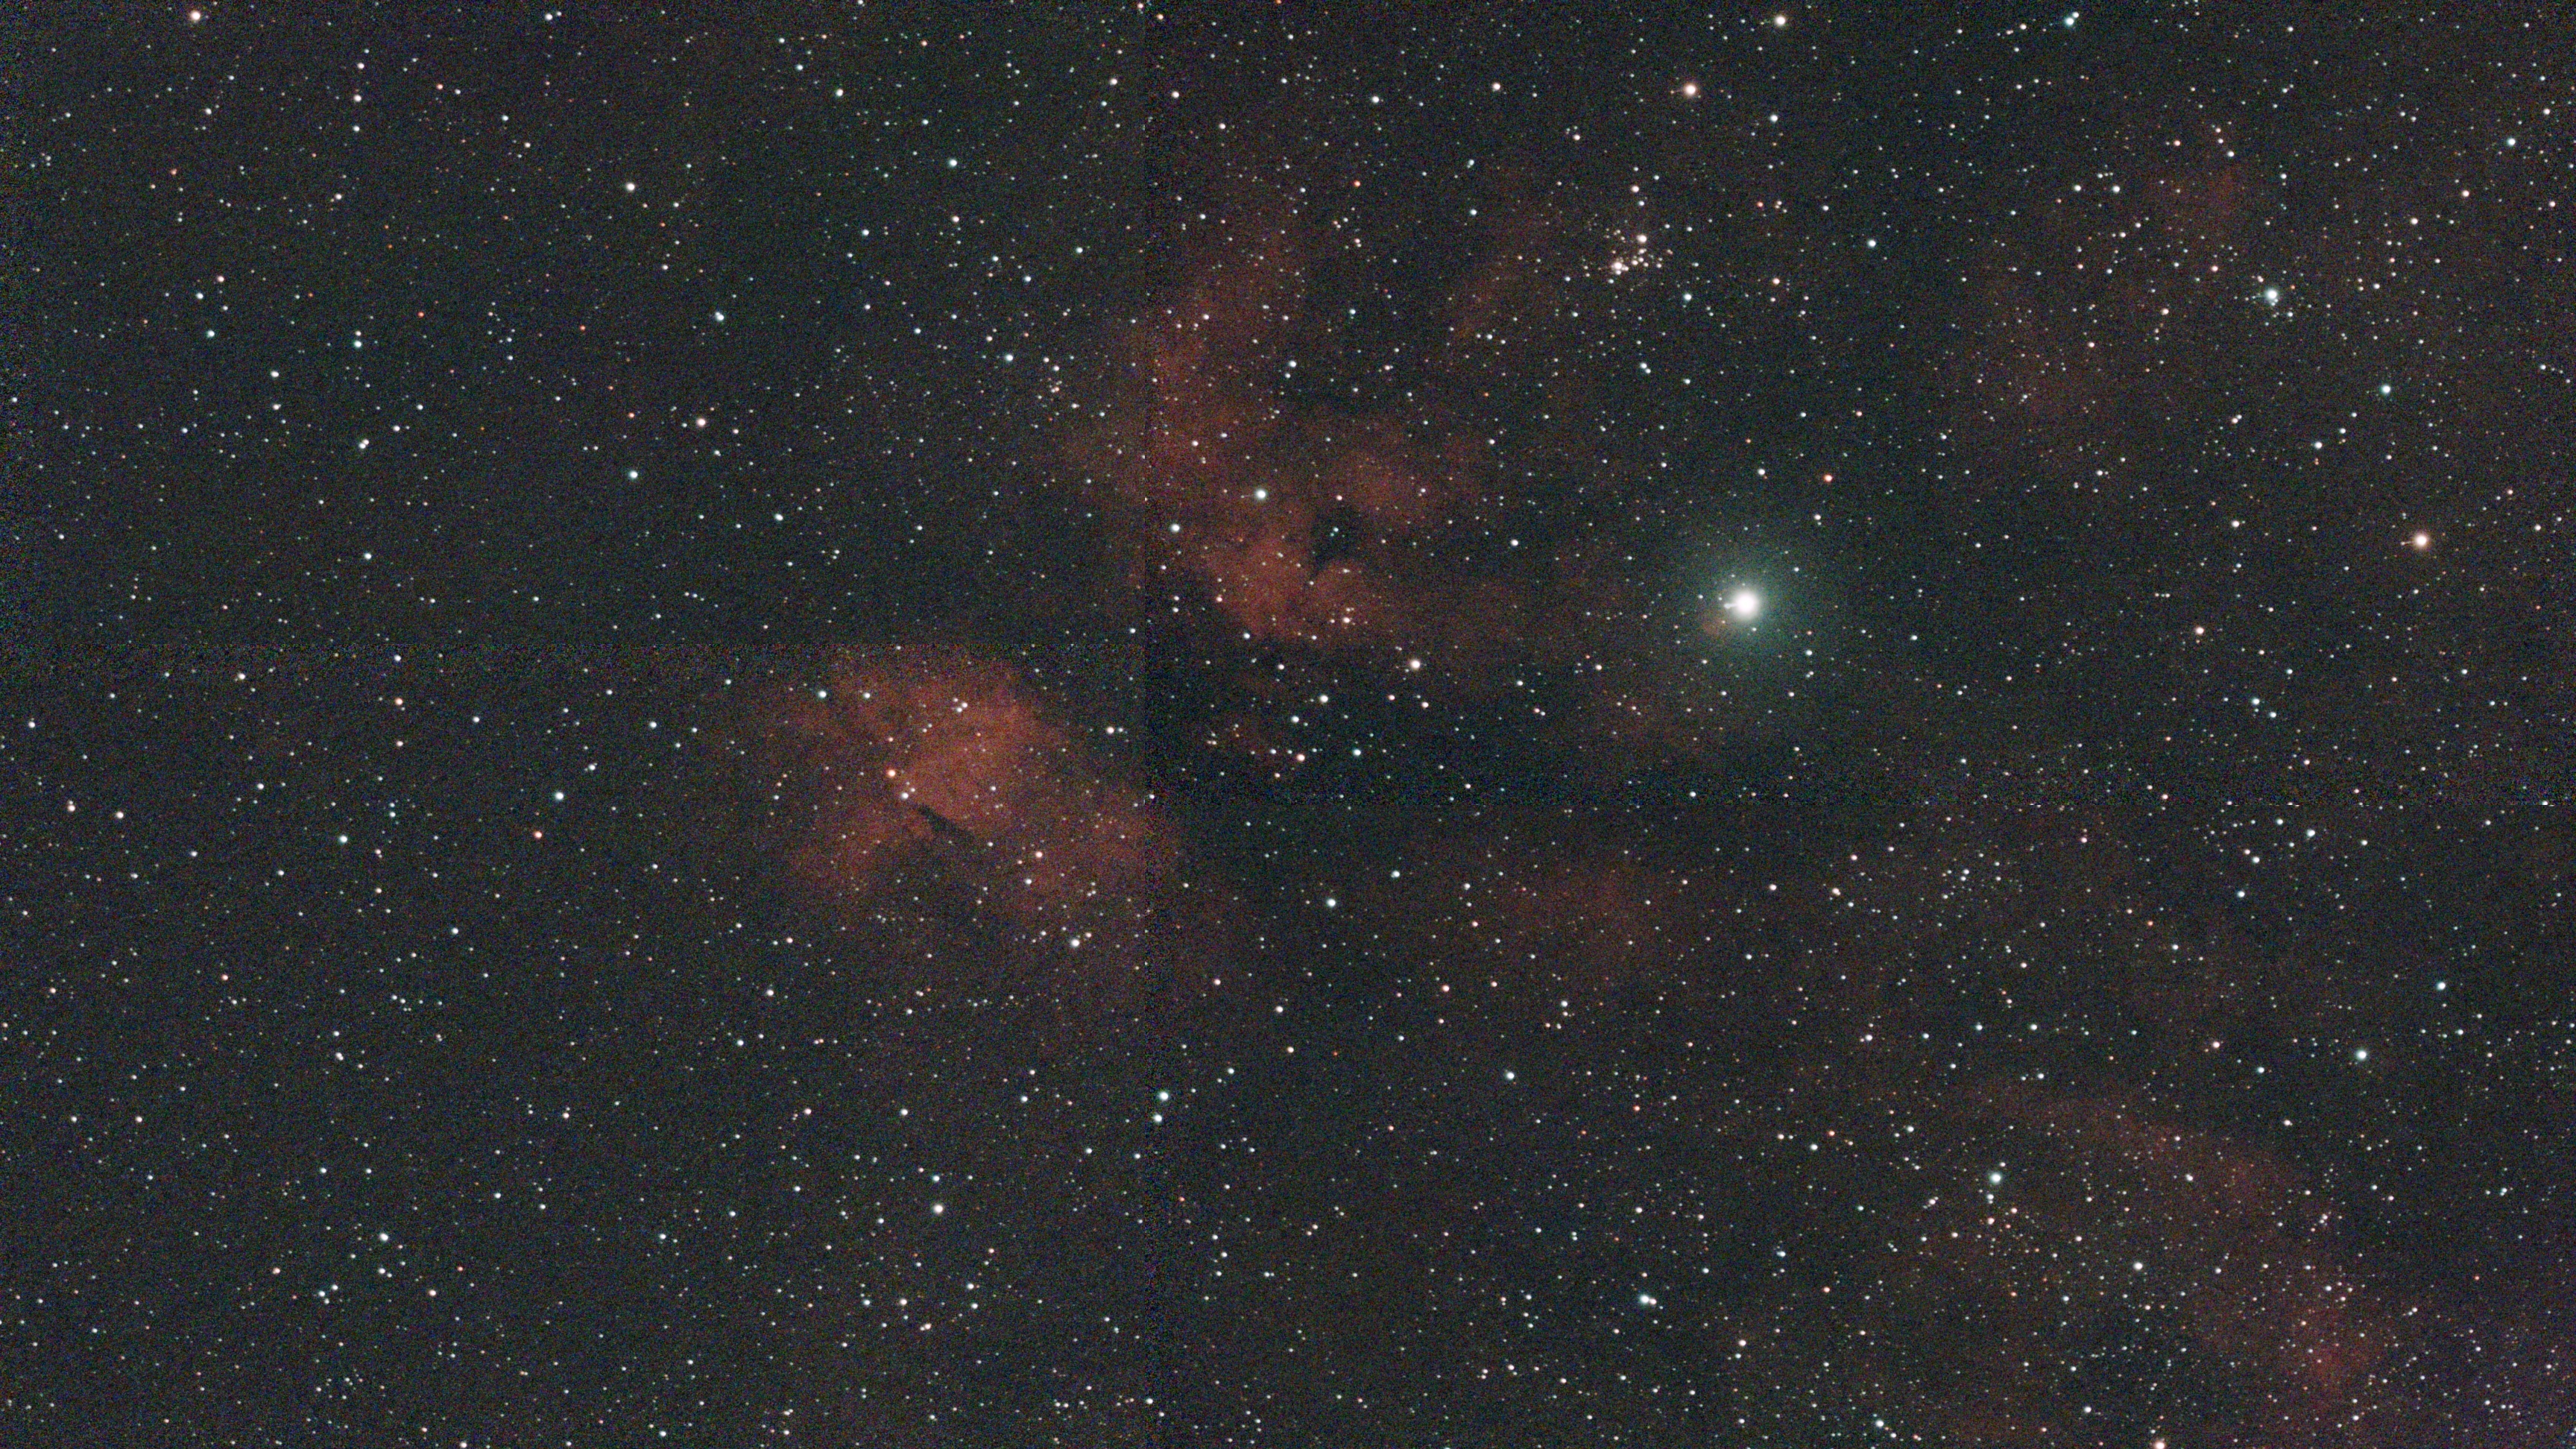 |
|---|
| Raw preview of the 2x2 mosaic of the Sadr region |
| The seams are visible, mainly because of gradients from light pollution |
To be honest, given the sky at my home, I had expected this result; the surprise came instead when I passed the image into the capable hands of Stellar Studio’s AI: after uploading the image to the cloud and waiting a little under a minute, the mosaic came back processed and with no visible seams.
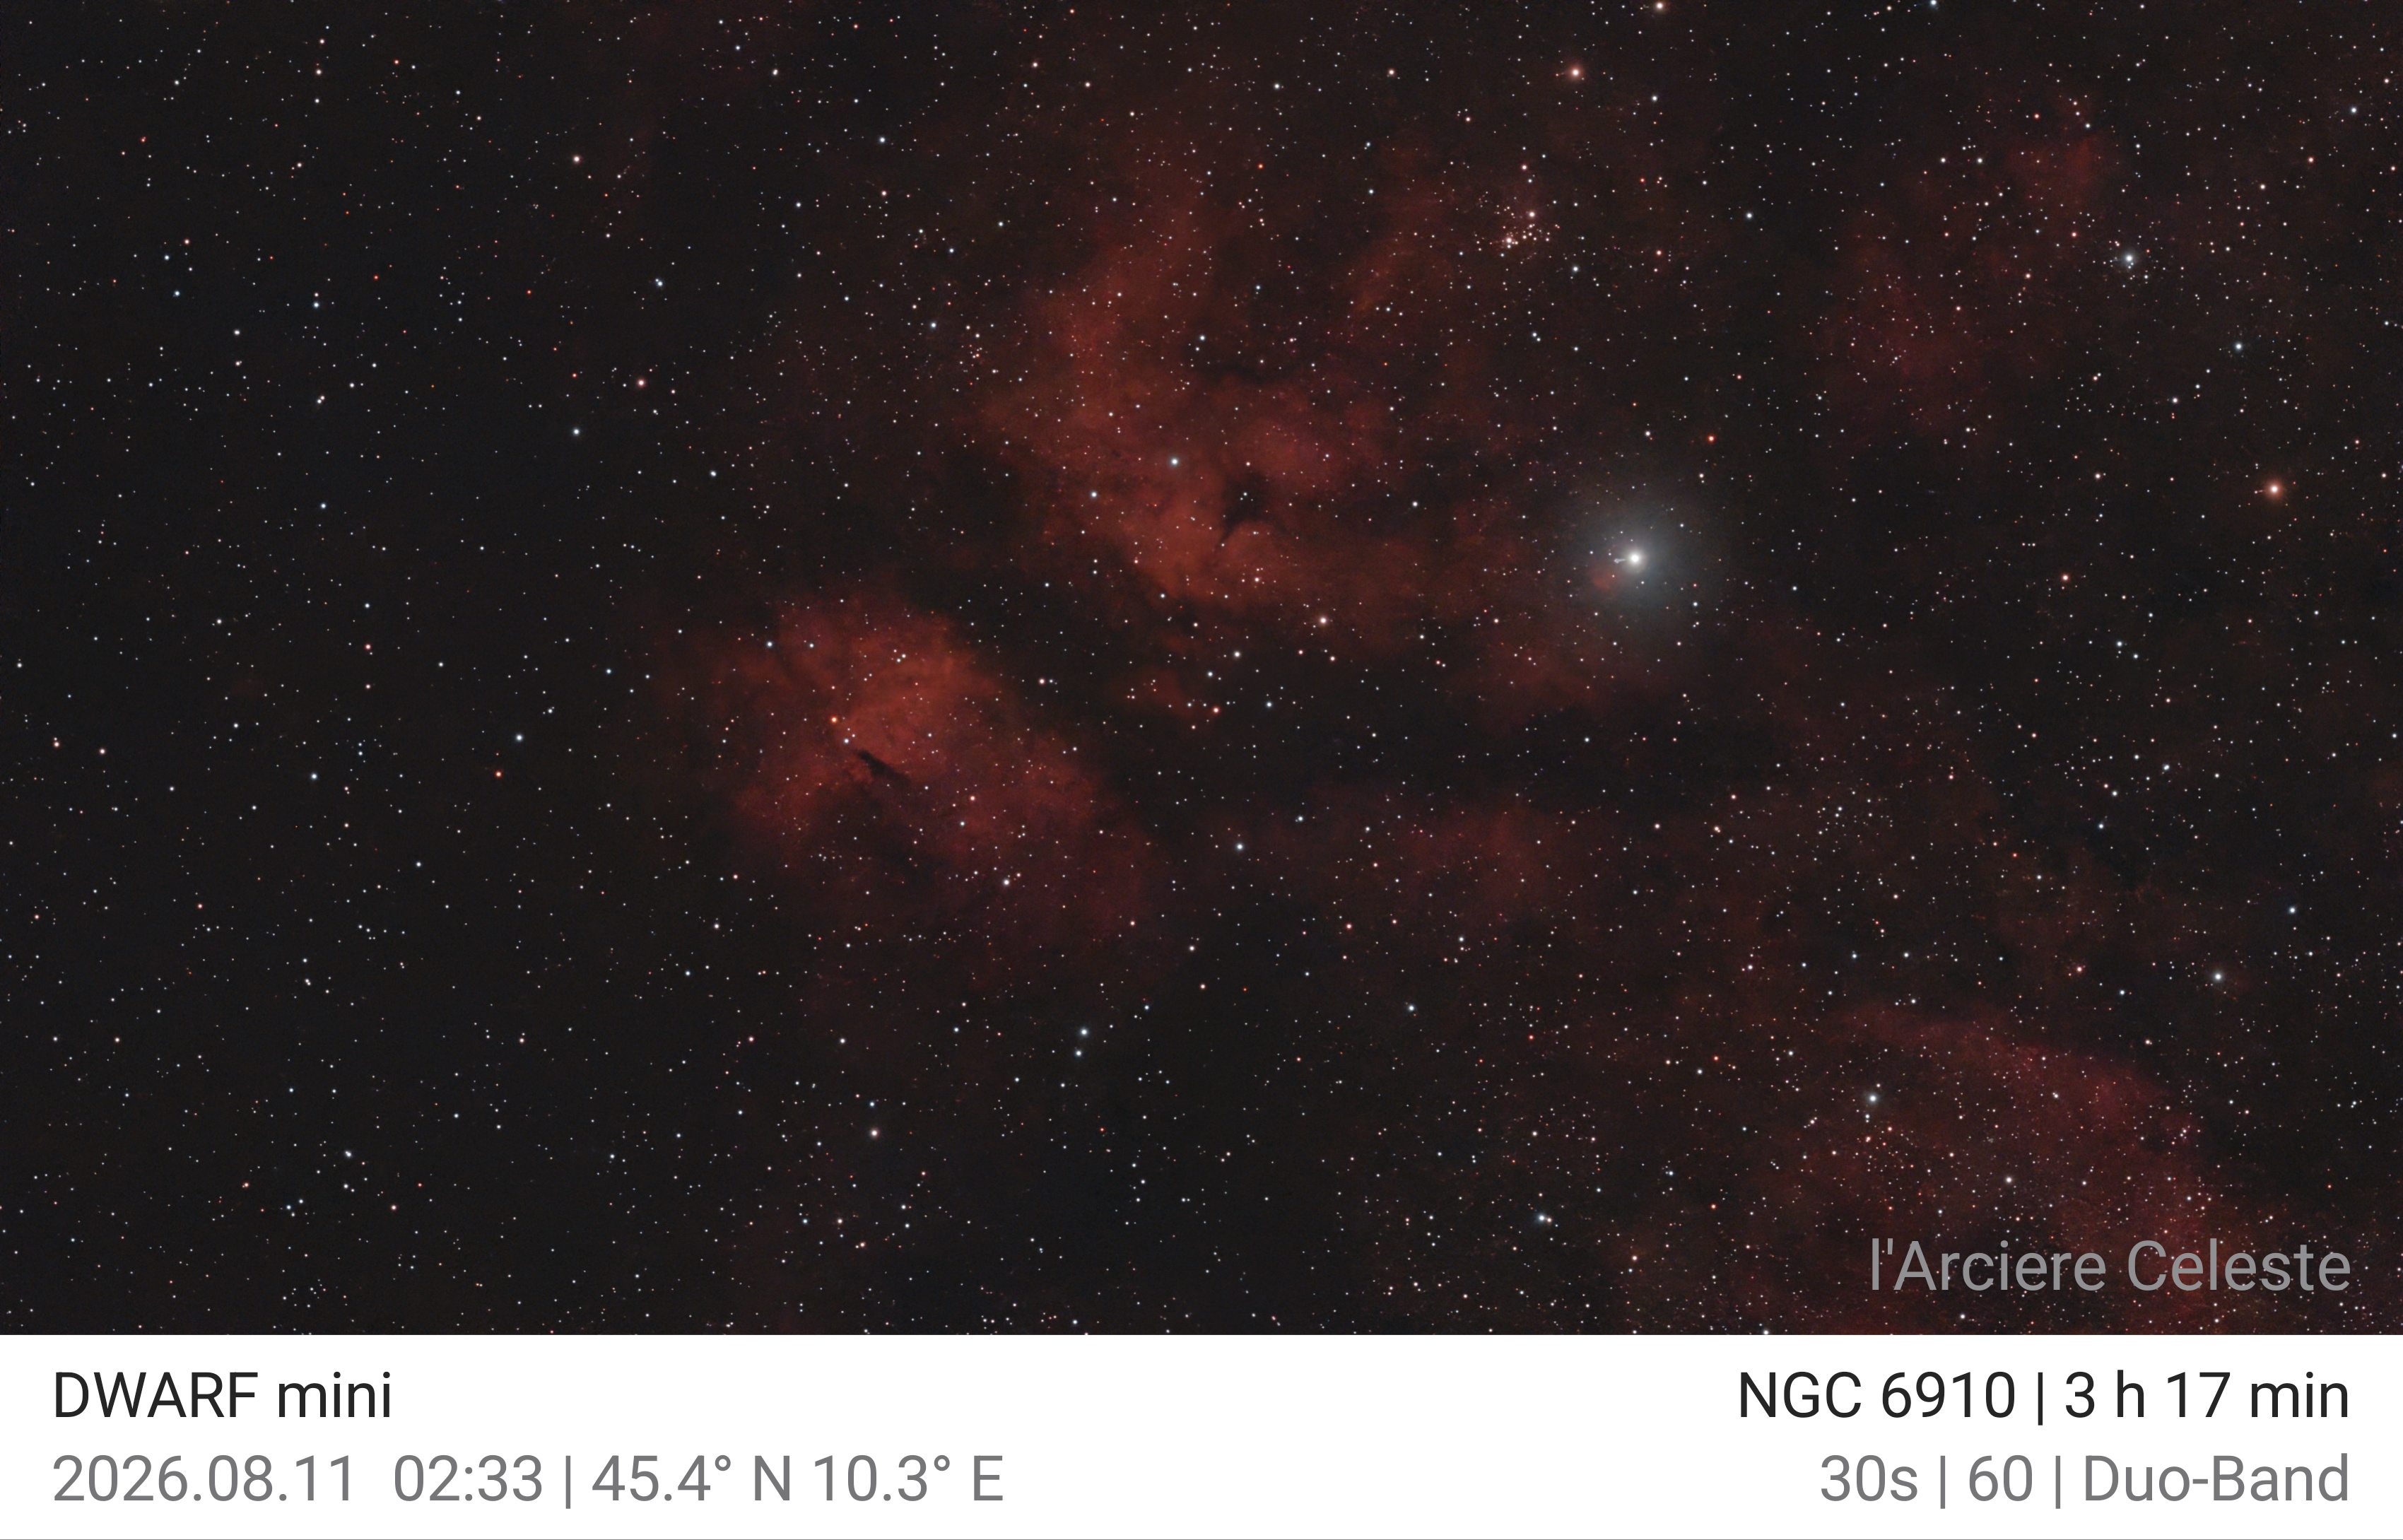 |
|---|
| 2x2 mosaic of the Sadr region acquired in equatorial mode and processed by Stellar Studio |
| Image obtained from 400 frames of 30 seconds (100 per panel) |
I still have to try assembling the mosaic in PixInsight, and achieving such a well-made blend by hand will certainly be no small job — though I am confident that the end result will be better still.
Exporting the data to a PC
As explained above, the DWARF Mini is able to acquire, stack and process images entirely on its own but, if you want to make the most of the data the instrument provides, it is advisable to export the raw files to a PC and carry out the post-processing — or indeed the whole pre- and post-processing chain — with software such as PixInsight.
Transferring the files from the DWARF Mini to a computer is simple: you connect the instrument with a USB-C cable (A-C or C-C) and the PC recognises it as an ordinary storage device. You just copy or move the files.
In theory you could edit the files directly on the smart telescope’s drive, but this is a practice I strongly advise against: NEVER work on the originals.
A practical tip: if you want to delete data from the DWARF to free up storage space, it is better to go through the DWARFLAB app (Album → Delete). It is the only way to remove folders and their associated metadata properly, avoiding leaving “orphan” files behind in the internal memory.
The folder structure
Once connected, the DWARF shows several folders, but the two that really matter are CALI_FRAME and DWARF_RAW.
CALI_FRAME is the calibration-file folder, split into three subfolders — Dark, Flat, Bias — each in turn divided by camera: cam_0 for the telephoto, cam_1 for the wide-angle. The separation is not accidental: each camera has different optics and a different sensor, so their respective calibration data must be kept apart in order to correct the image properly. Here you will find both the factory-calibrated files (bias and flat, specific to each individual unit) and the “master” dark frames generated automatically by the instrument during imaging runs.
DWARF_RAW, on the other hand, is the folder holding the light frames proper: each imaging session creates its own folder containing all the individual frames captured. This makes it possible to do post-processing entirely on your own terms.
The folder contains:
- The individual, uncalibrated FIT files from the run (including those not used in the automatic stack, marked as Failed)
- The Stacked FIT, that is the image integrated automatically by the telescope.
- Some JPEG files, probably used as previews by the smartphone software.
- A JSON metadata file (shotsInfo.json), with the target coordinates, exposure times, gain, sensor temperature and stacking statistics
And what about mosaics?
For mosaics the structure is only slightly more complex: the session folder contains one subfolder per panel, each with the same structure as a single session, and then, in the base folder, there is a JPEG showing the mosaic preview.
There is no FIT file of the mosaic itself, not least because in that case the seams would be visible (as in the preview) and it would be effectively unusable. What is more, from reading the documentation it appears that the actual assembly of the panels is carried out not in the telescope but in the cloud, through Stellar Studio.
Processing in PixInsight
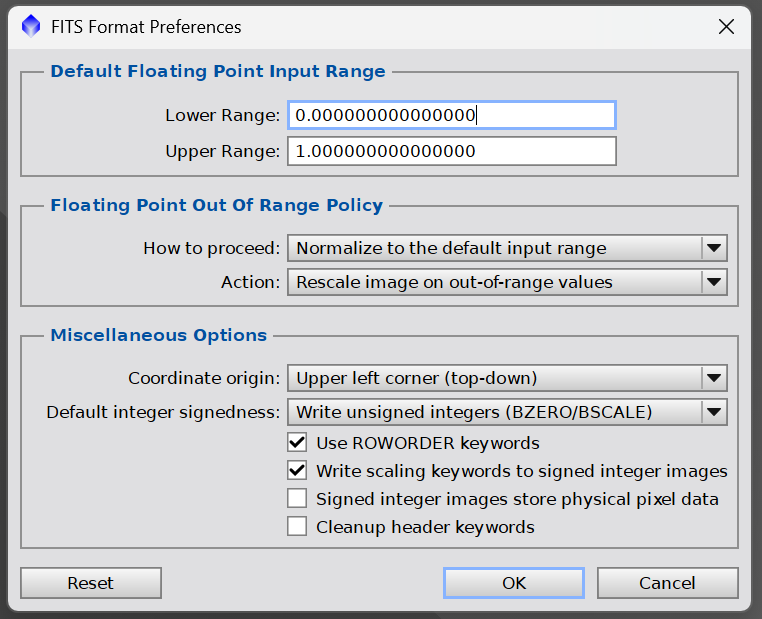
Processing in PixInsight raises no particular problems, provided you configure the handling of FITS files correctly so that the Bayer matrix is decoded properly.
The first step, then, is to set the decoding parameters using the Format Explorer
 |
|---|
The most important parameter to set is Coordinate Origin, which must be set to Upper left corner (top-down): this way the coordinate origin is read correctly and the Bayer matrix decoding therefore produces correct colours.
The second thing to watch out for concerns the master darks, flats and bias frames: they are in FITS format, but WeightedBatchPreprocessing (WBPP) accepts master files in XISF format only (the individual frames, on the other hand, can be used without any problem); moreover the FITS header lacks the metadata WBPP needs in order to assign the files correctly.
The trick, then, is to open the masters, add the missing metadata and then save them in XISF format, adding the word MASTER at the beginning of the filename.
In WBPP you then simply tick the Detect masters from path checkbox so that the master files are recognised as such.
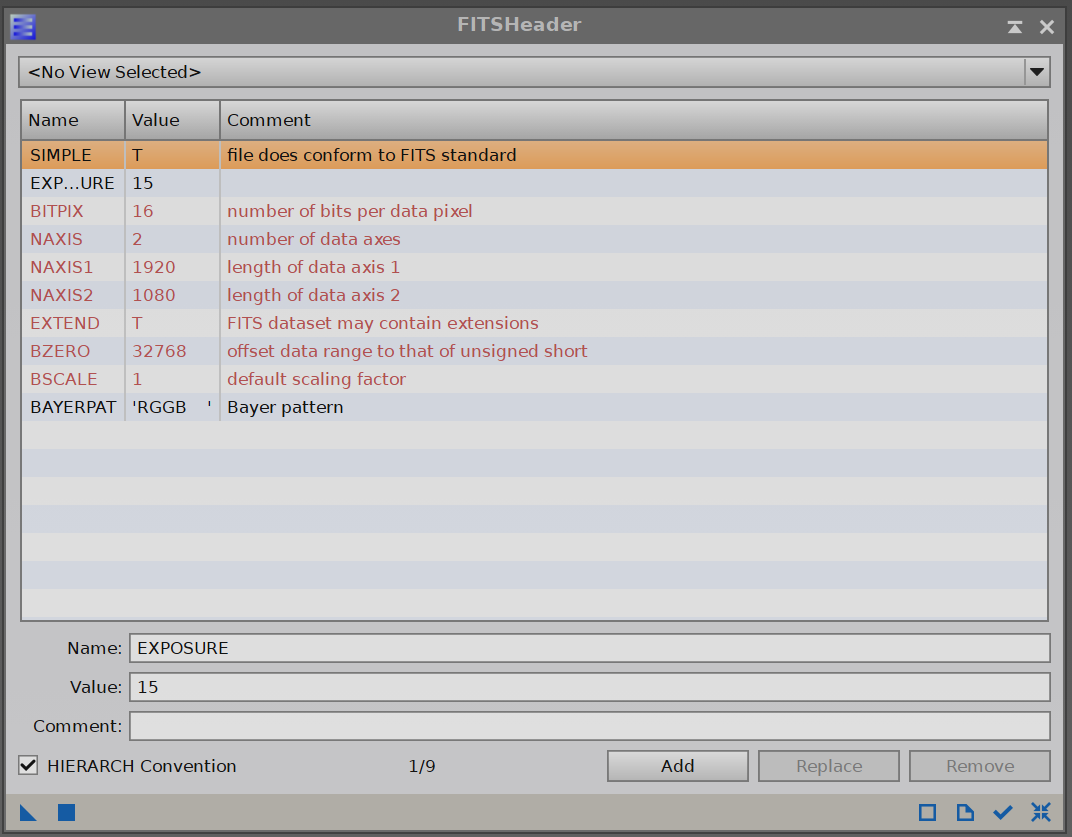
The keywords to add are:
- For darks — EXPTIME (giving the dark’s duration in seconds)
- For bias frames — you can skip the exposure time
- For flats — FILTER (giving either Astro or Duo-Band, depending on the filter used)
To do this, simply open the keyword list with the FILE->FITS Header command, add the keyword name and its value in the fields at the bottom, press Add and finally confirm the change by pressing the “Apply” button (the blue square).
 |
|---|
One last precaution, this time concerning the flats only: the files supplied by the DWARF are not calibrated, so the bias must be subtracted before saving them in XISF format. It only takes a moment with PixelMath: assign the identifier BIAS to the master bias image (the identifier is the one shown on the tab to the left of the image, and it can be changed with Image → Identifier… or, more conveniently, by double-clicking the tab itself), then apply this expression to the flat
$T - BIAS
bearing in mind that PixelMath is case sensitive: the identifier must be typed exactly as it appears in the image window. The flat corrected this way is ready to be saved in XISF.
Once saved in XISF format, the file will be recognised by WBPP and handled accordingly.
It would be nice, though, if a future firmware release already included the important metadata in the FITS header of the master files, to make users’ lives easier.
And if support for the XISF format were added as well, that would be more interesting still.
Still to be tested
I have tested many of this system’s functions (telescope + software), but a couple of tests still remain that I will certainly carry out in the future. First of all, Milky Way imaging with the wide-field camera: I am very curious to see what can be achieved with such a tiny lens (essentially a smartphone’s optics).
Another interesting function, again tied to the small wide-field camera, is star-trail imaging: here too I am waiting for dark skies to run the test.
Nor have I made any systematic measurement of the battery’s real-world runtime: I never ran flat during my sessions, but giving a reliable figure would call for a dedicated test, starting with a full charge and keeping the same imaging cadence from the beginning of the night to the end.
I have not yet been able to run an automated imaging plan in the field, but I did try creating one: at first I found the planning software slightly awkward, but once I had grasped its logic, building the plan with its various time windows went fairly quickly. Unfortunately the one thing you cannot plan for is a cloudless sky.
Finally, I have not tried the “social” features offered by the community of amateur astronomers through the app, nor the “star party” function, which lets you collaborate with other astronomers on the same target, building up long exposures on a single subject or extended mosaics.
Conclusions
As with the Seestar S30, I find myself torn between amazement at what such a small instrument manages to achieve and the fear that intellectual laziness might get the upper hand.
I have to say, though, that the DWARF Mini won me over, once I had come to terms with the limits imposed by the aperture.
The software could be improved, both in user experience and in the features. For the way I will use it the issue does not arise, because I take everything into PixInsight; anyone who stops at Stellar Studio, on the other hand, will have to accept its choices as they come, and that is where I hope DWARFLAB will step in.
The hardware, by contrast, is mature and perfectly suited to the goal the manufacturer set itself.
So who would I recommend it to? First and foremost to anyone approaching long-exposure deep-sky photography for the first time without wanting to invest too much effort: that is where the DWARF Mini is at its best. On the Moon and the Sun it can produce images that are interesting from an educational point of view, but very limited in terms of resolution, while on the planets it is essentially useless: anyone after high resolution should look elsewhere.
I would also recommend it, however, to the more experienced astrophotographer looking for an ultralight setup — one with no great pretensions but plenty of potential — who can make full use of its raw files to do things “the right way”, as the advertising on the website puts it: I think they will appreciate its playful, educational side too.
On that last point I have an anecdote: I took it with me to dinner with friends, pulled it out of my backpack, set it down in the middle of the table we had just eaten at, and within a few minutes I was showing them the brightest astronomical objects of the summer sky. Of course I still prefer observing through a telescope under a dark sky, but not everyone has the perseverance and stamina of the amateur astronomer, so I find this a good way of bringing the public closer to astronomy.
That is why the little DWARF Mini has officially joined my small family of lightweight astrophotography gear.
At this point I would love to try its brother, the DWARF 3, as well — and who knows, perhaps in the future DWARFLAB will decide to build an instrument with a larger aperture, a 50 or 60 mm say, as its direct competitors do, but with the same philosophy of compactness and portability: that really would be an interesting object to test.
EDIT: Right as I write these lines, DWARFLAB has announced the new Draco. The exact technical specifications haven’t been published yet, but it will feature a 90 mm optic, probably catadioptric, and some very, very interesting features such as a cooled sensor and a field derotator… who knows whether, sooner or later, I will manage to get one in my hands to test.