
Page translated by Claude — switch to Italian to read the original article.
As a city astrophotographer, in a city of the Po Valley — a region that suffers from one of the worst levels of light pollution in Europe — my first goal has always been to find clear, dark skies from which to shoot my images.
A dark, pristine sky makes everything easier: the images are easy to process, fainter objects can be captured in less time, and so, in general, the quality of the images is decidedly higher.
For these reasons I have always regarded shots taken from home as mere tests to fine-tune the equipment and the workflow; at most I have only ever considered narrowband shots feasible, since they greatly reduce the impact of light pollution.
Unfortunately, shooting from the mountains also has some non-negligible drawbacks: first of all you have to travel away from home, sometimes covering hundreds of kilometres to reach the chosen spot, carrying tens if not hundreds of kg of equipment that has to be set up and calibrated on site, and at the end of the night the field has to be dismantled and you have to return “to base”.
Moreover, the number of usable nights is extremely limited — restricted to new-Moon nights that are clear and fall on a weekend: a handful per year at best.
And so the idea takes shape of making photography from the polluted Lombard skies something more structural and organised than simply running tests: with the possibility of placing the telescope in the garden or, better still, of having a fixed station, the number of usable nights increases considerably.
One thing, however, must be clear from the outset: no processing technique or imaging technology can, in any way, bridge the gap that exists between a dark sky and one ruined by light pollution; so why spend time and resources knowing that the result will never match a photo taken under a mountain sky?
The reasons that push me to do it are many, but they all rest on a common fact: for me astrophotography is a hobby, from which I try to draw pleasure and relaxation:
- Shooting from home lets me increase the number of productive nights.
- The processing techniques developed for polluted skies can also be useful under better skies.
- I like to push my equipment to the limit and demonstrate that, even under barely adequate skies, it is possible to obtain pleasing and satisfying images of celestial objects.
The choice of subject was almost obligatory: the Messier Catalogue (https://en.wikipedia.org/wiki/Messier_object) is the first catalogue of deep-sky objects that every amateur astronomer learns about: it is a handful of relatively bright objects that should be accessible even from polluted city skies.
The catalogue, compiled by the French comet hunter Charles Messier and first published in 1774, is a heterogeneous collection of deep-sky objects that the astronomer catalogued and recorded so as not to confuse them with possible comets during his searches; it is no coincidence that most Messier objects are galaxies (40 out of 110), followed by globular clusters (29 out of 110) — the objects that, through the telescope, most resemble comets when they are discovered (little fuzzy patches of light with no tail).
Thus was born the Messier at Home project, abbreviated as M@H
The peculiar features of astronomical photography from city skies
What distinguishes urban astronomical photography is the continuous, invasive presence of artificial light sources that illuminate the night sky — in this case we speak of light pollution (for further information on the problems linked to this phenomenon, which go well beyond astronomical photography, I invite the reader to visit Cielo Buio).
Light pollution is a widespread problem: light spreads through the atmosphere for hundreds of km from its source and covers entire territories like a luminous bubble, erasing the stars from view, so the problem cannot be solved simply by moving elsewhere
As can be seen from the light-pollution maps (see https://www.lightpollutionmap.info/), Italy is unfortunately one of the countries with the worst light pollution in the world, and Lombardy is certainly the worst place in Italy.
 |
The map of light pollution in Europe. |
 |
The map of light pollution in Italy. |
The presence of light pollution has three important effects on imaging:
- The excess light rapidly saturates the sensor, so the exposure time of the individual frames must be shortened compared with shots taken under a dark sky.
- The brightness of the sky is not uniform: near the horizon the sky is much brighter than at the zenith, which produces an uneven illumination of the frame, resulting in brightness gradients that are difficult to manage
- The increased brightness of the sky background leads to an increase in noise in the individual frames.
The third point is certainly the most critical and it is worth exploring a little further.
An image sensor is, in effect, an instrument for measuring light: what interests the photographer is recording the signal produced by the light coming from the celestial objects.
Unfortunately, every signal recorded by an instrument is always accompanied by a certain amount of noise: a random, unpredictable variation in the measured signal.
Noise appears as a graininess in the image when it is observed at high magnification.
 |
Detail of a shot of the Pleiades where the electronic noise is evident: a single 120-second exposure with a blue filter |
A thorough treatment of noise in astronomical imaging goes well beyond the scope of this article, but it is enough to know that the sources of noise in an image are mainly three:
- Readout noise: the noise linked to the simple act of reading the data out of the sensor; it is a constant value characteristic of the sensor.
- Dark noise: the noise linked to the dark current generated by electrons produced through thermal agitation; it increases as the exposure time and the sensor temperature increase.
- Shot noise: the noise linked to the quantum nature of radiation; it increases as the recorded light increases.
Image quality is measured by the ratio between the useful signal and the overall noise of the image (denoted S/N): the higher the S/N, the better the image.
Readout noise and dark noise can be effectively reduced thanks to advances in technology — for example by designing very low read-noise sensors such as CMOS, or by cooling the camera; shot noise, on the other hand, depends on the physical nature of light and there is no way to eliminate it.
Shot noise is associated with any light source that hits the sensor, and so the most damaging effect of light pollution is precisely to increase the noise associated with the individual frames considerably; indeed, the greater brightness of the sky background increases the noise N, while the useful signal S coming from the photographed object does not change, and so S/N decreases and image quality worsens.
As we shall see more clearly later, the only way to reduce shot noise is to increase the total integration time of the images — for example by averaging, using dedicated software, many frames of the subject, as can be seen from the following image.
Techniques to mitigate the effects of light pollution
The effects of light pollution can be mitigated by combining changes both to the photographic technique and through software applications in post-production.
In all these cases it is extremely important to be able to count on powerful, fast PCs, because you will have to deal with large amounts of data; it is in this area that the valuable collaboration with MSI Italy comes in (MSI Italy website).
As an MSI Ambassador I had the chance to try one of the products in the MSI Creator P100 line, which offers fast multiprocessor CPUs and, above all, large, very-fast-access storage.
The P100 proved to be a fast and reliable machine, even when subjected to a heavy workload from PixInsight during the pre-processing of the hundreds of images resulting from a photographic project.
Let us now look in detail at the techniques that can be used to mitigate the effects of light pollution, from the shooting phase through to final processing.
Choosing the exposure time
As mentioned above, the most harmful effect of light pollution is to drastically reduce the signal-to-noise ratio of the frames because of the shot noise that becomes dominant over the other noise sources.
An interesting feature of shot noise is that, while the signal grows linearly with exposure time, the noise grows as the square root of the exposure time and therefore much more slowly: for example, quadrupling the exposure time will increase the overall signal fourfold, while the noise will only double, thus improving S/N.
Unfortunately, however, precisely because of light pollution, you cannot lengthen the exposure too much, on pain of saturating the sensor — and hence the dilemma: to fight light pollution you have to increase the exposure time, but because of light pollution you have to reduce the exposure time!
You can escape this impasse thanks to the fact that we are working with digital images that can be processed by summing them together via software: indeed, what matters for S/N is not the exposure time of the single image but the total of the whole series:
The only difference between a single shot and a series is the amount of readout noise it contains: in a single shot the sensor is obviously read only once, whereas when many shots are summed together the readout noise adds up, making the sum worse, in terms of S/N, than a single shot of equivalent total duration.
However, in images taken under a heavily polluted sky, shot noise is by far the dominant noise source, and so readout noise is absolutely negligible: under these conditions the difference between a single shot and an integrated one is minimal.
|
The detail of the Pleiades: hovering the mouse pointer will reveal the image produced by averaging 75 exposures of 120 seconds each |
So the choice of exposure time in city photography is fundamental: the exposure time must be long enough to make the readout noise negligible, but short enough to avoid having too bright a sky background, with the consequent saturation of the stars and, in extreme cases, of some details of the photographed object.
Here an interesting PixInsight script comes to our aid: CalculateSkyLimitedExposure.
This script, by analysing a single calibrated image (it is more than enough to simply subtract the BIAS), on the basis of the physical parameters of the sensor (sampling bits, gain, readout noise and possibly dark current), calculates the minimum exposure time that makes the readout noise and the dark noise (if the dark-current value is entered) negligible compared with the shot noise, using three different models.
Unfortunately the script contains a small bug, whereby the second calculated value indicates the time assuming a tolerance limit of 5% regardless of the value entered in the relevant parameter.
 |
Example of using the CalculateSkyLimitedExposure script |
Unfortunately the original documentation describing the theoretical basis and the calculations on which the script is based is no longer available online, but using the script is very simple: you load the calibrated image and create a small preview over a region of background sky.
You set the parameters of your CCD/CMOS, which can be found in the sensor’s data sheet or measured using the BasicCCDParameters script, you indicate the preview to be used in the calculation and you set the exposure time of the examined image; the script will instantly provide the three ideal exposure-time values.
The minimum exposure time to use, in order to minimise the effects of readout noise, is the maximum of the three indicated values; using a time much longer than the suggested one would have very little advantage in terms of improving S/N but would entail an increase in the overall brightness of the image, with a potential loss of dynamic range.
In the example above, therefore, the recommended time was 2 minutes and 33 seconds, so I decided to use exposures of 3 minutes.
Note that this principle does not apply only to astronomical photography from polluted skies; it can also be used under dark skies to determine the ideal exposure time, but in the case of light pollution it becomes even more important.
While there is a precise rule for determining the exposure time of the single frame, unfortunately the same cannot be said for determining the total exposure time.
The gap between a dark sky and a polluted one depends strongly on the brightness of the photographed subject; on a bright subject it may be enough to lengthen the exposure time by 3 or 4 times, while on faint subjects the gap can become practically unbridgeable.
Theoretically, by suitably lengthening the total exposure time, from the city you could obtain exactly the same results you get from the mountains, but the total exposure times required quickly become impractical as the subject becomes ever fainter.
If, in order to obtain a result comparable to what you would get in a single night under a dark sky, I have to invest twenty nights under the city sky, then the game is no longer worth the candle and the advantage of having more nights available is completely cancelled out; this is the main reason why, in this project, I decided to focus on the Messier catalogue.
At this point the only guideline is: Integrate as much as possible so as to obtain the “deepest” image possible, compatibly with your own patience.
As you can see, the rule is extremely subjective, but modern astronomical photography is made of very long exposures that bring out details unthinkable until a few years ago, and astronomical photography from the city must be no different, with all its limitations.
So total exposure times of 15 hours or more will not be unusual.
Filters
Light pollution comes mainly from public street lighting. Until a few years ago this lighting was based on lamps that emitted light only in certain limited regions of the electromagnetic spectrum: the most common were mercury-vapour and sodium-vapour lamps.
In past years, therefore, various types of filters had spread to counter light pollution; these filters selectively blocked the wavelengths typical of street lamps, proving very effective in reducing their interference.
Unfortunately, in recent years LED technology has become very widespread, both for public and private lighting; unlike gas lamps, LEDs have an essentially continuous emission spectrum that is, in effect, impossible to filter, so anti-light-pollution filters are gradually losing their effectiveness.
For this reason I personally do not use anti-light-pollution filters.
The matter is different when it comes to narrowband filters: these filters are designed to select a very narrow region of the spectrum around the emission lines of certain astronomical objects, excluding all the rest of the light: typically the alpha line of the hydrogen Balmer series, the doublet of the forbidden transition of doubly ionised hydrogen (OIII) and the emission line of ionised sulphur (SII).
Although it is not their primary purpose, these filters are extremely effective at suppressing light pollution and allow very deep shots to be taken even from city skies.
Unfortunately not all celestial objects are suited to imaging with this technique: all objects that have a continuous emission spectrum, such as galaxies, open and globular clusters and reflection nebulae, gain no benefit from this technique, which remains limited to emission nebulae (HII regions, planetary nebulae and supernova remnants).
Spiral galaxies deserve a separate mention: although these objects emit predominantly with a continuous spectrum, they often have large HII regions that can benefit from the use of H-alpha filters to highlight star-forming areas.
In these cases a hybrid technique is used that allows the H-alpha images to be blended with normal colour images (see, for example, my tutorial Enhancing HII regions in spiral galaxies or the YouTube video Integrating H-alpha emission into astronomical images: two PixInsight-based techniques).
Recently, manufacturers have begun to produce multiband narrowband filters that allow several spectral bands to be captured at once in a single shot without losing the effectiveness of a traditional narrowband filter. These filters are extremely interesting, especially for those who shoot with colour cameras.
Pre-processing techniques
After the data-acquisition phase comes the moment for pre-processing: the calibration and integration of the very many individual frames that make up the session: for example, a session with a total exposure of 5 hours (not very much, considering what was said above) with individual shots of three minutes each will contain 100 frames; for those who shoot with monochrome cameras the sequence must be repeated for each R, G, B and possibly H-alpha and OIII filter.
So a typical session may contain over 500 images, to which the calibration files are added: bias, dark, flat, dark flats; it is therefore not unlikely that almost a thousand images have to be processed for each photographed object.
It thus becomes clear how the PC to be used is not a mere “accessory” of the content-creation pipeline — it becomes a load-bearing element.
The Creator P100 PC entrusted to me by MSI Italy has a 1 TB SSD which, thanks to its read and write speed, makes it possible to improve PixInsight’s performance significantly during pre-processing; the CPU, with 8 processors and 16 threads managed in parallel by PixInsight, makes it possible to speed up the calibration and image-stacking operations, appreciably reducing processing times.
From the point of view of pre-processing in PixInsight it will be useful to use tools that allow images affected by strong brightness gradients to be handled at best:
After the alignment phase, tools such as LocalNormalization or integration settings such as Adaptive normalization can help make the gradients simpler and therefore more easily manageable.
A very interesting script also comes in here: NormalizeScaleGradient, which makes it possible, in a single step, to simplify the gradients, normalise the images and assign them a weight based on quality.
The common goal of these tools, designed specifically for difficult situations, is not to eliminate the light-pollution gradients but, as mentioned above, to make them simpler and therefore much easier to handle in post-processing.
The initial post-processing phase.
Once the pre-processing phase is finished, you move on to the actual processing of the image: one of the first steps to perform is certainly the one concerning gradient reduction.
PixInsight offers two specific tools for gradient reduction: AutomaticBackgroundExtractor (ABE) and DynamicBackgroundExtraction (DBE).
ABE is an excellent tool for handling very simple gradients, for example for narrow-field shots with long focal lengths where the gradient usually has no localised “bubbles” or “holes”.
DBE instead, if used well, is able to resolve even very complex situations: if the pre-processing tools have been used correctly, gradient removal should not be too demanding, provided there are good reference points on the image.
DBE, in fact, uses sampling points (sample points) placed on the background sky to compute a mathematical model of the gradient and subtract it from the image; the general rule says it is better to place a few points in the right positions than many points very close together, which can create “perturbations” in the model that inevitably translate into the production of artefacts.
A very important rule is never to place the samples near objects, so as not to incur the so-called doughnut effect, an over-correction of the gradient that produces a dark halo around the objects.
Unfortunately, in some cases (extended objects in which it is difficult to find reference points for DBE, or very complex gradients) it is not possible to find a good set of sampling points and so gradient reduction becomes virtually impossible.
In these cases a technique suggested by Vicent Peris on the official PixInsight site (Multiscale Gradient Correction) and presented during a webinar held on my YouTube channel (Gradient removal in PixInsight – Vicent Peris Baixauli’s multiscale method) can become fundamental.
In short, this method uses an image of the object taken with a shorter focal length than the main telescope to build a model of the gradient to be subtracted from the main image: the correction image can be taken together with the main image (for example by placing a telephoto lens in parallel with the main telescope) or it can be taken separately, perhaps under a better sky.
Thanks to this technique it is possible to correct even extremely complex gradients, or gradients on images where it is not possible to find a suitable group of sampling points.
The disadvantage is that you will have to take a double set of images, and so the processing work will be doubled.
Another extremely important operation is noise reduction: indeed, despite taking long exposures and summing many images, a certain amount of noise always remains.
For this PixInsight offers numerous tools dedicated to this purpose: noise reduction can be performed at various moments during the image-processing phase and constitutes a fundamental part of producing pleasing images.
To explore the subject further, see, for example, the video Denoising techniques as a building block of a composite image on my website, or the technique suggested by Jon Rista on his website (PixInsight Tips: Effective Noise Reduction).
After this first phase, image processing proceeds as usual and so falls back on the processing techniques of traditional astronomical photography.
The first tests
So what should anyone who takes on this challenge expect?
Here are the first results obtained from home on the outskirts of Brescia, including a couple of tests on M99 and M101, when the project was still in its embryonic phase: the links point to the relevant images in my Astrobin gallery, where you will be able to read all the technical data of each image.
The sky has an average SQM of around 18.7, which places it at a quality level of about Bortle 7 (https://en.wikipedia.org/wiki/Bortle_scale)
I will soon create a page dedicated to the project, where I will collect all the images that, over the coming months and years, I will gather; in the meantime they can be seen collected in the Astrobin gallery https://www.astrobin.com/users/astroedo/collections/6341/
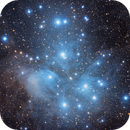 | 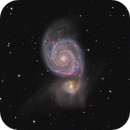 | 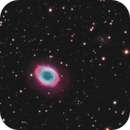 |
M45 | M51 | M57 |
 | 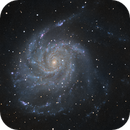 | 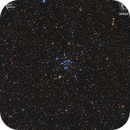 |
M99 | M101 | M34 |