

Page translated by Claude — switch to Italian to read the original article.
A few months ago (April 2024) I was contacted by Alessandro Roso and TS Italia Astronomy to try out a new flatbox.
The matter seemed interesting to me right away, since the acquisition of flat fields for an accurate calibration of images has always been one of the most debated topics in the world of astrophotography.
The Flat Killer 20250 is a flat box based on LED technology but with special diodes that have been studied, calibrated, composed, and built specifically for this type of product.
TS Italia Astronomy provided me with supporting documentation and illustrated the process by which these special continuous-spectrum emitters were built.
Moreover, the characteristics that immediately seemed interesting to me were the panel’s large dynamic range of brightness, selectable both manually and via the Ascom driver, and the almost “flat” emission spectrum.
The first characteristic is important when using different optical configurations with broadband and narrowband filters: a wide dynamic range allows exposure times to be kept comparable to one another even with very different optical systems and filters.
The advantage of this characteristic lies in the fact that you will not have to acquire different flat darks for each filter or optical configuration: it is enough to memorize the right panel brightness for each configuration and always expose with the same exposure time.
The essentially flat spectrum, on the other hand, becomes important when photographing with color cameras: having a balanced spectrum exposes the three RGB channels equivalently, and therefore the three flat fields (captured simultaneously with a single shot) will have the same signal-to-noise ratio.
Furthermore, if during calibration you do not perform a separate per-channel normalization, having a more balanced spectrum will help reduce the color casts introduced by the flat.
First impression
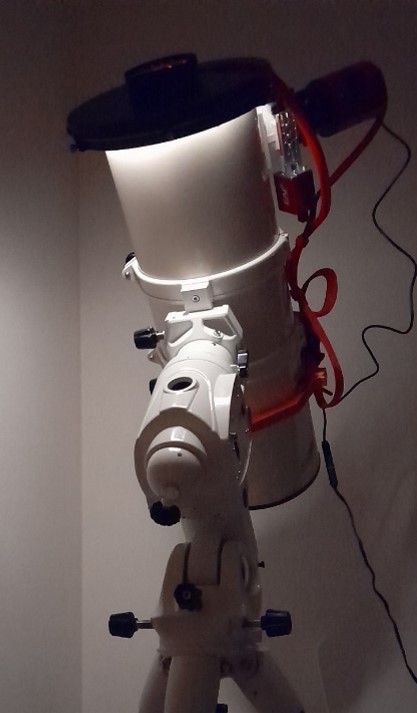
The first impression upon opening the box was one of great solidity and excellent workmanship, with an all-metal structure of about 32cm for a total flatbox weight of about 1900g. The electronics are housed in the upper part inside a plastic case with a transparent red closing window so that, during the night, the light of the OLED display does not disturb the user’s eyes.
The box contains the flatbox and a sheet with a QR Code that allows you to download the user manual and the Ascom drivers. The basic version therefore does not include any power supply or USB connection cable, which can in any case be chosen as accessories when ordering: the system is compatible with standard USB cables and power supplies.
If the user has kits such as Asi air or external power supplies, to power the panel a DC 5.5x2.1 power jack cable connected to a 12 V battery or a direct-current power supply providing at least 1 Ampere at 12 Volts is sufficient.
The flatbox is circular in shape with a raised edge so as to fit over the tube without risking falling, and has a usable diameter of 25 cm.
|
|


If the tube diameter is sufficient, the flatbox can be locked thanks to 3 screws arranged at 120° easily operated thanks to the knurled knob (all metal with a protective rubber tip on the end). If instead the tube is smaller, you can purchase a 3D-printed adapter: in this case the three screws act as a lock for the adapter.
The interesting thing is that, if you own a 3D printer, you can build the adapters completely on your own, since the print files are provided free of charge.
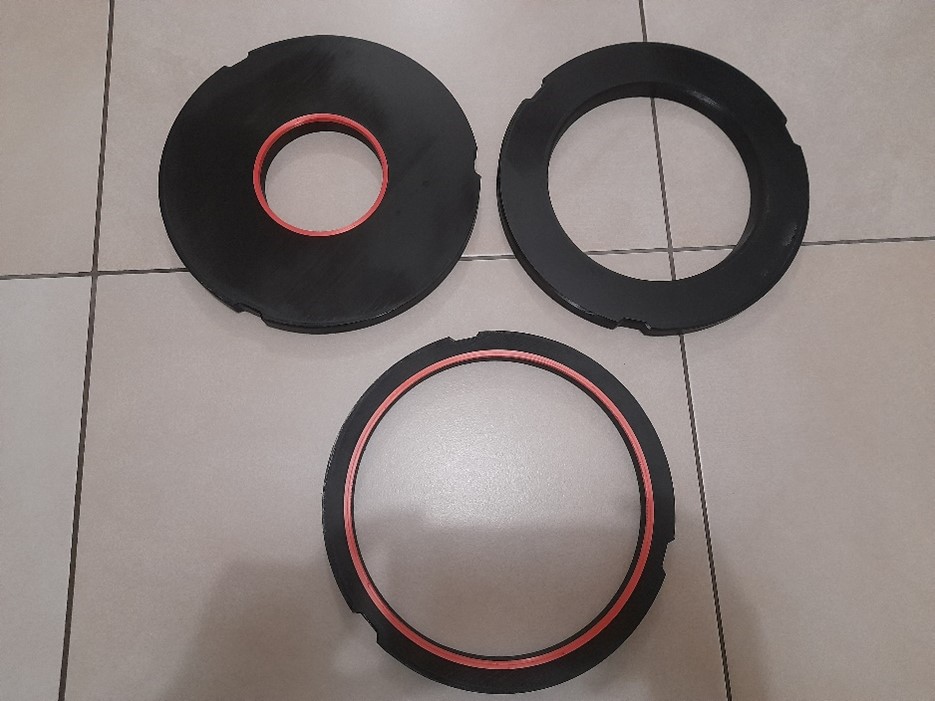
On the rear part is the panel, with a red window, for manual control of the flat box, equipped with six buttons and a 1.3-inch OLED that displays the flatbox settings.
In this area there is also the connector for the 12 V direct-current power supply and the USB-C connector for connection to the PC.
Getting familiar with the six little buttons, especially in the dark, takes a bit of practice, but after a while it all becomes fairly automatic. From this point of view I found the instruction manual very well made even if extremely concise; it explains the procedures for putting the flatbox into setting mode, for changing the operating mode (Standard for fast optical systems and broadband filters and Blind for slow optical systems and narrowband filters) and for memorizing and reusing up to 4 “presets”: a tip — if you use the flatbox in manual mode and if, like me, you photograph twice a year, keep a copy of the manual handy to review the functions of the various buttons.
Control via ASCOM, on the other hand, does not require the use of the keypad and switching from one mode to the other; simply, from the capture software, you set the panel brightness between 0 and 512.
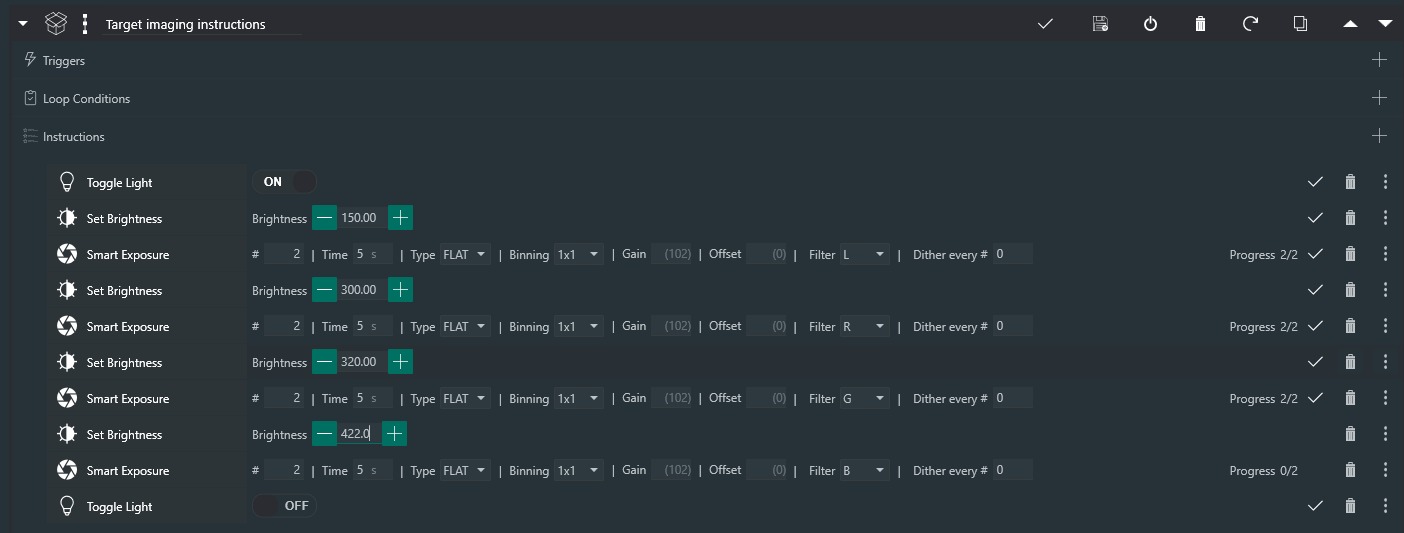
I tested its operation with N.I.N.A.. The connection to the ASCOM driver is very fast and gave no problems; I created a simple sequence (setting random brightness values, just to test its functionality) thanks to the advanced sequencer, which allows complete control of the flatbox, and everything ran smoothly on the first attempt.
Below you can see an example of a command sequence that allows the acquisition of flats with different filters.
The tests
I received the flatbox in April 2024 and I would have liked, after the “benchtop” tests, to test it on the sky with my Celestron C9.25; unfortunately spring 2024 for those living in Lombardy was one of the rainiest in history: from April to June I was unable to shoot even a single image. In agreement with the TS Italia Astronomy technicians we therefore decided to skip this part which, although important, is, in my opinion, secondary compared to the indoor tests, especially considering the fact that the light-pollution gradients typical of my imaging site could easily be mistaken for flat application errors and would therefore be of little significance.
Test 1: Color
One of the main strengths described in the Flat Killer 20250 datasheet is its broader emission spectrum compared to other similar products.
A typical problem of all flatboxes based on electroluminescent panels and of many based on LED technology is the strong deficiency in the red channel.
This has several drawbacks, as mentioned above:
- Monochrome cameras
- To have flats exposed in a similar way it is often necessary to greatly lengthen the exposure times in the red, Halpha, and SII channels.
- Having flats with different exposures, it is necessary to also acquire flat-darks with different times, making the calibration phase more complex
- Color cameras
- The red channel turns out to be underexposed and therefore has a worse signal-to-noise ratio
- The lack of red in the flat produces a strong excess of red in the calibrated image (if the calibration software does not allow per-channel normalization) which makes color calibration more difficult.
Flat Killer 20250 aims to mitigate these effects thanks to a more balanced panel and with greater brightness in the red channel, thinking above all of those who photograph in narrowband.
Unfortunately, I do not have a spectrophotometer but I still wanted to carry out an empirical test to verify this claim.
I captured flats with a Baader-modified Canon 60D and then performed a rigorous white balance using sunlight as a reference.
The result was what can be seen in the figure

As can be noted, the flatbox does not have the classic green-blue cast that is noticeable in many commercial flatboxes.
As a further test I used the flat to calibrate a daytime image in order to verify the induced color cast.
It is essential to remember that the introduction of a color cast, after using the flat in color cameras, is a perfectly normal and expected effect, provided that this imbalance is not excessive (as sometimes happens with electroluminescent panels).
Note that the saturation of the images has been increased so as to accentuate the cast.
 |  |
| Original image with daytime white balance | Image calibrated with Flat Killer 20250 |
 |
| Simulation of an image calibrated with a standard flatbox |
Normally, when doing this test, the calibrated image shifts decidedly toward red (as can be seen in the simulated image above), often in a way that is hard to recover; in the case of calibration with Flat Killer 20250, instead, the color takes on a slightly magenta tone, confirming the fact that the red channel is decidedly more intense than in other flatboxes and, above all, the blue is not as dominant as with conventional LEDs; in fact, the shift to magenta denotes a slight excess in the green channel with the red and blue channels balanced.
It must be noted that this cast can be completely cancelled by using software, such as PixInsight, that allows per-channel normalization of the flat; however, this function would not correct a possible worse signal-to-noise ratio in one of the channels: if a given channel has a very evident deficit, then the calibrated images will be noisier in that particular channel.
To have confirmation of this observation, I asked the TS team for the actual spectrum of the flatbox: see the illustration that follows
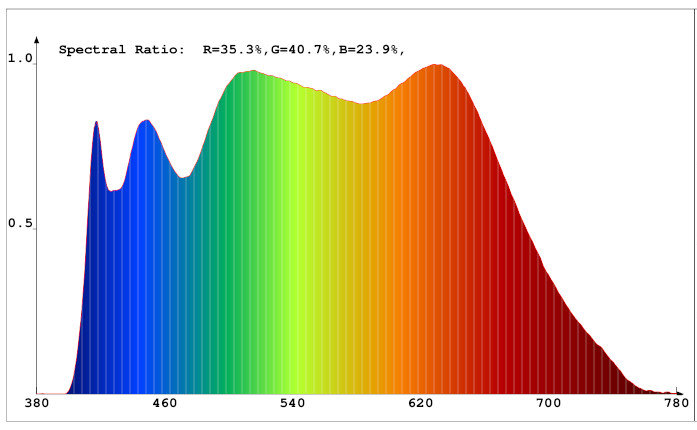 | 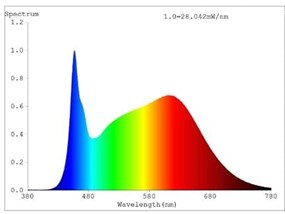 |
| Spectrum of the Flat Killer 20250 | Spectrum of a conventional 4000k LED |
Test 2: Brightness
Right from the very first tests the Flat Killer 20250 demonstrated its great range of brightness.
As mentioned above, via the manual panel it is possible to set two working modes, Normal and Blind; each mode then has 256 levels: the highest level of Normal mode corresponds, in fact, to the lowest level of Blind mode.
In PC-managed mode via ASCOM the two modes do not exist: the values in the 0-255 range correspond to Normal mode, those in the 256-512 range to Blind mode.
To understand how the brightness of the flatbox varies, I tried to take some measurements, again using the faithful Canon (obviously after verifying its response linearity); for each setting I took five measurements so as to also verify its stability (which proved to be excellent).
Two different laws came out for the two operating modes: a power law for the low range and an exponential one for the high range, as can be seen from the images that follow.
Note that the dynamic range of the flatbox is so wide that the Canon was unable to handle it, and I therefore had to discard some points in the bright part of the plot of both tests because the camera went into saturation.
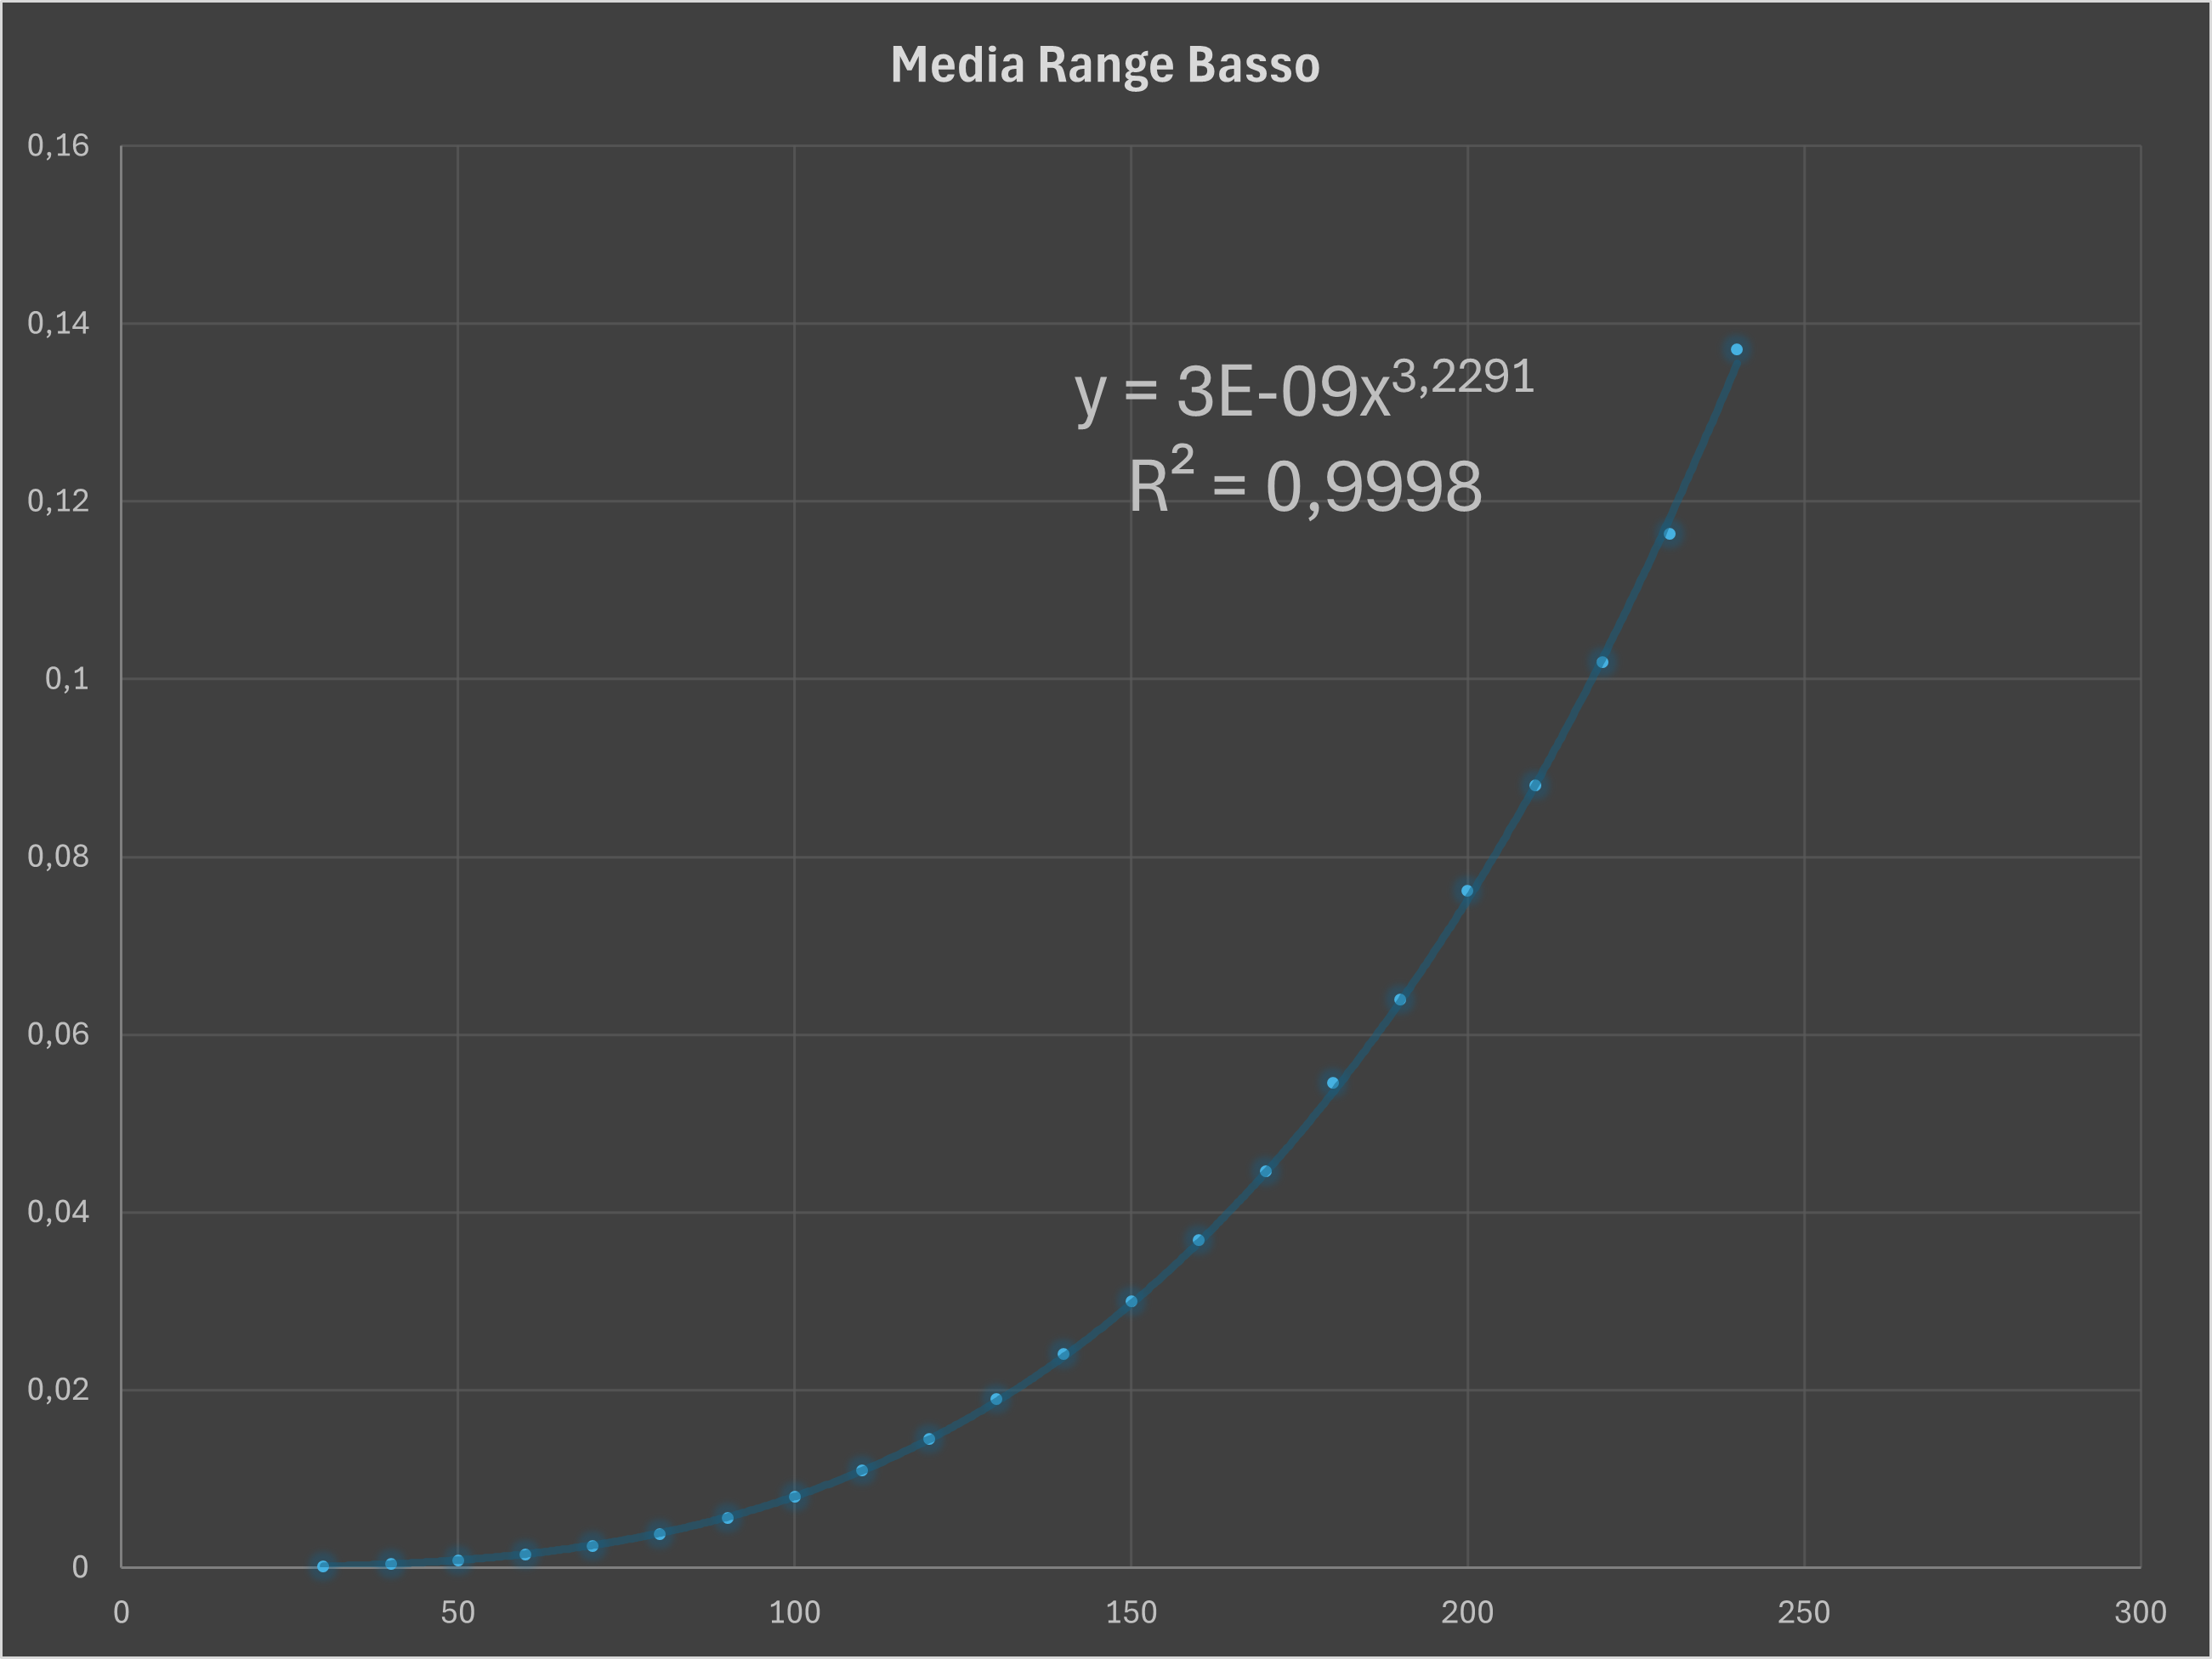
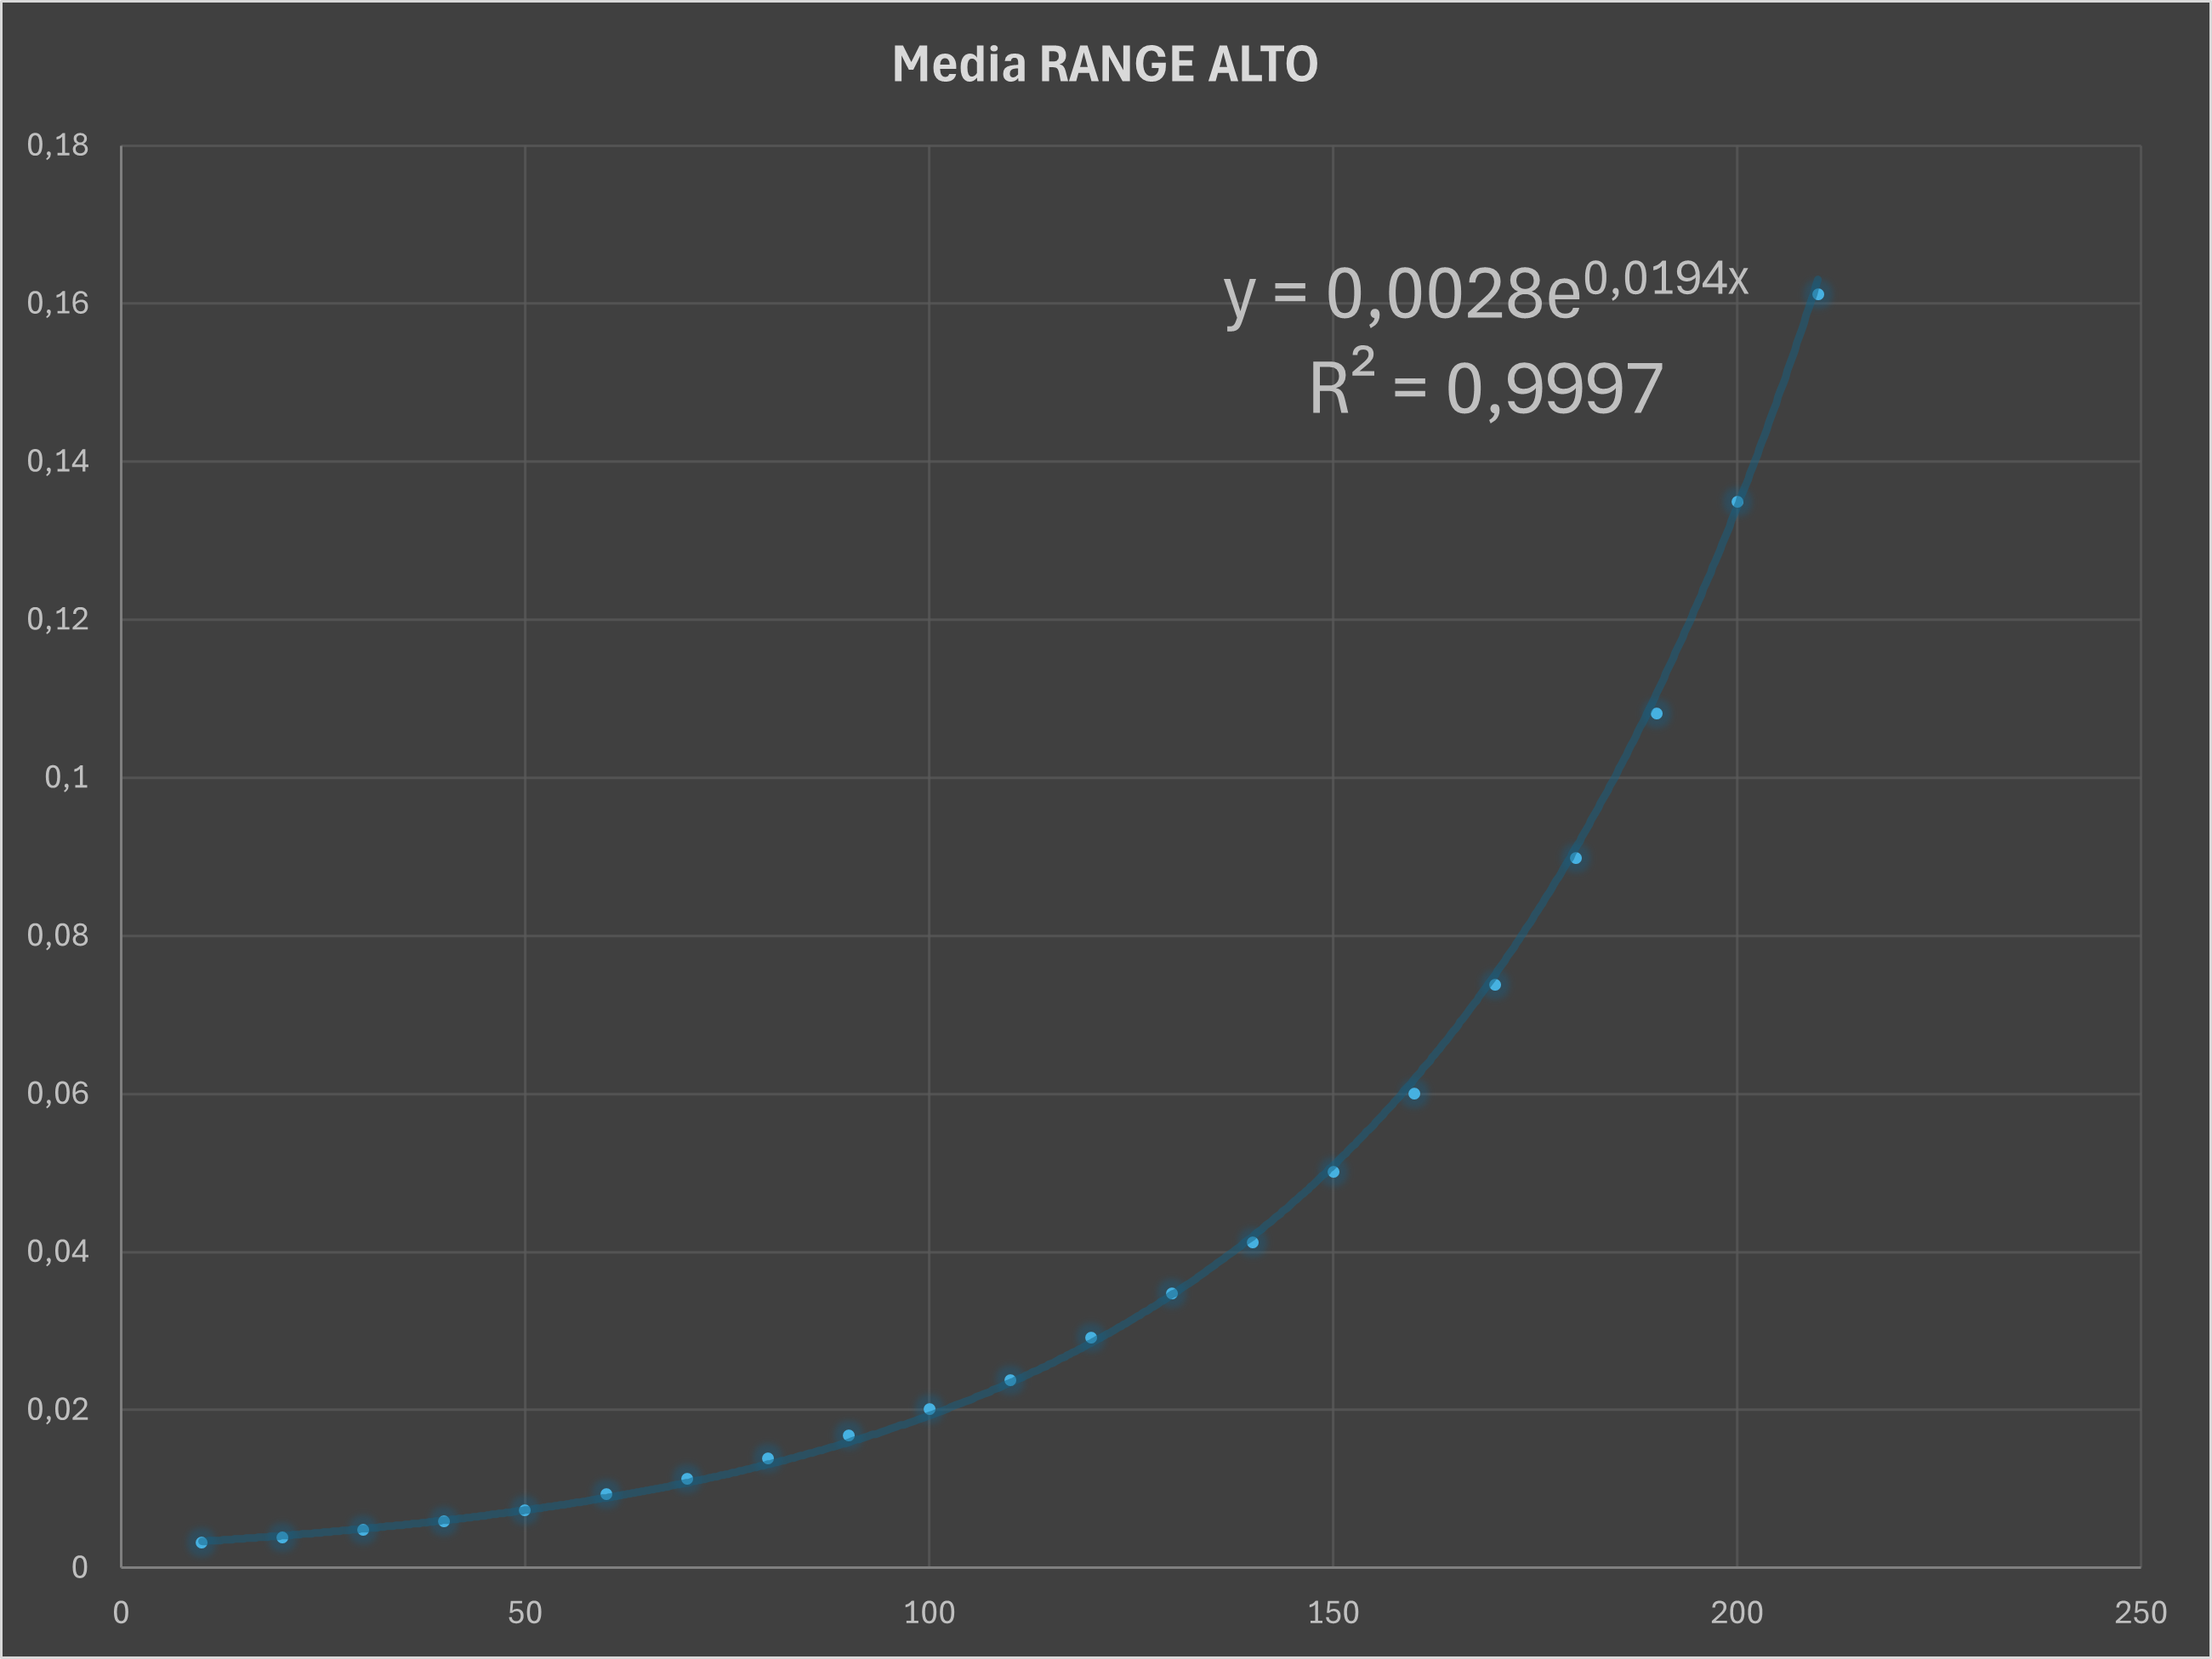
This observation says nothing about the quality of the flatbox; it is only information that might be useful to those who want to understand how the brightness varies as a function of the set value.
Personally I would have preferred a linear law between setting and brightness, which in my opinion would make it easier to know by how much to increase the value to obtain a given increase in exposure. When questioned about this, the TS Italia Astronomy technicians explained to me that the choice of these curves was made deliberately so as to have more precise control of the brightness in the lower part of the dynamic range (the most common use cases), spacing out the high-brightness ones more. However, they informed me that, in case of particular needs, the scales can be modified on request.
I found the reproducibility of the value as a function of the setting to be excellent, on the other hand.
Test 3 homogeneity
The homogeneity of the panel’s illumination is one of the most important characteristics of a flatbox: ideally the framed field should be perfectly homogeneous so as to be able to measure the multiplicative component that describes the illumination profile of an optic.
In this respect, electroluminescent flatboxes are practically unbeatable; LED flatboxes, on the other hand, for physical, technological, and constructional reasons, are more deficient on this point and tend to have less homogeneous panels; the important thing is that this inhomogeneity has little effect on the final image.
The Flat Killer 20250, being based on LED technology, is no exception to this rule but, as can be seen from the image that follows, it reduces its effects to the instrumental limit:

As can be seen, the panel is homogeneous up to a certain distance from the center, then it shows a variation in light: in this case a concentric decrease is noticeable.
Given the perfectly circular structure, this inhomogeneity will in fact be irrelevant for optics up to 20 cm in diameter that use the central part of the panel, but it could have some influence on larger optics in the case where large-format sensors are used.
In order to estimate this influence I used the “flat on flat” technique that I had used in the past to diagnose flat fielding problems caused by instrumental flexure (briefly described here http://www.arciereceleste.it/articoli/120-amatissimi-flat-field).
Not having a 20 cm telescope available to do the tests, I availed myself of the collaboration of TS Italia Astronomy, which acquired the test images for me with a VIXEN R200SS and a zwo 294 mc pro.
Three series of flats were acquired with their corresponding flat-darks for calibration:
- Perfectly concentric panel: this series serves as a reference since it was captured in the homogeneous part of the panel.
- Panel off-center to the right (called “New right”).
- Panel off-center to the left (called “New left”).
The off-center images should provide the result under the worst possible conditions.
The masterflats thus obtained were analyzed with the flat on flat technique:
Let
FR be the reference flat (the one made with the centered flatbox)
FA be the flat to be verified (alternately the one off-center to the right, the left, and the old concentric panel),
the image to be analyzed is obtained thanks to PixelMath with the expression:
FA/FR*med(FR)
If the reference flat and the analyzed flat are perfectly equivalent then the resulting image will have perfectly uniform brightness except for noise; if instead the two flats were different, the image would show brightness differences across its surface.
To have a quantitative assessment of this inhomogeneity I subjected the images to two simple statistical analyses:
In the first test, on each image the standard deviation was evaluated in a small region at the center (Sigma Center); this value represents the typical noise of the image, then the standard deviation was evaluated over the entire image (Sigma All): if the two flats are perfectly equivalent, the image will contain only noise without structures; therefore, the sigma of the whole image should be equal (or slightly higher) to that of the center, that is, their ratio should be equal to 1 or just above.
If instead the two flats are not equivalent, the standard deviation of the whole image must contain the imprint of the inhomogeneity and be significantly greater than that at the center (which contains only noise), therefore their ratio should be significantly greater than 1.
The second homogeneity test instead consists of measuring the magnitude of the gradient: on the image the maximum value and the minimum value are measured and the percentage difference is calculated.
If the two flats are equivalent the difference will be practically zero, otherwise it will have a measurable value.
The result of the tests carried out is summarized in the table that follows.
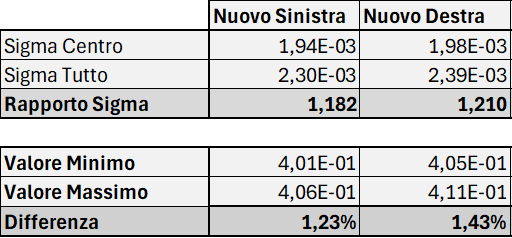
The table above shows that, in extreme cases such as telescopes with mirrors larger than 20 cm in diameter and with large sensors, an inhomogeneity induced by the flat field can indeed be noticed (the ratio between the standard deviations is slightly greater than 1) but the second test says that this inhomogeneity is less than 1.5% over the entire field.
Just to give an order of magnitude, a variation of 1.5% is similar to the brightness difference between the sky background and the IFN around the galaxies M81-M82, or to that between the sky background and the faint outer halo of the galaxy M51; even from moderately dark skies, the gradients induced by light pollution are clearly higher than this limit; therefore, in fact, this inhomogeneity can be neglected in the vast majority of cases, and this analysis was performed simply to verify that the panel was as uniform as possible.
Conclusions
From the tests carried out, the Flat Killer 20250 has proven to be a very valid instrument, well made, robust, and relatively easy to use.
Recapping briefly, all the points covered can be summarized in the table below:
- The Flatbox offers a wide range of brightness that allows it to adapt to all optical configurations and sensor-filter combinations with ease.
- The balanced color makes it possible to simplify the calibration work by standardizing exposure times across the various filters, even in extreme cases such as broadband and narrowband, and allows you to obtain less unbalanced flat fields with color cameras.
- The brightness control, both manual and via PC-ASCOM, makes it a versatile accessory that can adapt to the different needs of the astrophotographer.
- The possibility of having customized and possibly self-printable adapters allows the panel to be adapted to practically all instruments up to a diameter of 250 mm
- Like all Flatboxes with LED technology, the panel presents a very slight perimeter inhomogeneity of illumination which in some cases (with telescopes with optics or mirrors larger than 20 cm in diameter and with large sensors) can lead to a flat-induced gradient that, in the worst case, can reach AT MOST 1.43% overall but which in most cases can be neglected and does not preclude the successful outcome of the flat fielding.
I would like to thank the entire TS Italia Astronomy Team and, in particular, Alessandro Roso for giving me full support during the writing of this review, for answering all my questions promptly and dispelling my doubts.
If, after reading this review, you feel like buying a FlatKiller 20250 Spectrum, contact the manufacturer directly at this address: Richiesta FK20250
Until July 31, 2024, as readers of Arciere Celeste you can choose to request an adapter for your telescope at no additional cost, or a free power supply and shipping.